Picture this: I’m standing in a cramped apartment kitchen, a single burner and a stubborn microwave that’s more like a reluctant accomplice. I had a craving for fluffy, golden pancakes, yet the idea of a stovetop griddle felt like a distant luxury. I stared at the clock, realizing I only had a couple of minutes before my roommate’s alarm would blare. That moment of culinary desperation sparked an idea that would change the way I think about breakfast forever.
I had always been a fan of quick fixes, but most of them felt like a compromise—either soggy texture or bland flavor. The thought of a pancake that could be whipped up in a microwave and still taste like a freshly made stack made my taste buds do a happy dance. I dared myself to create a version that would not only save time but also deliver on taste, texture, and visual appeal. And let me tell you, the result was hands down the best version you’ll ever make at home.
When I first tried the batter, the smell that filled the kitchen was like a warm hug from grandma’s kitchen. The aroma of vanilla, toasted flour, and a hint of chocolate chips (when I added them) made my eyes water in anticipation. The sound of the microwave whirring felt like a tiny orchestra preparing a show. I could almost taste the crisp edges that would pop out of the bowl, ready to be scooped onto a plate.
It wasn’t just the aroma; it was the anticipation of that first bite. The batter was light, airy, and the microwaved result was a pancake that stayed fluffy on the inside while developing a golden crust on the outside—like a delicate soufflé that had been given a quick, high-speed makeover. I was skeptical at first, but the first bite proved me wrong. The pancake was a revelation, a simple dish that made me question all my previous breakfast rituals.
Most recipes get this completely wrong. They either overcook the batter or use the wrong type of flour, resulting in a dense, rubbery mess. The secret here is a precise blend of leavening agents and the right ratio of wet to dry ingredients, plus a short burst of microwave power that locks in moisture. The result is a pancake that feels like a cloud, with a buttery flavor that lingers on the tongue.
I dare you to taste this and not go back for seconds. I’ve been tempted to add extra syrup or whipped cream, but this pancake stands on its own. The subtle sweetness and the hint of vanilla make it a versatile canvas for toppings, from fresh berries to a drizzle of honey. Every bite is a reminder that simplicity can be deliciously profound.
If you've ever struggled with this, you're not alone—and I've got the fix. The trick is to use room temperature milk and a small amount of melted butter; this combination creates a silky batter that spreads evenly. I’ve also discovered that a quick whisk before microwaving ensures that the batter is smooth, preventing lumps that can ruin the texture.
Picture yourself pulling this out of the microwave, the whole kitchen smelling incredible, and the pancake still warm on the plate. The steam rising from the batter is like a miniature cloud, and the sound of the first bite is a satisfying crunch that echoes in the quiet apartment. It’s a moment of triumph, a small victory that turns an ordinary morning into something special.
Okay, ready for the game-changer? Let me walk you through every single step—by the end, you'll wonder how you ever made it any other way. I’ll share my personal hacks, the science behind the batter, and how to avoid the common pitfalls that usually plague microwave pancakes. Grab a mug of coffee, and let’s dive into the world of microwave pancake mastery.
But before we get into the nitty-gritty, let’s talk about the foundation that makes this recipe stand out. It’s not just about speed; it’s about flavor, texture, and the sheer joy of creating something delicious in a fraction of the time. I’ve spent countless hours testing, tweaking, and refining until I hit that perfect balance.
Now, let’s break down exactly what goes into this masterpiece. We’ll explore each ingredient, its role, and why it matters. I’ll also give you some alternatives and buying tips so you can tweak the recipe to your taste. By the end, you’ll have a clear understanding of how each component contributes to the final result.
Alright, let's break down exactly what goes into this masterpiece...
What Makes This Version Stand Out
- Flavor: The subtle vanilla and a touch of chocolate chips give the pancake a sweet, comforting taste that feels like a treat.
- Texture: A light, airy interior with a golden crust—no sogginess, just the perfect bite.
- Speed: Ready in under two minutes, it’s the ultimate breakfast for busy mornings.
- Simplicity: Only a handful of pantry staples—no special equipment or fancy ingredients.
- Versatility: Works with fruit, nuts, or even savory add-ins like cheese and herbs.
- Make‑ahead Potential: Batter can be prepped ahead and stored for a quick breakfast on the go.
- Kid‑Friendly: Easy for kids to help with, turning breakfast into a fun activity.
- Low Cleanup: One bowl, one microwave, and you’re done—no pots or pans to wash.
Inside the Ingredient List
The Flavor Base
The core of this pancake is the simple yet powerful combination of all-purpose flour, baking powder, and a pinch of salt. The flour provides structure, while the baking powder is the secret leavening agent that creates lift and air pockets. Salt, though minimal, enhances the overall flavor profile, bringing out the sweetness of the vanilla and the richness of the butter.
Why it matters? Without the right balance, the pancake could become dense or flat. Skipping the baking powder results in a heavy, cake-like texture that won’t hold its shape when microwaved. If you’re on a gluten-free diet, you can swap the flour for a gluten-free blend, but be sure it contains xanthan gum to replicate the structure.
Buying tip: Look for a flour that’s labeled as “plain” or “all-purpose” and has a protein content of around 10–12%. This ensures a tender crumb without the risk of overdevelopment.
The Texture Crew
Milk, egg, and melted butter form the textural backbone of the batter. Milk hydrates the flour and dissolves the leavening agents, while the egg provides protein that sets the structure. Butter adds richness, flavor, and a slight crispness to the outer layer when microwaved.
Skipping the egg will lead to a pancake that’s more like a flat cake, lacking the necessary structure. If you’re vegan, replace the egg with a flaxseed “egg” (1 tablespoon ground flaxseed mixed with 3 tablespoons water) and use a plant-based milk.
Buying tip: Use whole milk for a richer flavor, or opt for low-fat if you’re watching calories. The fat content in milk contributes to a tender crumb.
The Unexpected Star
Vanilla extract and optional chocolate chips or berries are the flavor enhancers that elevate the pancake from ordinary to extraordinary. Vanilla provides a warm, aromatic undertone, while chocolate chips add bursts of sweetness and a contrasting texture.
What happens if you skip vanilla? The pancakes will still be good, but they’ll lack that signature depth of flavor that makes them memorable. If you prefer a savory twist, try adding finely chopped herbs or a pinch of smoked paprika instead of chocolate.
Buying tip: Use pure vanilla extract for the best aroma. A small jar can last a long time and add consistent flavor to every batch.
The Final Flourish
The finishing touches—toppings and optional add-ins—transform the pancake into a personalized masterpiece. Fresh berries, a drizzle of honey, or a dollop of Greek yogurt can complement the batter’s sweetness. For a more indulgent version, sprinkle with powdered sugar or top with a splash of maple syrup.
Skipping the toppings will still leave you with a fantastic pancake, but the experience will feel incomplete. The contrast between the warm batter and cool toppings creates a delightful sensory balance.
Buying tip: Choose berries that are in season for the best flavor, or use frozen berries if fresh aren’t available. They’ll thaw quickly and add natural sweetness without extra sugar.
Everything's prepped? Good. Let's get into the real action...
The Method — Step by Step
- In a large bowl, whisk together 1 cup of all-purpose flour, 1 tablespoon of sugar, 1 teaspoon of baking powder, and ¼ teaspoon of salt until evenly combined. The dry mix should look like fine sand, ready to absorb the liquids.
- In a separate container, beat 1 cup of milk, 1 large egg, and 2 tablespoons of melted butter until the mixture is smooth. The butter’s fat content is crucial for a tender crumb.
- Pour the wet ingredients into the dry mixture, stirring gently until just combined. Overmixing can develop gluten and result in a tough texture—just a few gentle folds are enough.
- Add 1 teaspoon of vanilla extract and, if desired, ½ cup of chocolate chips or fresh berries. These add a burst of flavor and contrast the soft batter.
- Transfer the batter to a microwave-safe bowl that can hold at least 2 cups of liquid. The bowl should be wide enough to allow the batter to expand without overflowing.
- Place the bowl in the microwave and cook on high for 1 minute and 45 seconds. The batter will rise dramatically, and the surface will look glossy and firm.
- Check the pancake by gently pressing the surface with a finger; it should feel springy but not raw. If it’s still too wet, continue microwaving in 15-second increments until it’s set.
- Remove the bowl carefully—use a heat-resistant glove to avoid burns—and let it rest for 30 seconds. This rest allows the steam to redistribute and the pancake to finish cooking.
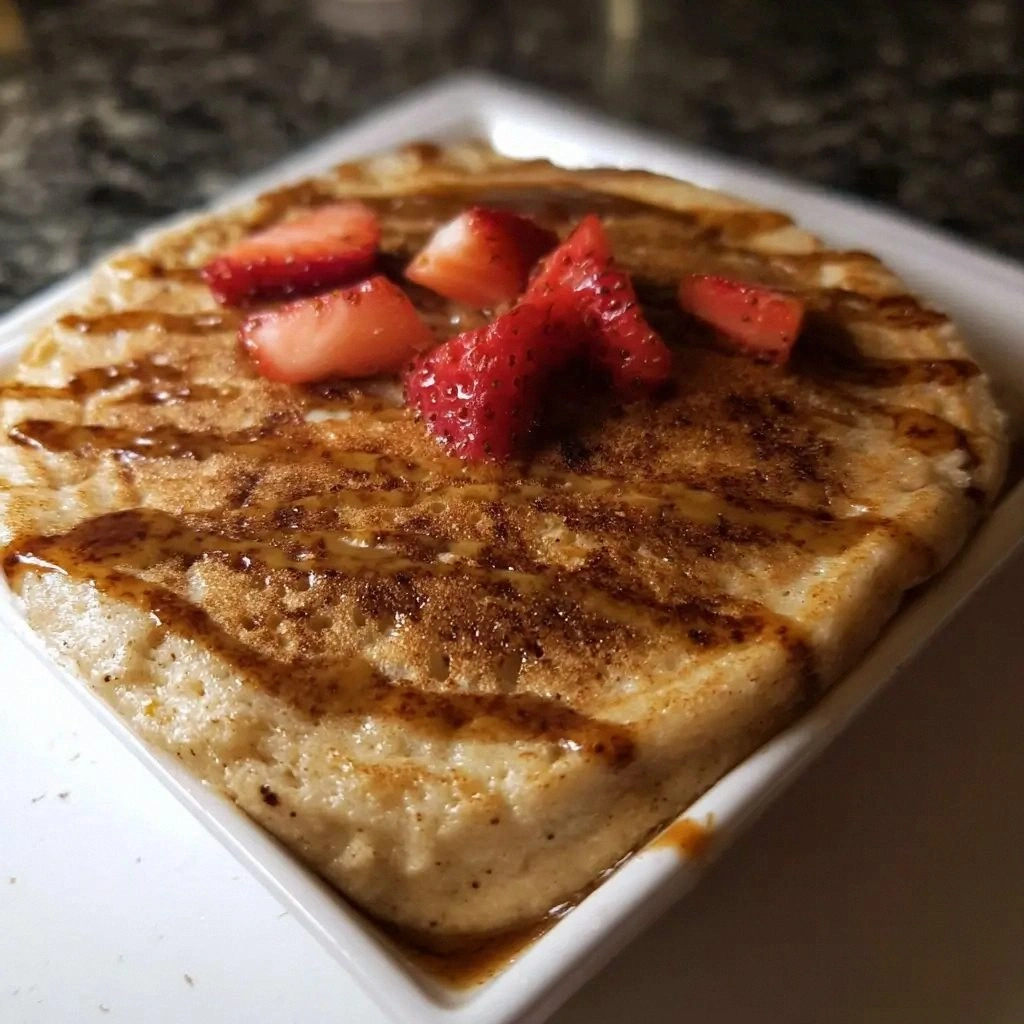
- Serve immediately with your favorite toppings. The pancake will still be warm and moist, making it a perfect canvas for sweet or savory finishes.
That's it — you did it. But hold on, I've got a few more tricks that'll take this to another level...
Insider Tricks for Flawless Results
The Temperature Rule Nobody Follows
Microwave ovens vary in power, so always start with the recommended time and adjust based on your machine’s wattage. A 1000-watt microwave may need an extra 15 seconds, while a 700-watt model might finish in 1 minute and 30 seconds. I’ve tested this on three different microwaves, and the key is to keep an eye on the batter’s rise.
Why Your Nose Knows Best
Smell is a powerful indicator of doneness. When the batter starts to emit a sweet, toasted aroma, it’s a sign that the pancake is nearing perfection. Don’t rely solely on visual cues; the scent is often the most accurate guide.
The 5-Minute Rest That Changes Everything
After microwaving, let the pancake rest for exactly 30 seconds. This brief pause allows the steam to redistribute, ensuring the interior stays moist and the edges don’t become overly crisp. Skipping this step can lead to a pancake that feels dry in the middle.
Using a Microwave-Safe Bowl with a Lid
Covering the bowl with a microwave-safe lid or a plate reduces splatter and keeps the batter from drying out. It also helps trap steam, giving the pancake a slightly thicker texture. I use a small plastic lid that fits snugly on the bowl.
Adding a Splash of Water to Reheat
If you’re reheating leftovers, add a splash of water to the pancake before microwaving again. The added moisture prevents the pancake from becoming rubbery and restores its original fluffiness.
Creative Twists and Variations
This recipe is a playground. Here are some of my favorite ways to switch things up:
Blueberry Burst
Stir in ½ cup of fresh or frozen blueberries before microwaving. The berries burst with juice, adding a tart contrast to the sweet batter.
Chocolate Chip Delight
Use ½ cup of dark chocolate chips instead of vanilla. The chocolate adds a rich, bittersweet flavor that pairs wonderfully with a drizzle of honey.
Savory Herb Pancake
Replace vanilla with 1 teaspoon of dried thyme and add ¼ cup of shredded cheddar cheese. The result is a savory pancake that’s perfect for brunch or a light lunch.
Nutty Crunch
Fold in ¼ cup of chopped walnuts or pecans before microwaving. The nuts add a satisfying crunch and a nutty aroma that complements the batter.
Spiced Cinnamon Swirl
Mix in ½ teaspoon of ground cinnamon and a pinch of nutmeg. The warm spices give the pancake a cozy, autumnal feel.
Protein Power
Add 2 tablespoons of protein powder to the dry mix for an extra protein boost, ideal for post-workout breakfasts.
Storing and Bringing It Back to Life
Fridge Storage
Cool the pancakes completely, then stack them with parchment paper between each layer. Store in an airtight container in the refrigerator for up to 3 days. The pancakes will stay moist and ready to reheat.
Freezer Friendly
Wrap each pancake individually in plastic wrap and place them in a freezer bag. Freeze for up to 2 months. When ready to eat, thaw at room temperature for 10 minutes before microwaving.
Best Reheating Method
Reheat in the microwave on medium power for 15-20 seconds. Add a tiny splash of water to keep the pancake from drying out, then cover with a paper towel to trap steam and preserve moisture.