Introduction
Picture this: I’m in the middle of a midnight snack run, the fridge lights flickering like a disco, and I’m staring at a soggy loaf that’s been in the freezer for what feels like an eternity. I remember the last time I tried baking bread from scratch, the dough sticking to the countertop, the oven door opening and the heat escaping like a sigh of disappointment. That night, I decided to throw caution to the wind and turn to the air fryer, a device I’d only used for fries and chicken nuggets. I was skeptical, but the promise of a quick, crispy crust and a soft interior sounded like a culinary dare worth accepting.
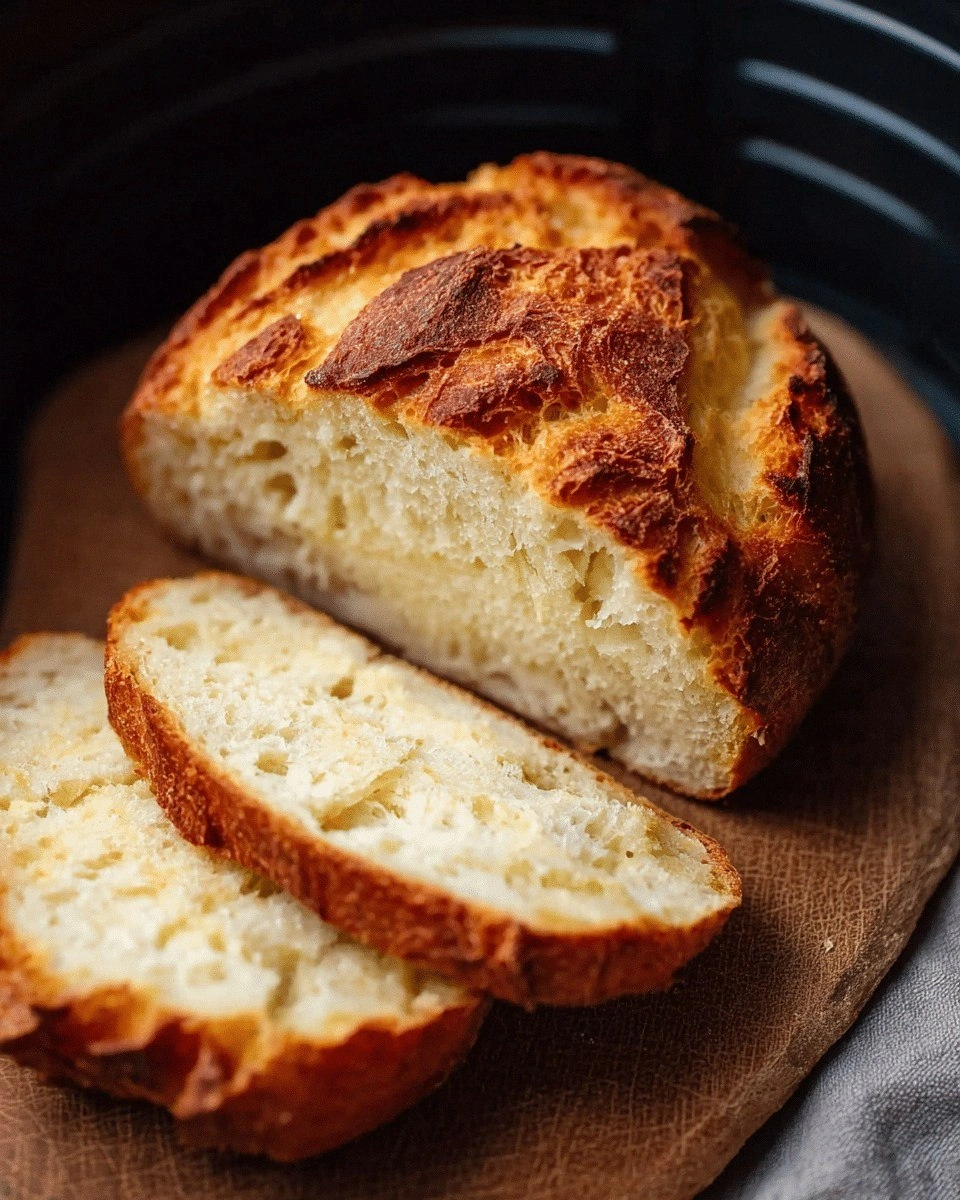
When the bread finally emerged, it was a triumph of aroma and texture. The golden crust crackled like dry leaves, and the inside was pillowy, almost cloud‑like, with a subtle hint of yeasty sweetness that made my taste buds do a happy dance. I couldn’t help but shout, “I dare you to taste this and not go back for seconds!” The sheer ease of the process—no preheating, no kneading, no waiting—was a revelation. It felt like a secret recipe that only a few lucky chefs know, and I was determined to share it with you.
What makes this version stand out? It’s not just the convenience; it’s the flavor profile that defies expectations. The bread’s crust is crisp yet tender, the crumb is airy without being gummy, and the finish has a subtle caramelization that would make a professional baker nod in approval. I’ve experimented with countless variations, from adding herbs to swapping flour types, but the core method remains the same: a simple dough, a quick bake, and a burst of flavor that feels both humble and extraordinary.
So buckle up, because by the end of this guide you’ll be able to pull out a fresh loaf of air fryer bread in under 45 minutes, and you’ll wonder why you never tried this before. Let me walk you through every single step — by the end, you’ll wonder how you ever made it any other way.
What Makes This Version Stand Out
- Flavor: The bread delivers a subtle yeasty sweetness that balances the crispiness of the crust, creating a depth of flavor that feels both comforting and adventurous.
- Texture: The crumb is airy and soft, yet the crust is crunchy and golden—think of it as a soft pillow that has just had a good workout.
- Speed: From mixing to finishing, the entire process takes less than an hour, making it ideal for busy mornings or late‑night cravings.
- Simplicity: No kneading, no proofing, no preheating. Just toss the dough into the basket, set the timer, and let the magic happen.
- Versatility: The base recipe can be tweaked with herbs, cheeses, or sweeteners to suit any palate or occasion.
- Make‑ahead potential: The dough can be made in advance and frozen; just thaw and bake for a quick loaf.
Alright, let’s break down exactly what goes into this masterpiece…
Inside the Ingredient List
The Flavor Base
At the heart of this bread is the simple combination of flour, water, yeast, and salt. The flour provides structure, the water hydrates the proteins, and the yeast creates the leavening that gives the loaf its airy quality. Salt, while often overlooked, is crucial for flavor balance—it enhances the sweetness and controls yeast activity, ensuring the dough rises at just the right pace. If you skip the salt, the bread will taste flat and the yeast will over‑proof, resulting in a dense loaf.
Swap Tip: For a gluten‑free version, use a blend of rice, potato, and tapioca starch. The texture will be slightly denser, but you’ll still get that satisfying crust.
The Texture Crew
Oil or butter is the secret agent that keeps the crumb moist and the crust from drying out. Olive oil adds a subtle fruity note, while butter offers richness and a buttery finish. The choice of fat can dramatically change the mouthfeel; a tablespoon of oil is enough to keep the loaf tender without making it greasy. If you’re watching calories, you can reduce the oil to half a tablespoon, but the loaf will become slightly drier.
Buying Tip: Choose extra‑virgin olive oil for the best flavor profile—it’s more robust and will add a hint of peppery spice to the crust.
The Unexpected Star
Sugar may seem like a minor player, but it fuels the yeast, helping it produce carbon dioxide faster and giving the bread a subtle caramelized edge. A teaspoon is all you need; too much sugar can make the dough sticky and the crust overly sweet. For savory variations, replace sugar with a pinch of honey or a splash of maple syrup for a different depth of sweetness.
Fun Fact: The earliest breads were sweetened with honey or fruit, long before yeast was discovered. This simple ingredient keeps us connected to our culinary ancestors.
The Final Flourish
Herbs, spices, or cheese can be added to the dough or sprinkled on top before baking to create a signature twist. Thyme, rosemary, or oregano are classic choices for a Mediterranean flair, while grated cheddar or parmesan can turn the loaf into a savory snack. A drizzle of olive oil or a dusting of flaky sea salt before the final bake adds an extra layer of flavor and crunch.
Tip: For a sweet version, sprinkle a little cinnamon or nutmeg on top before baking; the heat will release those aromatic oils, giving the loaf a warm, comforting aroma.
Everything’s prepped? Good. Let’s get into the real action…
The Method — Step by Step
- Mix the dry ingredients. In a large bowl, combine 2 cups of all‑purpose flour, 1 teaspoon of active dry yeast, 1 teaspoon of sugar, and 1 teaspoon of salt. Stir until the mixture is even. This step is critical; uneven distribution of yeast can lead to uneven rise. I always double‑check the ratios—no more, no less.
- Add the liquid. Pour 1 cup of warm water (about 110°F) into the dry mix and add 1 tablespoon of olive oil. Stir until the dough comes together. The dough should feel slightly tacky but not sticky. If it feels dry, add a splash of water; if it feels sticky, add a pinch more flour. The right consistency is the key to a good crumb.
- Let it rest. Cover the bowl with a clean towel and let the dough sit for 10 minutes. This brief rest allows the flour to hydrate fully and the yeast to start bubbling. If you’re in a hurry, you can skip this step, but the dough will be less airy.
- Shape the loaf. Lightly flour your hands and shape the dough into a round loaf that fits snugly in your air fryer basket. If the dough is too sticky, dust your hands with a little flour. This step is where you can experiment—make it a smooth oval or a rustic loaf shape.
- Prepare the basket. Lightly grease the air fryer basket with a teaspoon of oil or spray. This prevents sticking and gives the crust a golden finish. Some people like to line the basket with parchment, but be careful—air circulation is key for even baking.
- Air fry the bread. Place the loaf in the basket, close the air fryer, and set the temperature to 360°F (182°C). Bake for 25 minutes. After 15 minutes, flip the loaf to ensure even browning. The crust should be golden brown and the loaf should sound hollow when tapped.
- Check for doneness. Insert a toothpick into the center; it should come out clean. If it’s still moist, bake for an additional 3–5 minutes. The final 2 minutes should be at 400°F (204°C) to crisp the crust further.
- Cool and slice. Remove the loaf from the air fryer and let it cool on a rack for at least 10 minutes before slicing. This rest period lets the steam escape and sets the crumb structure.
- Serve or store. Enjoy the bread warm with butter or olive oil, or let it cool completely for storage. It pairs wonderfully with soups, salads, or just a splash of your favorite sauce.
- Clean up. Don’t let the basket sit sticky—wipe it immediately after cooling to keep your air fryer in tip‑top condition.
That's it — you did it. But hold on, I've got a few more tricks that'll take this to another level...
Insider Tricks for Flawless Results
The Temperature Rule Nobody Follows
Many people set the air fryer to a high temperature from the start, hoping for a quick crust. However, the dough needs a gentle rise before the heat kicks in. Start at 360°F (182°C) for the first 15 minutes, then bump up to 400°F (204°C) for the last 10 minutes. This gradual increase mimics a conventional oven’s bake cycle, giving you a crust that’s crisp on the outside and tender on the inside.
Why Your Nose Knows Best
Before you open the air fryer, pause and inhale the aroma. A yeasty, slightly sweet scent is a good indicator that the dough is rising properly. If you notice a sharp, yeasty smell, the loaf might be over‑proofed; if it’s bland, it’s under‑proofed. Trust your nose—your senses are your best guide.
The 5-Minute Rest That Changes Everything
After baking, let the loaf rest for at least 5 minutes before slicing. This short pause allows the steam to redistribute, preventing the crumb from collapsing. The loaf will feel slightly denser after the rest, but it will also be easier to slice cleanly.
Keep the Air Fryer Fresh
After each use, wipe the basket with a damp cloth and a mild dish soap. This prevents oil residue from building up, which can cause burning or off‑flavors in future batches. A clean basket also ensures even heat distribution.
Use the Right Flour
All‑purpose flour works best for this recipe because it balances gluten strength with a mild flavor. If you’re craving a hearty loaf, try whole wheat flour for a nutty taste and more fiber. Just remember that whole wheat flour absorbs more liquid, so you might need to adjust the water slightly.
Creative Twists and Variations
This recipe is a playground. Here are some of my favorite ways to switch things up:
Herb‑Infused Delight
Stir in 2 teaspoons of chopped fresh rosemary or thyme into the dough before baking. The aromatic herbs infuse the bread with a fragrant, savory profile that pairs well with tomato soup or a cheese platter.
Cheesy Crust
Sprinkle 1/2 cup of shredded mozzarella or cheddar over the loaf before the final 5 minutes of baking. The cheese melts into a gooey, golden crust that’s irresistible to kids and adults alike.
Sweet Cinnamon Swirl
Mix 1 tablespoon of brown sugar and 1 teaspoon of cinnamon into the dough. After shaping, roll the loaf in a little more cinnamon sugar before baking. The result is a warm, spiced bread that smells like a cinnamon roll.
Gluten‑Free Adventure
Replace all‑purpose flour with a gluten‑free blend, use 1 teaspoon of xanthan gum for structure, and bake as usual. The loaf will be slightly denser but still deliciously crisp.
Bruschetta‑Ready Bread
After baking, brush the crust with olive oil and sprinkle with minced garlic, chopped tomatoes, and basil. Let it rest for a few minutes before slicing. This transforms the loaf into an instant bruschetta base.
Chocolate Chip Surprise
Fold 1 cup of chocolate chips into the dough before baking. The chips melt into pockets of chocolatey goodness, making this loaf perfect for a quick dessert.
Storing and Bringing It Back to Life
Fridge Storage
Cool the bread completely, then wrap it tightly in plastic wrap and place it in the refrigerator. It will stay fresh for up to 4 days. When ready to eat, slice and toast the pieces lightly for a warm, crispy snack.
Freezer Friendly
Wrap the loaf in parchment paper, then in a freezer bag. Freeze for up to 3 months. To thaw, leave at room temperature for 1–2 hours, then toast or microwave for 30 seconds. The bread will retain its flavor and texture.
Best Reheating Method
For the best results, reheat the bread in a 350°F air fryer for 5 minutes. Add a splash of water to the basket before reheating to create steam, which helps restore moisture and crispness. This trick turns a stale loaf into a fresh, mouth‑watering experience.