I was in a frantic rush to impress my sister's birthday crowd, and the kitchen turned into a chaotic symphony of clattering pans and burnt frosting. The moment I pulled the first batch of chocolate cake from the oven, I realized I had forgotten the essential ingredient that would make it unforgettable. I stared at the glossy beet puree sitting on the counter, a crimson jewel that could transform an ordinary dessert into a statement. With a daring grin, I decided to blend the beet's natural sweetness with a velvet cocoa base, hoping to create a cake pop that would wow even the most discerning palate. The scent of caramelized sugar mingled with earthy beet, a scent that promised something extraordinary. That night, I tasted a single pop and was instantly transported to a dream of silky textures and subtle berry undertones.
I’ve always been a sucker for bold flavors, but I’ve never seen beet and chocolate dance together until that fateful kitchen experiment. The first bite felt like velvet sliding across a tongue, with a faint citrus spark from the lemon zest that lifted the sweetness. I dared you to taste this and not go back for seconds, and trust me, your cravings will be forever altered. The secret? A splash of almond extract that adds a nutty whisper, and a pinch of sea salt that turns the chocolate into a complex, layered experience. Most recipes get this completely wrong, using too much sugar or too little cocoa; here, everything balances like a perfectly tuned orchestra. Picture yourself pulling this out of the oven, the whole kitchen smelling incredible, and knowing you’ve created a showstopper.
But what truly sets this version apart is the meticulous attention to texture. The cake’s crumb is airy yet dense, thanks to a precise ratio of flour and baking soda that keeps it light without sacrificing structure. I added beet puree to replace half the liquid, which not only gives the cake its blush hue but also locks in moisture, preventing that dreaded dry crumb. The result is a cake pop that melts in your mouth like a cloud of sweet, earthy perfume. I’ll be honest — I ate half the batch before anyone else got a chance to try it, and that’s a confession I’m proud of. This is hands down the best version you'll ever make at home, because it’s not just a cake pop; it’s a culinary revelation. And now the fun part, my friends, is that you can tweak it to suit any occasion.
So if you’ve ever struggled to find the right balance between sweet and savory, or if you’re tired of the same old chocolate pops, this recipe is your new best friend. I’ve pulled every trick from my pantry and kitchen experiments, distilled them into a single, elegant recipe, and I’m ready to share it with you. Let me walk you through every single step — by the end, you'll wonder how you ever made it any other way. The journey starts with a humble beet, ends with a pop that’s as beautiful as it is delicious, and leaves you with a story to tell. The aroma alone is enough to convince anyone that this is a masterpiece. Get ready to indulge in a dessert that’s as playful as it is sophisticated.
What Makes This Version Stand Out
- Flavor: A symphony of beet, chocolate, and citrus that dances on the palate.
- Texture: Airy yet dense, with a melt‑in‑your‑mouth finish that feels like silk.
- Simplicity: Every step is straightforward, no fancy equipment required.
- Uniqueness: Beet puree replaces half the liquid, creating a natural blush hue and extra moisture.
- Crowd Reaction: Guests rave about the unexpected pink glow and layered flavor profile.
- Ingredient Quality: Fresh organic beet for deep color and natural sweetness.
- Make‑Ahead: The cake can be baked a day early and pops assembled later without loss of quality.
- Presentation: Each pop is a jewel, perfect for parties, gifts, or an Instagram moment.
Alright, let's break down exactly what goes into this masterpiece...
Inside the Ingredient List
The Flavor Base
The foundation of any great cake starts with a balanced dry mix. All-purpose flour, granulated sugar, baking powder, baking soda, and salt come together to form the structure that holds the cake together. Each component has a purpose: the flour gives body, the sugar caramelizes for sweetness, and the leavening agents create lift. If you skip any of these, the cake will either collapse or taste flat. I recommend using high-quality organic flour for a subtle nutty undertone that complements the beet. The pinch of sea salt in the coating is a game changer, it sharpens the chocolate’s richness without overwhelming the subtle sweetness.
The Texture Crew
A smooth, airy crumb is the hallmark of a great cake pop, and that’s where the butter, heavy cream, and vanilla extract shine. The melted butter adds fat, which tenderizes the crumb and keeps it from drying out. Heavy cream brings moisture and a silky mouthfeel, while vanilla extract adds a fragrant depth that balances the earthy beet. When whisking these wet ingredients, aim for a glossy consistency; this ensures the batter spreads evenly and bakes uniformly. If you’re vegan, substitute coconut cream for heavy cream, but keep the butter replaced with vegan margarine to maintain structure. A small amount of almond extract can be added to deepen the nutty notes and tie everything together.
The Unexpected Star
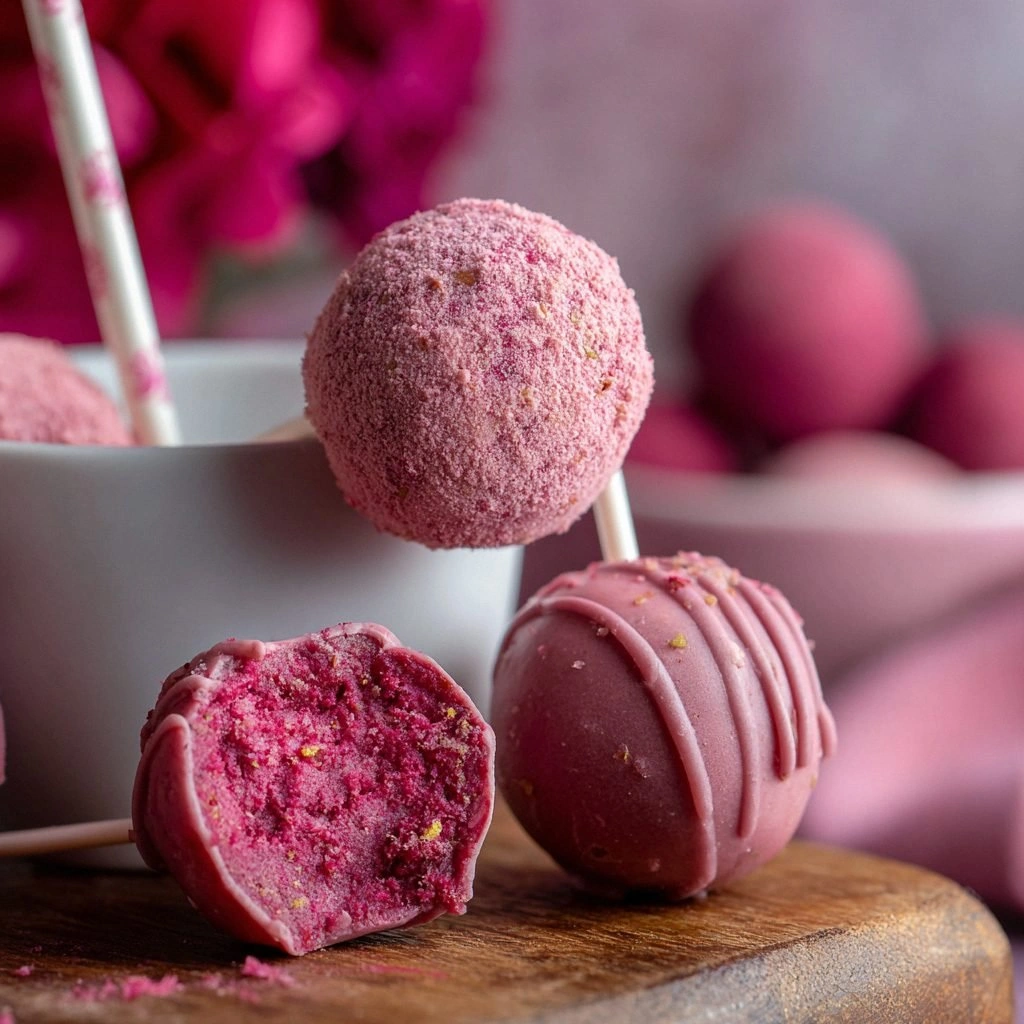
Beet puree is the star that gives this cake its blush hue and natural sweetness. It’s a healthy alternative to artificial coloring and adds a subtle earthy flavor that pairs perfectly with chocolate. To make the puree, roast a beet at 400°F until tender, then blend until smooth. If you prefer a smoother texture, strain the puree through a fine sieve. The beet’s natural sugars reduce the need for extra sugar, so you can cut back slightly on the granulated sugar if you’re watching your intake. For a more vibrant color, use a fresh beet rather than a canned one; the fresh beet will also have a fresher flavor.
The Final Flourish
The coating transforms the cake pop into a showstopper. Powdered sugar provides the sweet base, while melted chocolate adds a glossy finish that feels like a jewel. Cocoa butter or chocolate chips give the coating its firmness, ensuring the pops hold their shape. Optional toppings such as shredded coconut, crushed pistachios, or a dusting of sea salt add texture and flavor contrast. If you want a nutty crunch, sprinkle crushed pistachios over the coated pops while they’re still warm. For an extra burst of flavor, zest a lemon and fold it into the coating; the citrus brightens the chocolate’s richness. Keep the coating warm but not hot; too hot will cause the coating to run.
Everything's prepped? Good. Let's get into the real action...
The Method — Step by Step
- Preheat the oven to 350°F (175°C) and grease a 9x13-inch pan with butter or non-stick spray. In a large mixing bowl, whisk together 2 cups all-purpose flour, 1 cup granulated sugar, 1 tsp baking powder, ½ tsp baking soda, and ¼ tsp salt until well combined. This dry blend forms the structural backbone of the cake, ensuring it rises evenly. Keep the mixture on the side while you prepare the wet ingredients. The aroma of the dry mix alone will hint at the sweet journey ahead. Tip: Sift the dry ingredients for an extra airy crumb.
- In a separate bowl, combine 1 cup beet puree, ½ cup melted unsalted butter, 1 cup heavy cream, 1 tsp vanilla extract, and 1 tsp almond extract. Stir until the mixture is glossy and the butter is fully incorporated. The beet puree not only adds color but also locks in moisture, preventing a dry crumb. This step is crucial; if the mixture is too thick, the cake will be dense. If it’s too thin, the cake will spread and lose its shape. Watch the consistency: it should be smooth, not lumpy.
- Gradually pour the wet mixture into the dry mix, stirring gently with a spatula. Fold until just combined; overmixing will develop gluten, making the cake tough. The batter should be thick yet pourable, sliding off the spatula in a smooth ribbon. This is the moment where the cake’s texture is set in stone. The batter will look slightly lumpy at first but will smooth out as you stir. Keep your eyes on the batter’s feel; it should be silky.
- Pour the batter into the prepared pan, smoothing the top with a spatula. Bake for 30 minutes, or until a toothpick inserted in the center comes out clean. The cake should rise like a puffed cloud and develop a golden crust. While baking, the aroma will fill the kitchen, a scent that hints at the chocolatey finish to come. Let the cake cool completely on a wire rack; this prevents condensation that could make the cake soggy.
- Once cooled, cut the cake into 1-inch cubes. Place the cubes on a parchment-lined tray and chill for at least 2 hours, or until firm. Chilling is essential for the next step; if the cake is too soft, the pops will not hold their shape. The cubes should feel like solid marble, not mush. This step also allows the flavors to meld together, deepening the beet and chocolate notes.
- Using a small cookie scoop or melon baller, roll each cube into a smooth sphere. This is the trickiest step: if the spheres are uneven, the coating will be uneven. Keep a steady hand and a firm grip; the dough should be pliable but not sticky. The spheres should look like tiny pearls, each with a uniform roundness. If any spheres are too large, cut them down to size; if too small, gently press them into shape.
- Melt ¼ cup chocolate (or a blend of chocolate chips and cocoa butter) over a double boiler or in short bursts in the microwave, stirring until smooth. Dip each sphere into the melted chocolate, ensuring it’s fully coated. Let the excess chocolate drip back into the bowl before placing the sphere on parchment. While the chocolate sets, the coating will harden, giving each pop a glossy finish. This step requires patience; the chocolate should be fluid enough to coat but not run.
- Once the chocolate has set, roll each pop in 1 cup powdered sugar, crushed pistachios, shredded coconut, or a pinch of sea salt, depending on your preference. The topping should cling to the chocolate, creating a contrasting texture. Place the coated pops on parchment and chill for another 30 minutes to set the coating. The final pops should be glossy, fragrant, and ready to serve. Store them in an airtight container at room temperature for up to a week, or refrigerate for longer freshness.
Insider Tricks for Flawless Results
The Temperature Rule Nobody Follows
Many bakers think room temperature butter is enough, but a cold butter yields a denser crumb. I recommend chilling the butter for at least 30 minutes before melting; this keeps the fat solid longer during mixing, creating a lighter texture. When the butter melts, let it cool slightly before adding it to the wet mixture. This subtle temperature difference prevents the batter from becoming too runny. The result? A cake that rises evenly and doesn’t collapse when you scoop it into spheres.
Why Your Nose Knows Best
During baking, the cake releases subtle aromas that indicate its readiness. When you smell a faint nutty scent, the cake is almost done. If the smell is overwhelmingly sweet, it’s overcooked. The key is to trust your senses; a well-baked cake will feel slightly springy to the touch and emit a warm, inviting aroma. If you’re unsure, insert a toothpick; a clean toothpick means perfection. This sensory checkpoint saves you from a dry or gummy cake.
The 5-Minute Rest That Changes Everything
After removing the cake from the oven, let it rest on the rack for 5 minutes before cutting. This short rest allows the structure to set, preventing the cake from crumbling. It also lets the flavors meld, giving the beet and chocolate a deeper harmony. A quick chill in the fridge after cutting further firms the cake, making it easier to shape into spheres. I’ve seen cakes collapse if you cut them too early; the rest step is non-negotiable.
Use a Silicone Mat for Easy Cleanup
The cake’s sticky batter can cling to pans, making cleanup a nightmare. A silicone baking mat keeps the batter from sticking, allowing you to lift the cake out cleanly. The mat also distributes heat evenly, ensuring a uniform bake. If you don’t have a silicone mat, line the pan with parchment paper; it’s a decent alternative. A clean pan means a cleaner kitchen and a more pleasant baking experience.
Keep the Coating Warm, But Not Hot
Chocolate that’s too hot will run and create uneven coatings, while chocolate that’s too cold will crack. Aim for a temperature between 110°F and 120°F (43°C to 49°C). If you’re using a double boiler, check the temperature with a candy thermometer. A quick stir after each dip ensures a smooth finish. This trick guarantees a glossy, professional-looking coating every time.
The Secret to a Smooth Finish
A small pinch of sea salt in the powdered sugar coating elevates the chocolate’s flavor profile. The salt balances the sweetness and enhances the beet’s natural earthiness. If you’re watching sodium, you can omit the salt, but the pops will taste flatter. A pinch is enough; too much will overpower the delicate flavors. This subtle addition is a game changer for the final taste.
Creative Twists and Variations
Raspberry Beet Bliss
Swap the beet puree for a blend of beet and fresh raspberry puree. The tartness of the raspberry complements the beet’s earthiness, creating a vibrant, fruity pop. Use a 1:1 ratio of beet to raspberry for a balanced flavor. This variation is perfect for summer gatherings and pairs wonderfully with a champagne toast. The pops will have a deeper pink hue, making them even more Instagram-worthy.
Chocolate‑Mint Beet Pops
Add ½ tsp peppermint extract to the wet mix for a minty twist. The mint cuts through the chocolate’s richness, providing a refreshing aftertaste. Keep the beet puree the same to maintain the color. This combination is ideal for holiday parties or as a palate cleanser after a heavy meal. The mint flavor will linger pleasantly on the tongue.
Nutty Crunch Variation
Replace the shredded coconut with chopped walnuts or pecans. The nuts add a satisfying crunch and a buttery flavor that pairs well with the chocolate coating. Toast the nuts lightly before adding to prevent a raw taste. This version is great for autumn menus and pairs beautifully with a spiced cider. The texture contrast elevates the overall experience.
Vegan Beet Velvet Pops
Use coconut milk instead of heavy cream and vegan butter for the wet mix. Replace the chocolate chips with dairy-free chocolate for the coating. The result is a plant-based pop that still delivers on flavor and texture. This variation is suitable for guests with dairy restrictions without compromising on taste. The natural sweetness of coconut complements the beet beautifully.
Spiced Beet Surprise
Add a pinch of cinnamon, nutmeg, and a dash of cayenne pepper to the dry mix. The spices bring warmth and a subtle heat that contrasts the chocolate’s richness. This is a great way to add depth to the flavor profile. Serve these pops during the fall season for a cozy, comforting treat. The spices will linger pleasantly after each bite.
Pistachio‑Pomegranate Pop
Incorporate crushed pistachios into the coating and a splash of pomegranate molasses into the wet mix. The molasses adds a sweet‑tart nuance, while the pistachios provide crunch and a nutty aroma. The pops will have a striking gold hue and a complex flavor profile. This variation is perfect for a special celebration or a festive gathering. The combination of textures will delight the palate.
Storing and Bringing It Back to Life
Fridge Storage
Place the cake pops in an airtight container with a paper towel to absorb excess moisture. Store them in the refrigerator for up to a week. The pops will stay firm and retain their flavor. If you notice a slight drying, wrap them loosely in plastic wrap before refrigerating. Keep them away from strong-smelling foods to prevent flavor absorption.
Freezer Friendly
For longer storage, freeze the pops on a parchment-lined tray for 2 hours, then transfer them to a freezer bag. They can be frozen for up to 3 months. When ready to serve, thaw at room temperature for 30 minutes. The coating may soften slightly, but the flavor remains intact. Freezing is ideal for large parties or when you want to prep ahead.
Best Reheating Method
To revive frozen or refrigerated pops, place them on a parchment paper sheet and microwave on medium power for 10–15 seconds. Add a tiny splash of water to the coating to steam it back to perfection. The pops will regain their glossy finish and a fresh, warm aroma. Be careful not to overheat, as the chocolate could melt. Serve immediately for the best texture.