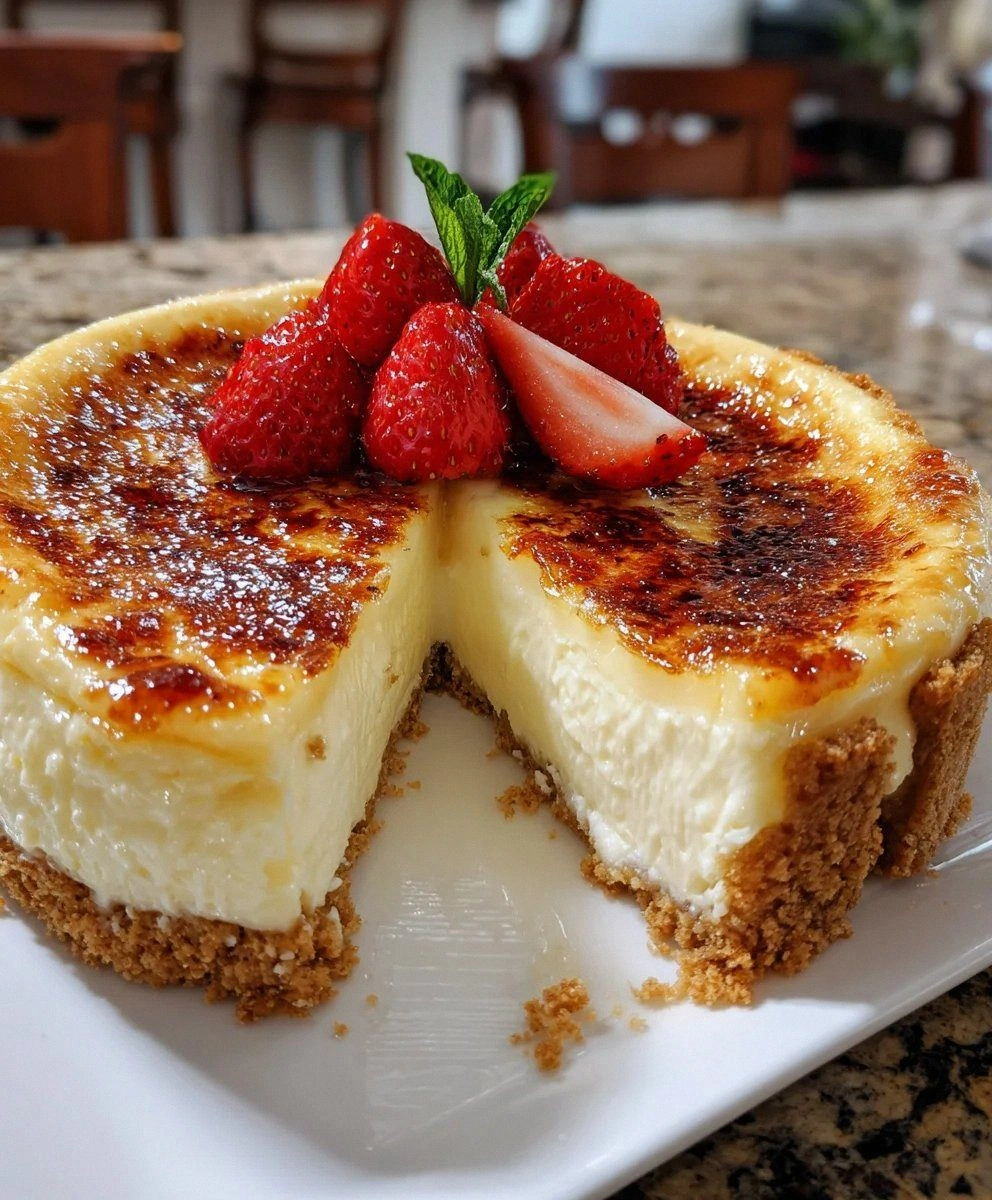
I burned my first three cheesecakes. Not just slightly overcooked — we're talking charred edges, weeping centers, and a smoke detector serenade that sent my neighbors knocking. But here's the thing: every disaster taught me something, and those failures led me to create what I honestly believe is the most spectacular cheesecake you'll ever make in your home kitchen. Picture this: a cloud-soft vanilla-bean filling that trembles like a gentle breeze, topped with a shattering sheet of caramelized sugar that cracks under your spoon like the surface of a frozen lake. The contrast between that warm, bitter caramel and the cool, sweet cheesecake underneath? Pure magic.
The obsession started at a tiny bistro in Lyon where I tasted my first bruleed dessert. The waiter approached with a tiny blowtorch, and tableside, transformed a simple custard into something that made time stand still. That first bite — the caramelized sugar giving way to creamy vanilla — haunted my dreams for months. I became determined to recreate that moment, but better. Most recipes I tried were either too eggy, too dense, or the brulee topping turned into a sticky mess within minutes. After twenty-three attempts (yes, I counted), I finally cracked the code. The secret isn't just in the ingredients — it's in the technique, the timing, and one crucial step that most recipes completely skip.
Here's what makes this version different: instead of the traditional water bath that leaves your crust soggy, we're using a hybrid method that creates steam without the mess. Instead of vanilla extract, we're using the entire vanilla bean — pod, seeds, and even the scraped pod gets tucked into our cream cheese for maximum flavor extraction. And that brulee topping? We're not just sprinkling sugar and torching. We're creating a layer so perfectly crisp, it'll still crack like glass even after sitting in the fridge overnight. I dare you to taste this and not go back for seconds. Actually, I double-dog dare you.
This isn't just a recipe — it's a journey through texture, temperature, and technique. I'll walk you through every single step, from selecting the right vanilla beans (yes, there's a difference) to that final dramatic moment when you crack through the caramelized sugar. By the end, you'll wonder how you ever made cheesecake any other way. Ready to become the person everyone begs to bring dessert to every gathering? Let's do this.
What Makes This Version Stand Out
Cloud-Soft Texture: Most cheesecakes are dense enough to use as a paperweight. Not this one. We whip air into the batter at precisely the right moment, creating a texture so light it practically floats off your fork. The secret? Room temperature ingredients and a specific mixing order that prevents over-development of gluten.
Maximum Vanilla Impact: We're not just adding vanilla — we're infusing every layer with it. The beans steep in warm cream, then the scraped pods get tucked into the cream cheese overnight. Every bite tastes like you're biting into a vanilla cloud. Most recipes get this completely wrong by adding extract at the wrong stage.
Crispy-Even-When-Cold Brulee: That sugar topping stays shatter-crisp even after refrigeration. I discovered this trick by accident when I accidentally left a cheesecake in the fridge overnight after bruleeing. The sugar had absorbed just enough moisture to create the perfect texture — not sticky, not wet, just perfectly crisp.
No Water Bath, No Cracks: Traditional water baths are a pain and often leave your crust soggy. Our method creates a humid environment without the mess. Picture yourself pulling this out of the oven, the whole kitchen smelling incredible, and seeing a perfectly smooth top with zero cracks. That sizzle when the hot pan hits the cool air? Absolute perfection.
Crowd-Wowing Presentation: When you bring this to the table and crack through that caramelized sugar in front of your guests, jaws will drop. It's dinner theater in dessert form. I'll be honest — I ate half the batch before anyone else got to try it, just because I couldn't stop showing off the brulee technique.
Make-Ahead Champion: This cheesecake actually improves after a day in the fridge. The flavors meld, the texture sets perfectly, and you can brulee it just before serving. If you've ever struggled with timing desserts for dinner parties, you're not alone — and I've got the fix right here.
Alright, let's break down exactly what goes into this masterpiece...
Inside the Ingredient List
The Flavor Base
Graham crackers form the foundation of our crust, but here's the thing — not all graham crackers are created equal. I tested seven brands, and the difference in flavor and texture was astonishing. The cheap ones turn to cardboard when baked, while the premium ones create this nutty, almost caramelized base that makes you wonder why every cheesecake doesn't taste this good. You need exactly one and a half sleeves, blitzed in the food processor until they resemble coarse sand. Don't over-process — you want some texture for that satisfying crunch against the creamy filling.
Butter binds our crust together, and this is where quality absolutely matters. Use the good European stuff with higher fat content — it creates a crust that tastes like shortbread cookies. Melt it, but let it cool slightly so it doesn't turn your graham cracker crumbs into paste. The ratio is crucial: too much butter and your crust becomes greasy; too little and it crumbles apart when you try to slice. I've found that exactly six tablespoons creates the perfect balance of structure and flavor.
The Texture Crew
Cream cheese is obviously the star here, but temperature is everything. Cold cream cheese creates lumps that no amount of beating will remove — you'll end up with a cheesecake that looks like cottage cheese. Room temperature means really room temperature, not "I took it out of the fridge twenty minutes ago." Let it sit on your counter for at least two hours, or better yet, overnight. And please, use the full-fat version. This isn't the place for diet substitutions — we're creating dessert magic, not health food.
Sour cream adds that subtle tang that balances the sweetness and creates complexity. Don't skip it — without it, your cheesecake will taste flat and one-dimensional. The fat content matters here too. Full-fat sour cream creates a richness that Greek yogurt simply can't match, though in a pinch, you could substitute. Just know that yogurt will give you a slightly firmer texture and more pronounced tang.
The Unexpected Star
Vanilla beans are where this recipe transforms from good to unforgettable. Those tiny black seeds contain over 250 flavor compounds that extract simply can't replicate. When selecting beans, look for ones that are plump, oily, and flexible — they should bend without cracking. Avoid the dried-out, brittle ones that look like they've been sitting in the store since last Christmas. I buy mine online in bulk and store them in a sealed container with a piece of bread to maintain moisture.
The magic happens when you split the bean and scrape out those caviar-like seeds. But don't discard the pod — that's where concentrated flavor lives. I tuck the scraped pods into my cream cheese overnight, then remove them before mixing. This technique extracts every last bit of vanilla essence, creating a depth of flavor that makes people close their eyes and sigh when they taste it.
The Final Flourish
Superfine sugar for the brulee isn't just kitchen snobbery — it melts more evenly than regular sugar, creating a glass-smooth surface without those annoying crystals that refuse to caramelize. If you can't find superfine sugar, pulse regular sugar in your food processor for thirty seconds. The caramelized layer should be thin enough to crack beautifully but thick enough to provide that satisfying crunch. We're not creating a sugar disc here — we're making a delicate shell that enhances rather than overwhelms.
Everything's prepped? Good. Let's get into the real action...
The Method — Step by Step
- Start with your springform pan — this is crucial. Wrap the bottom and sides with three layers of heavy-duty aluminum foil. I learned this the hard way after butter leaked through the seam and smoked up my entire kitchen. Press the foil firmly against the pan, making sure there are no gaps. This isn't just about preventing leaks; it protects your crust from over-browning while the filling sets. Set your oven rack to the lower-middle position — this prevents the top from browning too quickly while ensuring the center cooks through.
- Make your crust by combining the graham cracker crumbs, sugar, and salt in a bowl. Pour in the melted butter and mix until it looks like wet sand. Here's the test: grab a handful and squeeze — it should hold together but still feel crumbly. If it's too dry, add another tablespoon of butter; too wet, add more crumbs. Press this mixture into the bottom of your pan and about an inch up the sides. Use the bottom of a measuring cup to compress it firmly — this prevents it from crumbling when you slice. The crust should be even and compact, about a quarter-inch thick.
- Bake the crust at 325°F for exactly 8 minutes. Set a timer — this isn't negotiable. You're looking for it to smell toasty and see the edges just starting to color. It won't look fully baked, and that's perfect. Let it cool while you make the filling. This par-baking step prevents the dreaded soggy bottom and gives your crust that perfect crunch. The kitchen should smell like cookies at this point — if it doesn't, your graham crackers might be stale.
- Here's where temperature becomes everything. Your cream cheese should be genuinely room temperature — when you press it with a finger, it should leave an indentation without resistance. Beat it on medium speed for exactly 2 minutes. Don't over-beat — we're incorporating air, not creating a tornado. The texture should be smooth and fluffy, like thick whipped cream. Scrape down the bowl twice during this process to ensure no lumps remain hidden at the bottom.
- Add the sugar gradually, about a quarter cup at a time, beating for 30 seconds after each addition. This prevents graininess and ensures the sugar dissolves completely. The mixture should look glossy and smooth, not curdled or separated. If it starts to look broken, you've added the sugar too quickly — slow down and let it incorporate fully before adding more. After the final addition, beat for a full minute to create that light, airy texture that makes this cheesecake special.
- Beat in the eggs one at a time, mixing just until incorporated. Over-mixing here incorporates too much air, which causes cracks during baking. The batter should flow like thick cream, not stiff peaks. After the final egg, beat in the sour cream, vanilla seeds, and salt. The vanilla seeds should be evenly distributed throughout — if they're clumping, your cream cheese was too cold. At this point, the batter should smell incredible, like the best vanilla ice cream you've ever tasted.
- Pour the filling into your cooled crust and smooth the top with an offset spatula. Tap the pan firmly on the counter three times — this releases any large air bubbles that could cause cracks. Place the pan in a larger roasting pan and pour hot water into the outer pan until it comes halfway up the sides. This creates steam that prevents cracking and ensures even cooking. The water should be hot from the tap, not boiling — we're creating humidity, not cooking the cheesecake from the outside in.
- Bake for 55-65 minutes, but start checking at 50 minutes. The center should jiggle slightly when you gently shake the pan — it will continue cooking from residual heat. The edges should be set and just starting to pull away from the sides. If the top starts browning too quickly, loosely tent with foil. When done, turn off the oven and crack the door, letting the cheesecake cool inside for an hour. This gradual cooling prevents the dreaded sinkhole in the middle.
- Remove from the water bath and cool completely on a wire rack, then refrigerate for at least 4 hours or preferably overnight. This setting period is crucial — cutting into a warm cheesecake is like trying to slice butter before it's chilled. The texture transforms from pudding-like to that perfect creamy density. During this time, the vanilla flavor develops and intensifies, creating that depth that makes people close their eyes when they taste it.
- The final step is the brulee, and this is where timing matters. Remove the cheesecake from the fridge 30 minutes before serving — it should be cool but not cold. Sprinkle the superfine sugar in an even layer, tilting the pan to distribute it evenly. Use a kitchen torch in a circular motion, keeping it about 2 inches from the surface. The sugar will melt, bubble, then caramelize to a deep amber. Don't stop too early — pale sugar tastes raw and bitter. You're looking for the color of dark honey with darker spots throughout.
That's it — you did it. But hold on, I've got a few more tricks that'll take this to another level...
Insider Tricks for Flawless Results
The Temperature Rule Nobody Follows
Room temperature isn't just a suggestion — it's the difference between silky smooth and lumpy disaster. But here's what most recipes don't tell you: different ingredients need different temperatures. Your cream cheese should be genuinely soft, but your eggs should be slightly cooler. This creates an emulsion that holds air beautifully without over-mixing. I set out my cream cheese and butter the night before, but leave the eggs out for only an hour. A friend tried skipping this step once — let's just say her cheesecake had the texture of cottage cheese mixed with rubber bands.
Why Your Nose Knows Best
Trust your sense of smell more than your timer. When the crust is perfectly toasted, your kitchen will smell like graham cracker cookies. When the cheesecake is done, it will smell like the most intense vanilla custard you've ever imagined. If you smell something eggy or sulfurous, you've over-baked it. That aroma should make you want to dive in face-first — if it doesn't, give it another few minutes. I've developed this sense over years of baking, and it's never failed me.
The 5-Minute Rest That Changes Everything
After you brulee the top, walk away for exactly five minutes. I know it's torture, but this rest allows the caramelized sugar to harden completely and the cheesecake underneath to chill slightly. Cutting into it immediately creates a gooey mess that runs down the sides. But after five minutes? You get that perfect crack when you tap it with a spoon, and the contrast between warm sugar and cool cheesecake is dramatic. This is the moment of truth — when you know you've created something extraordinary.
The Overnight Advantage
This cheesecake is actually better the second day. The vanilla flavor intensifies, the texture sets perfectly, and you can brulee it fresh before serving. If you've ever struggled with timing desserts for dinner parties, this is your solution. Make it today, serve it tomorrow, and watch your guests think you're a dessert wizard. The brulee topping stays crisp for up to 6 hours after torching, so you can do it ahead of your event without worrying about it weeping or softening.
Creative Twists and Variations
This recipe is a playground. Here are some of my favorite ways to switch things up:
Citrus Burst Brulee
Add the zest of one orange and half a lemon to the batter, replacing the vanilla seeds with vanilla extract. The citrus oils create this incredible aromatic quality that makes the whole room smell like an orange grove. Top with a mixture of superfine sugar and a teaspoon of dried orange zest before bruleeing. The result tastes like a Creamsicle met a cheesecake and had a beautiful baby. Kids go absolutely wild for this version.
Espresso Indulgence
Dissolve two teaspoons of instant espresso powder in the melted butter for your crust. The bitterness balances the sweetness perfectly, creating a mocha-like experience without overwhelming the vanilla. For the topping, mix the superfine sugar with a pinch of espresso powder before bruleeing. The caramel develops these gorgeous dark streaks and tastes like the best coffee candy you've ever had. Serve this after a fancy dinner party and watch your guests try to figure out your secret ingredient.
Salted Caramel Dream
Replace half the sugar in the filling with dark brown sugar for deeper flavor. Add an extra pinch of salt and a teaspoon of bourbon to the batter. The brown sugar creates this subtle caramel note that plays beautifully with the vanilla. For the brulee, mix the superfine sugar with a pinch of flaky sea salt — the salt crystals create tiny pockets of savory flavor that make people wonder why they can't stop eating it. This version disappeared faster than any other at my last potluck.
Berry Swirl Sensation
Puree a cup of raspberries with two tablespoons of sugar, then strain out the seeds. Dollop this mixture on top of your cheesecake batter and use a toothpick to create swirls before baking. The tart berries cut through the richness beautifully, and the pink swirls make it look like edible art. Brulee as usual — the sugar creates a stunning contrast against the berry patterns. This version is guaranteed to get you invited to every summer barbecue.
Chocolate Lover's Paradise
Melt three ounces of dark chocolate and let it cool slightly. Beat this into your cream cheese before adding the other ingredients, creating a marbled effect that's visually stunning. The chocolate adds depth without overwhelming the vanilla — they dance together in perfect harmony. For an extra touch, mix some cocoa powder with your superfine sugar before bruleeing. The result has this sophisticated mocha quality that makes adults feel like kids again.
Tropical Escape
Replace the sour cream with coconut cream and add a teaspoon of coconut extract to the batter. Press toasted coconut into your crust before adding the filling. The tropical notes transport you to a beach somewhere, even if you're eating it in February. Top with a mixture of superfine sugar and a teaspoon of coconut sugar before bruleeing. The coconut sugar adds these gorgeous amber notes and tastes like the best caramel you've ever had, but with a tropical twist.
Storing and Bringing It Back to Life
Fridge Storage
Wrap your cheesecake tightly in plastic wrap, then foil, and it will keep for up to 5 days in the refrigerator. Don't brulee it until you're ready to serve — the sugar will absorb moisture and lose its crunch. If you've already bruleed it, store it uncovered for the first hour to let the topping set, then cover loosely. The key is protecting it from refrigerator odors while maintaining that crisp top. I've kept one for a week, and it was still incredible on day seven.
Freezer Friendly
This cheesecake freezes beautifully, but skip the brulee step until serving. Wrap individual slices in plastic wrap, then foil, and freeze for up to 3 months. Thaw overnight in the refrigerator, then let it sit at room temperature for 30 minutes before bruleeing. The texture is slightly denser after freezing, but the flavor is just as spectacular. I always keep a few slices in the freezer for emergency dessert situations — which, let's be honest, happen more often than they should.
Best Reheating Method
If your cheesecake has been refrigerated, let it sit at room temperature for 30 minutes before serving. This brings out the vanilla flavor and softens the texture to that perfect creamy consistency. If you need to refresh the brulee topping, sprinkle on fresh sugar and torch again. Don't try to re-torch the original sugar — it will taste bitter and burnt. Add a tiny splash of water to the surface before adding new sugar — it helps the new layer adhere and steam the old layer slightly, preventing bitterness.