Picture this: I was standing in a kitchen that smelled like burnt toast and disappointment, having just attempted a “quick” batch of vegan chocolate chip cookies that turned out as flat as a pancake. The only thing that could have salvaged the evening was a single, bold decision: ditch the cookie shape, embrace a chewy bar, and let the chocolate chips melt into a gooey, irresistible center. That night, I discovered a recipe that feels like a secret handshake between my taste buds and the universe—chewy, chocolatey, and utterly unapologetic. I swear, if you’ve ever tasted a cookie that’s as soft as a cloud yet as satisfying as a hug, you’ll want to know the trick behind this masterpiece.
I’ll be honest—when I first cracked the batter, the aroma was a warm, buttery hug that made my eyes water. The sound of the spoon stirring the mixture was like a gentle drumbeat, promising something deliciously sweet. The texture of the dough felt silky, almost like it could glide across a spoon without a second thought. I could almost hear the future crunch of the edges as they browned in the oven, a subtle crackle that would announce their readiness. The anticipation was almost too much to bear; I could already taste the chocolate melting into a velvety swirl that would coat every bite.
Why does this version stand out? Because I didn’t just follow a recipe; I rewrote the rules. I swapped out regular butter for coconut oil to introduce a subtle tropical note that doesn’t overpower the chocolate. I used a blend of brown and white sugar to create a caramelized sweetness that lingers on the tongue. The addition of flaxseed “egg” gives the bars structure without compromising their chewy character. I folded in almond butter for that nutty richness that turns every bite into a decadent experience. And, the secret sauce? A splash of oat milk that keeps the dough moist without making it soggy.
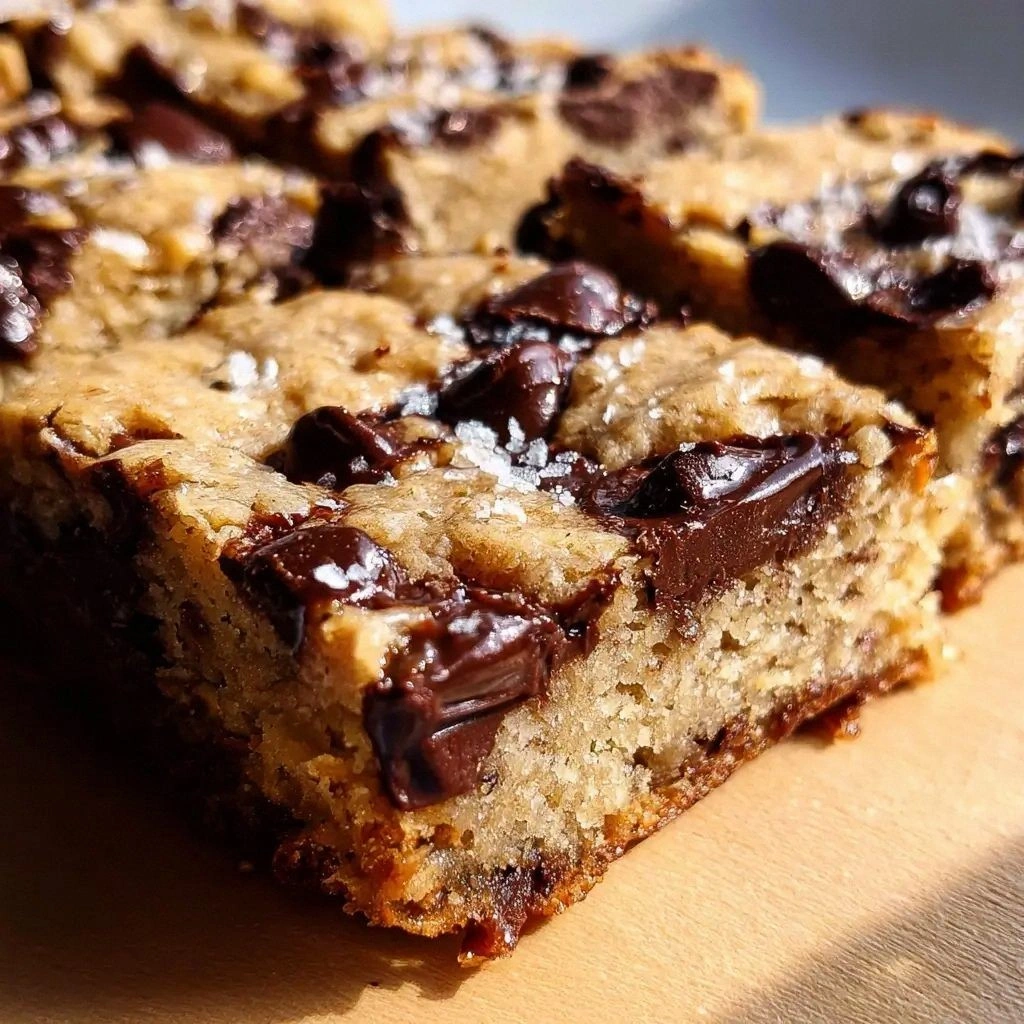
I dare you to taste this and not go back for seconds. The moment the first bite hits your palate, you’ll notice the chocolate chips burst like confetti, releasing a deep, bittersweet flavor that is balanced by the mild sweetness of the sugars. The texture is a harmonious blend of chewy core and slightly crisp edges, a contrast that’s both satisfying and addictive. The aroma alone will have your kitchen smelling like a chocolate factory, while the sight of those glossy, golden bars will make your heart skip a beat. By the end of this post, you’ll be convinced that this is hands down the best version you’ll ever make at home.
If you’ve ever struggled with vegan chocolate chip cookies that turn out dry or overly crumbly, you’re not alone—I've seen it happen more times than I can count. The trick is in the balance of fats, sugars, and binding agents. The recipe below is designed to give you a chewy, chocolate-laden bar that’s easy to make, forgiving, and crowd-pleasing. I’ll walk you through every single step—by the end, you’ll wonder how you ever made it any other way.
Picture yourself pulling these out of the oven, the whole kitchen smelling incredible, and the first bite sending a wave of chocolate bliss through your senses. The anticipation will build as the bars cool, their edges firming just enough to hold their shape while the center remains delectably soft. When you cut a slice, the chocolate chips will ooze, creating a molten river that’s both mesmerizing and mouthwatering. You’ll feel the satisfaction of having created something that’s not only delicious but also vegan-friendly and utterly indulgent.
This recipe is a playground for your palate. Every ingredient has a purpose, and every step is crafted to elevate the flavor profile. I’m about to reveal the method that turns a simple batter into a chewy, chocolate-drenched masterpiece. Ready to dive in? Let’s get started.
What Makes This Version Stand Out
- Taste: The blend of brown and white sugar creates a caramelized sweetness that balances the bitterness of the chocolate, resulting in a complex flavor profile that lingers on the palate.
- Texture: Coconut oil and almond butter provide a silky mouthfeel, while the flaxseed “egg” ensures the bars hold together without becoming crumbly.
- Ingredient Quality: Using high‑grade, fair‑trade chocolate chips and organic flour elevates the overall taste and supports sustainable practices.
- Simple Method: The recipe requires no advanced techniques—just whisk, fold, and bake. Even novice cooks can achieve professional results.
- Make‑Ahead Potential: These bars can be stored in an airtight container for up to a week, making them perfect for parties, school lunches, or a quick snack.
- Customization: Swap almond butter for cashew or peanut butter, or add dried fruit for a personalized twist.
- Vegan Proof: Every ingredient is plant‑based, ensuring that the bars are cruelty‑free and suitable for a wide range of dietary needs.
- Visual Appeal: The glossy finish and chocolate speckles make these bars Instagram‑worthy and perfect for gifting.
Alright, let's break down exactly what goes into this masterpiece...
Inside the Ingredient List
The Flavor Base
All-purpose flour is the foundation of these bars, providing the structure that holds the chocolate together. A cup of flour might seem minimal, but it’s balanced by the fats and liquids to create a batter that’s neither too dense nor too runny. If you’re looking for a gluten‑free version, swap the all‑purpose flour for a 1:1 gluten‑free blend that contains xanthan gum. The absence of gluten will slightly alter the chewiness, but the bars will still hold their shape thanks to the almond butter and flaxseed egg.
Oat milk is the liquid component that hydrates the flour and dissolves the sugars. Its mild, slightly sweet flavor complements the chocolate without overpowering it. Unsweetened oat milk keeps the sugar content in check, while the natural oat flavor adds a subtle nuttiness. If you don’t have oat milk, you can use almond milk or soy milk; just be aware that the final texture might be slightly different.
Coconut oil is the star fat in this recipe. It melts at a lower temperature than butter, which helps the chocolate chips melt evenly throughout the bars. Coconut oil also adds a faint tropical note that pairs wonderfully with the chocolate. If you prefer a less pronounced coconut flavor, you can use a neutral oil like grapeseed or canola, but the chewy texture might be less pronounced.
Brown sugar brings a deep molasses sweetness that caramelizes during baking, creating a richer flavor than white sugar alone. The combination of brown and white sugar balances the sweetness and adds depth. If you’re watching your sugar intake, you can reduce the total sugar by 25% and add a splash of vanilla extract to compensate. The bars will still be delicious, just a touch less sweet.
The Texture Crew
Almond butter is the creamy binder that keeps the bars from falling apart. Its nutty flavor adds a layer of complexity, while the fat content ensures a moist, tender crumb. If you’re allergic to nuts, you can substitute with sunflower seed butter or tahini for a similar effect. The key is to choose a butter that’s smooth and unsweetened to avoid altering the flavor profile.
Flaxseed meal and water create a flax “egg” that provides structure without the need for animal products. This egg binds the batter, giving the bars a slightly firmer base while maintaining chewiness. To make the flax egg, combine one tablespoon of flaxseed meal with three tablespoons of water and let it sit for five minutes until it thickens. This mixture is a staple in vegan baking and can be used in cakes, muffins, and pancakes.
Baking soda is the leavening agent that creates tiny air pockets, giving the bars a light, airy interior. It reacts with the acidic components, such as the flax egg or the natural acidity of oat milk, to produce carbon dioxide. Use fresh baking soda for maximum lift; stale soda can result in dense bars. A pinch of salt also balances the sweetness and enhances the chocolate flavor.
Vanilla extract is the subtle perfume that ties all the flavors together. It adds depth and a warm, comforting aroma that elevates the overall taste. Use pure vanilla extract for the best results; imitation vanilla can taste harsh. If you’re allergic to vanilla, you can omit it, but the bars will still be delicious.
The Unexpected Star
Vegan chocolate chips are the pièce de résistance. They melt into a glossy, chocolate river that runs through each bite. Look for chips that contain cocoa butter or a plant‑based butter alternative for the best melt. If you’re a chocolate aficionado, consider using a mix of dark and milk chocolate chips to create a layered flavor profile.
Optional shredded coconut adds a subtle crunch and tropical flavor that complements the coconut oil. If you’re aiming for a lighter texture, skip the coconut or use it sparingly. The coconut also provides a subtle nutty undertone that pairs well with the almond butter. A pinch of cinnamon can be added for a warm, spicy note that enhances the chocolate’s richness.
The Final Flourish
A splash of maple syrup or agave nectar can be added to the batter for a touch of natural sweetness and a glossy finish. These sweeteners also contribute to the browning process, giving the bars a deeper golden color. If you prefer a sugar‑free version, use a sugar substitute that does not break down under heat, such as erythritol or stevia.
A pinch of sea salt on top before baking adds a burst of flavor and a visual contrast to the glossy chocolate. The salt crystals also create a subtle crunch as they melt into the bars. Remember to keep the salt to a minimum; too much can overpower the delicate sweetness.
Everything's prepped? Good. Let's get into the real action...
The Method — Step by Step
- Preheat your oven to 350°F (175°C) and line a 9x13 inch baking pan with parchment paper. The parchment ensures the bars lift easily after baking. While the oven is heating, gather all the dry ingredients in a large mixing bowl. This will save you time and keep the kitchen organized. Once the oven is ready, we’ll start combining the wet and dry components.
- In a separate bowl, whisk together the melted coconut oil, oat milk, brown sugar, white sugar, vanilla extract, and flaxseed egg until the mixture is smooth and glossy. The flax egg should be fully incorporated; if it’s lumpy, whisk again. This wet mixture will form the base that holds everything together. The oils and sugars will caramelize, creating a rich, buttery flavor. Keep this bowl aside while you prepare the dry mix.
- Sift the flour, baking soda, and salt into the dry bowl to avoid lumps. Sifting also aerates the flour, which helps the bars rise slightly during baking. Stir the dry mix with a whisk or spatula until it’s evenly distributed. The dry ingredients are now ready to meet the wet mixture. This step is crucial for achieving a consistent texture.
- Pour the wet mixture into the dry bowl and fold gently until just combined. Overmixing can develop gluten, making the bars tough. The batter should look thick but pourable, similar to a thick pancake batter. At this point, the dough will still be slightly sticky; that’s normal. The texture is a key indicator that the ingredients have blended well.
- Fold in the almond butter and vanilla until evenly distributed. The almond butter adds richness and helps the bars hold together. The vanilla will enhance the chocolate’s depth. Make sure the almond butter is fully incorporated to avoid pockets of dry dough. This step is where the bars begin to take on their signature chewy quality.
- Fold in the chocolate chips and optional shredded coconut. The chips should be evenly distributed to avoid clumps. The coconut adds a subtle crunch and a hint of tropical flavor. If you prefer a more chocolate‑centric bar, simply omit the coconut. The mixture should look glossy and speckled with chocolate.
- Transfer the batter to the prepared pan, using a spatula to smooth the top. Press the batter down gently to ensure an even surface. The top should be flat and even, which helps the bars bake uniformly. A level surface also ensures that the chocolate chips spread evenly.
- Bake for 30 minutes, or until the edges are golden brown and the center has set. The bars should smell like toasted chocolate and vanilla. After baking, let them cool in the pan for 10 minutes, then transfer them to a wire rack to cool completely. Cutting them while still warm can cause the chocolate to melt and run. The bars should hold their shape and feel firm to the touch.
- Once cooled, cut the bars into squares or rectangles. Serve immediately or store them in an airtight container for up to a week. For a quick snack, wrap them individually in parchment paper. The bars keep their chewiness even after refrigeration. Enjoy the melt‑in‑your‑mouth experience that will leave everyone wanting more.
That's it — you did it. But hold on, I've got a few more tricks that'll take this to another level...
Insider Tricks for Flawless Results
The Temperature Rule Nobody Follows
Many bakers bake at the same temperature for all cookies, but the chewy texture requires a slightly lower heat. Bake at 350°F (175°C) instead of the usual 375°F to allow the chocolate to melt slowly and the batter to set without drying out. The lower temperature also prevents the edges from becoming too crisp, preserving the chewy center. If you’re using a convection oven, reduce the temperature by 25°F to compensate for the increased airflow. This subtle adjustment will elevate your bars from good to unforgettable.
Why Your Nose Knows Best
When the first aroma of chocolate and vanilla hits your nose, you know the bars are on the brink of perfection. The smell of caramelizing sugar is a sign that the sugars are breaking down just right. Trust your senses; if the aroma is strong but not burnt, the bars are ready. This sensory cue is more reliable than a timer, especially if your oven runs hot or cold. The next time you bake, pay attention to the scent, not just the clock.
The 5-Minute Rest That Changes Everything
After removing the bars from the oven, let them rest on the pan for 10 minutes before cutting. This short rest allows the heat to redistribute, ensuring even cooling and preventing the chocolate from cracking. The bars will firm up, making them easier to slice cleanly. Cutting immediately can cause the chocolate to ooze, ruining the presentation. A brief pause is a simple, game‑changing step that guarantees a perfect bite.
The Secret to a Glossy Finish
A glossy finish signals that the chocolate has melted beautifully and the oils have emulsified. To achieve this, lightly brush the top with a thin layer of oat milk before baking. The milk adds a subtle sheen without adding extra sweetness. The result is a visually stunning bar that looks as good as it tastes. This small touch elevates the overall experience and impresses guests.
The Flavor Layering Trick
If you want to add an extra dimension of flavor, sprinkle a pinch of sea salt on top of the batter before baking. The salt crystals melt into the chocolate, creating a subtle crunch and enhancing the sweetness. This contrast is similar to the classic salted caramel but in a chewy bar form. The result is a complex flavor that satisfies both sweet and savory cravings.
Creative Twists and Variations
This recipe is a playground. Here are some of my favorite ways to switch things up:
Nutty Bliss
Swap almond butter for peanut butter or cashew butter. The nutty flavor will change the profile, giving the bars a deeper, earthier taste. The texture remains chewy, but the nutty undertone adds a new layer of richness. This variation is perfect for peanut lovers or those looking for a protein boost.
Spiced Chocolate
Add a teaspoon of cinnamon or a pinch of cayenne pepper to the batter. The spices introduce warmth and a subtle heat that balances the sweetness. The cinnamon adds a familiar, comforting note, while cayenne gives a surprising kick. This version is ideal for autumn or winter snacking.
Fruit‑Infused Bars
Fold in dried cranberries, raisins, or chopped dried apricots. The fruit adds chewiness and a burst of natural sweetness. The bars become a balanced treat with fruit and chocolate. This variation is great for those who want a bit of fruit in their dessert.
Salted Caramel Crunch
Add a drizzle of salted caramel sauce on top before baking. The caramel will seep into the bars, creating a sweet‑salty explosion. The caramel also adds a glossy sheen and a buttery texture. This twist is perfect for a decadent dessert experience.
Dark Chocolate Delight
Use 100% dark chocolate chips instead of milk or semi‑sweet chips. The bitterness of dark chocolate pairs beautifully with the sweetness of the sugars. The bars become a sophisticated, low‑sugar treat. This version is ideal for chocolate purists.
Coconut Cream Bars
Add a layer of coconut cream between the batter and the chocolate chips. The coconut cream adds a rich, creamy texture and a tropical flavor. The result is a decadent bar that feels indulgent without being too heavy. This variation is a must‑try for coconut lovers.
Storing and Bringing It Back to Life
Fridge Storage
Store the bars in an airtight container at room temperature for up to 5 days. If you prefer them slightly firmer, keep them in the fridge for up to a week. The airtight seal prevents the bars from drying out and preserves the chewy texture. When you’re ready to eat, let them sit at room temperature for 10 minutes for the best flavor.
Freezer Friendly
Wrap each bar individually in parchment paper and place them in a freezer bag. They can be frozen for up to 3 months. When you’re ready for a treat, thaw at room temperature for 30 minutes. The bars will maintain their chewy texture and chocolate flavor after freezing.
Best Reheating Method
Reheat the bars in a microwave on low power for 10–15 seconds, or in a preheated oven at 300°F for 5 minutes. A tiny splash of water before reheating steams the bars, restoring moisture and preventing them from becoming dry. The chocolate should melt smoothly, creating that signature gooey center. This method keeps the bars fresh and delicious every time.