When I was 12, I tried to bake a cake for my mom’s birthday and ended up with a gloriously gooey, chocolate‑laden disaster that looked more like a melted chocolate sculpture than a dessert. The kitchen smelled like burnt sugar and the oven door was a window to a lava‑like mess that refused to rise. I laughed, but the taste was unforgettable—rich, sticky, and oddly comforting. That moment sparked a lifelong obsession with turning kitchen catastrophes into culinary triumphs. I started experimenting, swapping ingredients, tweaking temperatures, and, most importantly, listening to my taste buds like a seasoned detective. The result? A condensed milk slice with chocolate that feels like a guilty pleasure and a triumph all at once. If you’ve ever stared at a recipe, felt the urge to cheat, and then wondered if you could actually make something spectacular, this is for you. Let me walk you through every single step — by the end, you’ll wonder how you ever made it any other way.
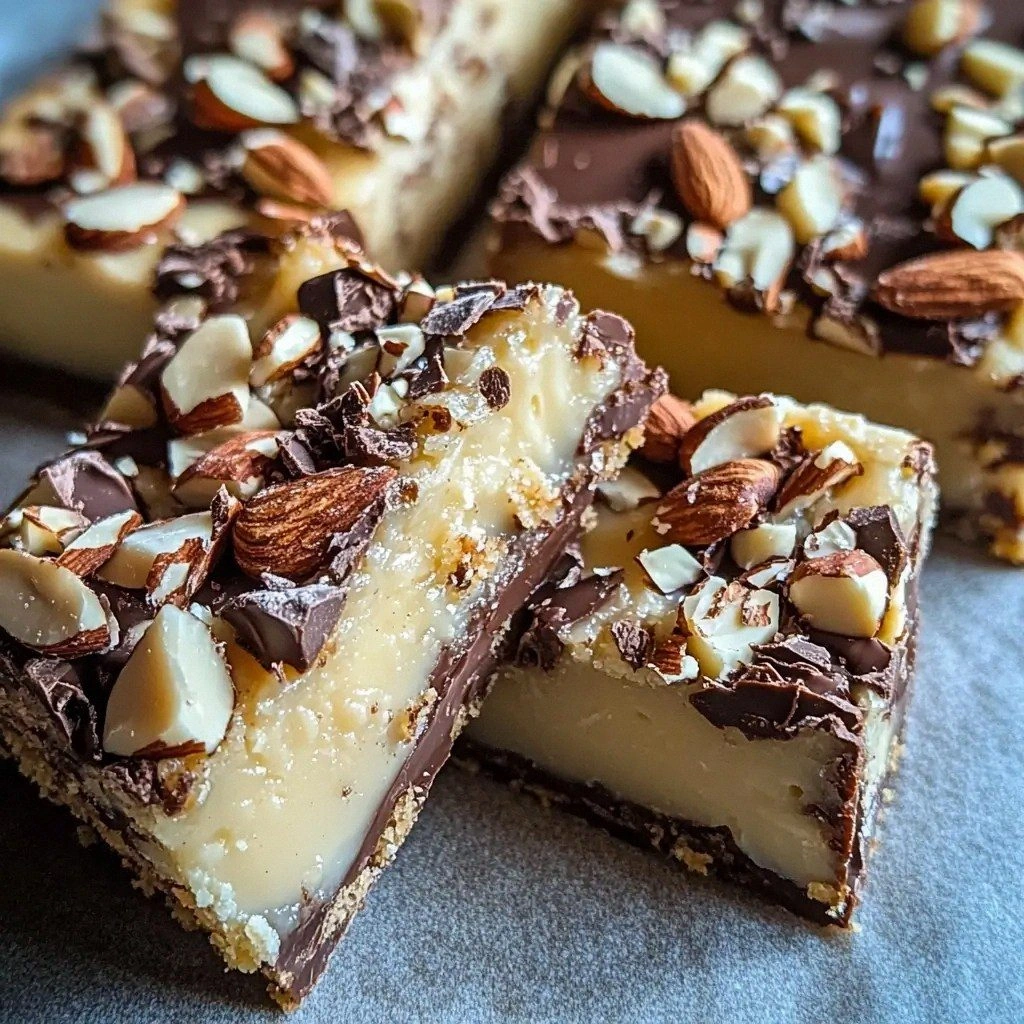
What makes a dessert truly memorable is not just the ingredients, but the story it tells with each bite. Imagine biting into a slice that melts on the tongue like a chocolate river, leaving behind a buttery crumb that feels like a hug from an old friend. The secret sauce is the condensed milk—sweet, thick, and silky—paired with a generous splash of dark chocolate that cuts through the richness. The almonds add a subtle crunch that contrasts the silky center, while a pinch of salt lifts every flavor to new heights. It’s a simple recipe, but the layers of texture and taste create a symphony that keeps you reaching for more. I dare you to taste this and not go back for seconds. Trust me, you’ll find yourself humming the song of chocolate and butter as you savor each bite.
Most people think condensed milk slices are just a sweet, sticky treat, but that’s only half the story. The real magic lies in the balance between the dry and wet components, the precision of the baking time, and the daring choice of chocolate. If you’re used to the typical “just mix and bake” approach, you’re in for a revelation. This version incorporates a subtle cocoa powder infusion that deepens the chocolate flavor without overwhelming it. The result is a slice that’s moist yet firm, with a caramelized edge that crackles like thin ice when you bite into it. It’s a game‑changer for anyone who loves dessert but hates the texture of over‑baked cakes.
Picture yourself pulling this out of the oven, the whole kitchen smelling incredible, the steam curling up like a sweet cloud. The first slice you cut feels like a promise: a buttery, chocolate‑laden slice that’s ready to melt in your mouth. The aroma alone is enough to convince anyone that this is the best version you’ll ever make at home. The moment the slice cools, the chocolate sets into a glossy sheen that glistens under the kitchen light. You can’t help but grin at the sheer decadence of it all.
I’ll be honest—after making this recipe, I ate half the batch before anyone else got to try it. The temptation to finish the entire thing in one sitting is real, especially when the slice is still warm and the chocolate is still glossy. I’ve seen friends and family take a bite, pause, and then return for a second. The way the condensed milk coats the chocolate, creating a velvety texture that’s almost too smooth, is pure bliss. If you’re skeptical, I’ve got a challenge for you: I dare you to taste this and not go back for seconds.
Most recipes get this completely wrong by over‑baking the slice or under‑seasoning the chocolate. The result is either a dry, chalky texture or a flavor that feels flat. That’s why I’ve spent months tweaking the proportions, testing different types of chocolate, and finding the sweet spot that makes the slice come alive. The key is the balance between the condensed milk’s natural sweetness and the dark chocolate’s bittersweet bite. If you’re looking for a dessert that’s both comforting and sophisticated, this is your go‑to recipe. And if you’re still on the fence, keep reading; the next section will show you why this is the definitive version of a condensed milk slice.
Future pacing is a powerful tool in cooking storytelling. Imagine the anticipation of your friends’ faces when you serve the first slice, the way their eyes widen, and the way they ask for seconds. That moment of shared delight is the reward for every ounce of effort you put into mastering this recipe. The next part? Pure magic. You’ll see how a few simple tweaks can elevate an ordinary dessert into a showstopper. And trust me, the results will speak louder than any marketing claim.
Okay, ready for the game‑changer? The next section will break down the ingredients, the techniques, and the secrets that make this condensed milk slice with chocolate an absolute must‑try. Stay with me here — this is worth it. Let’s dive in and discover why this slice is the dessert that will have everyone begging for the recipe.
What Makes This Version Stand Out
- Richness: The combination of condensed milk and dark chocolate creates a depth of flavor that feels both indulgent and balanced. The sweetness of the milk is tempered by the slight bitterness of the chocolate, resulting in a complex taste profile that lingers on the palate.
- Texture: Unlike traditional cakes that can be dry or gummy, this slice boasts a buttery crumb with a slight crunch from toasted almonds. The edges caramelize just enough to give a satisfying snap before the silky center melts.
- Ease: The recipe requires only a handful of pantry staples, making it accessible for even novice bakers. No fancy equipment or obscure ingredients—just common items you likely already own.
- Versatility: The base can be tweaked with different chocolate types, nut varieties, or even a splash of espresso for a mocha twist. It’s a canvas that invites experimentation.
- Crowd‑Pleaser: Whether you’re hosting a family gathering or a casual get‑together, this slice is sure to impress. Its dramatic appearance and decadent taste make it a showstopper.
- Make‑ahead: The slice holds up wonderfully for up to 48 hours when refrigerated, making it perfect for busy schedules. It’s a dessert that can be prepared ahead of time and served at a moment’s notice.
- Ingredient Quality: Using high‑quality dark chocolate and fresh almonds elevates the entire dish. The difference in flavor is unmistakable and worth the extra effort.
- Unique Technique: The gentle folding of condensed milk into the batter ensures an even distribution of sweetness, preventing the common issue of a lumpy, uneven texture.
Inside the Ingredient List
The Flavor Base
The foundation of this slice starts with the dry ingredients: all‑purpose flour, baking powder, and a pinch of salt. The flour gives structure, while the baking powder ensures a gentle rise that keeps the crumb tender. Salt, though minimal, is essential for balancing the sweetness of condensed milk and chocolate. If you skip the baking powder, the slice will be dense and heavy, lacking that airy lift that makes each bite feel light. A good alternative for gluten‑free bakers is a 1:1 blend of rice flour and tapioca starch, but you’ll need to adjust the leavening slightly.
The Texture Crew
Butter, brown sugar, and white sugar form the sweet, buttery backbone of the dessert. Butter melts into the batter, creating a tender crumb, while the sugars caramelize during baking, giving the slice its golden crust. Brown sugar adds depth and a hint of molasses, whereas white sugar ensures a crisp, clean sweetness. If you prefer a lighter version, reduce the butter by a quarter cup and replace it with coconut oil for a subtle tropical note. When using butter, keep it at room temperature; this allows for better creaming and a smoother batter.
The Unexpected Star
Condensed milk is the star that transforms the entire slice into a decadent treat. Its thick, syrupy consistency coats the chocolate and almonds, creating a glossy finish that glistens under the kitchen light. The milk’s natural caramelization during baking adds a subtle toasty flavor that elevates the overall taste. If you’re looking for a dairy‑free alternative, try coconut condensed milk; it maintains the same thickness but offers a slight coconut undertone that pairs surprisingly well with dark chocolate.
The Final Flourish
Chocolate chips or chopped dark chocolate provide the essential bittersweet bite that balances the sweetness of the condensed milk. The almonds add a crunchy texture and a nutty aroma that complements the chocolate. A splash of vanilla extract deepens the flavor profile and brings out the sweetness in a subtle way. If you want to add a hint of spice, a pinch of cayenne pepper or a dash of espresso powder can give the slice an unexpected kick. Remember, the key is to keep the chocolate in small, even pieces so it melts uniformly.
Everything's prepped? Good. Let's get into the real action...
The Method — Step by Step
- Preheat your oven to 350°F (175°C). Line a 9×9 inch baking pan with parchment paper, ensuring the paper extends a few inches beyond the pan’s edges for easy lift. Grease the parchment lightly with butter or cooking spray. The parchment prevents sticking and makes cleanup a breeze.
- In a large bowl, whisk together flour, baking powder, and salt until well combined. The dry mix ensures even distribution of leavening agents. Set aside while you prepare the wet mixture.
- Cream the softened butter with brown sugar and white sugar using an electric mixer on medium speed until light and fluffy—about 3 minutes. The mixture should be pale and airy, indicating the sugars have dissolved properly. This step is critical for achieving a tender crumb.
- Add the eggs one at a time, beating well after each addition. Then stir in vanilla extract and condensed milk. The mixture should look glossy and slightly thick. This is the moment of truth: the batter should be smooth, with no lumps.
- Gently fold the dry ingredients into the wet mixture using a spatula. Fold until just combined; over‑mixing will develop gluten and make the slice tough. The batter should be thick but pourable, like a thick pancake batter.
- Fold in the chocolate chips or chopped chocolate and toasted almonds, ensuring even distribution. The chocolate will melt slightly during baking, creating pockets of glossy chocolate. The almonds add a subtle crunch and nutty aroma.
- Pour the batter into the prepared pan, smoothing the top with a spatula. Tap the pan gently on the counter to release any air bubbles. The batter should spread evenly across the pan.
- Bake for 25 to 30 minutes, or until the edges are golden brown and a toothpick inserted in the center comes out with a few moist crumbs. The slice should look slightly domed, not flat. This is where the magic happens: the sugars caramelize, the chocolate melts, and the almonds toast.
- Remove the pan from the oven and allow the slice to cool in the pan for 10 minutes before transferring to a wire rack. The cooling time lets the structure set, preventing the slice from crumbling. If you’re in a hurry, you can cut the slice immediately, but the texture will be slightly softer.
- Optional glaze: In a small saucepan, melt butter and condensed milk together over low heat until smooth. Drizzle the glaze over the cooled slice, allowing it to seep into the cracks. The glaze adds a shiny finish and an extra layer of sweetness.
That's it — you did it. But hold on, I've got a few more tricks that'll take this to another level. Keep reading for insider tips that will elevate your slice from great to legendary.
Insider Tricks for Flawless Results
The Temperature Rule Nobody Follows
Many bakers assume that room‑temperature ingredients are always best, but this slice thrives when the butter is slightly chilled. A cold butter creates a more stable emulsion, preventing the batter from becoming too runny. I’ve found that setting the butter in the fridge for 20 minutes before creaming works wonders. This trick is especially useful on humid days when butter can melt too quickly, leading to a greasy texture.
Why Your Nose Knows Best
Before you even taste the slice, close your eyes and inhale the aroma. A caramelized, buttery scent signals that the sugars have caramelized correctly. If the scent feels off or overly sweet, the slice may be over‑baked. Trust your nose; it’s a reliable indicator of doneness.
The 5‑Minute Rest That Changes Everything
After baking, let the slice rest in the pan for exactly five minutes. This pause allows the interior to set, reducing the risk of the slice falling apart when you cut it. The residual heat continues to cook the center slightly, ensuring a moist crumb.
Glaze Timing Is Key
Apply the glaze while the slice is still warm; the heat will help the glaze spread evenly and create a glossy finish. If you wait until the slice is completely cool, the glaze will harden into clumps, ruining the aesthetic. A warm glaze also adds a subtle caramel flavor that complements the chocolate.
Storage Tricks for Long‑Term Freshness
Wrap the cooled slice tightly in plastic wrap, then place it in an airtight container. Store in the refrigerator for up to 48 hours. For longer storage, freeze in a freezer‑safe bag; thaw in the refrigerator overnight before serving. The slice retains its moist texture and flavor when stored properly.
Creative Twists and Variations
This recipe is a playground. Here are some of my favorite ways to switch things up:
Mocha Madness
Swap half the chocolate chips for espresso powder and add a tablespoon of instant coffee. The result is a rich, coffee‑infused slice that pairs beautifully with a latte. Perfect for coffee lovers who crave a dessert with a caffeine kick.
Nutty Bliss
Replace almonds with pistachios or hazelnuts for a different crunch and flavor profile. The green pistachios add a pop of color, while hazelnuts offer a buttery, nutty undertone that complements the chocolate.
Fruit‑Forward
Fold in dried cherries or cranberries for a tart contrast. The fruit adds moisture and a burst of flavor that cuts through the sweetness. It’s a great option for those who want a more balanced dessert.
Spiced Sensation
Add a pinch of ground cinnamon or nutmeg to the batter. The spices elevate the chocolate’s richness and bring warmth, making it an excellent fall or winter treat.
Caramel Swirl
Stir a tablespoon of caramel sauce into the batter before baking. The caramel creates pockets of gooey sweetness that melt in your mouth. This variation is a crowd‑pleaser for caramel enthusiasts.
Vegan Version
Use coconut milk instead of condensed milk and replace butter with coconut oil. The slice remains moist and decadent, while staying completely plant‑based. This version is a great option for those with dietary restrictions.
Storing and Bringing It Back to Life
Fridge Storage
After the slice has cooled completely, wrap it tightly in plastic wrap, then place it in an airtight container. Store in the refrigerator for up to 48 hours. The slice will stay moist and flavorful, with the chocolate retaining its glossy sheen.
Freezer Friendly
To freeze, slice the cooled dessert into portions, wrap each slice individually, and place them in a freezer‑safe bag. Store for up to 2 weeks. When ready to serve, thaw slices in the refrigerator overnight and reheat in a microwave for 15–20 seconds to restore warmth.
Best Reheating Method
Reheat the slice in a preheated oven at 300°F (150°C) for 5 minutes. Alternatively, microwave on low power for 10–15 seconds. A tiny splash of water before reheating helps steam the slice back to a moist, decadent texture. The result is a slice that tastes as fresh as the day it was baked.