Picture this: I’m standing in a cramped kitchen, the counter cluttered with flour bags, cocoa tubs, and an absurd amount of green gel food coloring that looks like a science‑lab experiment. I had just finished a disastrous batch of chocolate cookies that came out as hard, flat slabs, and I was desperate for a rescue. My friend dared me to make the most luscious, green‑themed treat ever, and I was ready to prove that even a kitchen disaster can turn into a triumph.
The moment I dropped the first spoonful of dough into the oven, the house filled with a scent that was part cocoa, part peppermint, and an unmistakable hint of fresh green. The steam curled like a lazy cat, and the sound of the timer ticking felt like a countdown to pure bliss. I could almost taste the buttery softness before the cookies even left the oven—an anticipation that made every second feel like a promise.
What makes this version stand out is that it’s not just a cookie; it’s an experience. The dough is light enough to melt in your mouth, the peppermint adds a subtle zing that lifts the chocolate, and the white chocolate drizzle turns each bite into a glossy, decadent surprise. I’ve tried countless green velvet recipes, but none of them captured the same balance of texture, flavor, and visual impact. I’m telling you, this is hands down the best version you’ll ever make at home.
I’ll walk you through every single step. By the end, you’ll wonder how you ever made it any other way. Let’s dive into the art of making the perfect green velvet cookie.
What Makes This Version Stand Out
- Taste: The subtle peppermint undertone cuts through the richness of the cocoa, creating a layered flavor profile that feels fresh yet indulgent.
- Texture: The dough’s high moisture content, thanks to cream cheese and coconut oil, keeps the cookies soft and chewy, unlike the brittle results of most chocolate cookie recipes.
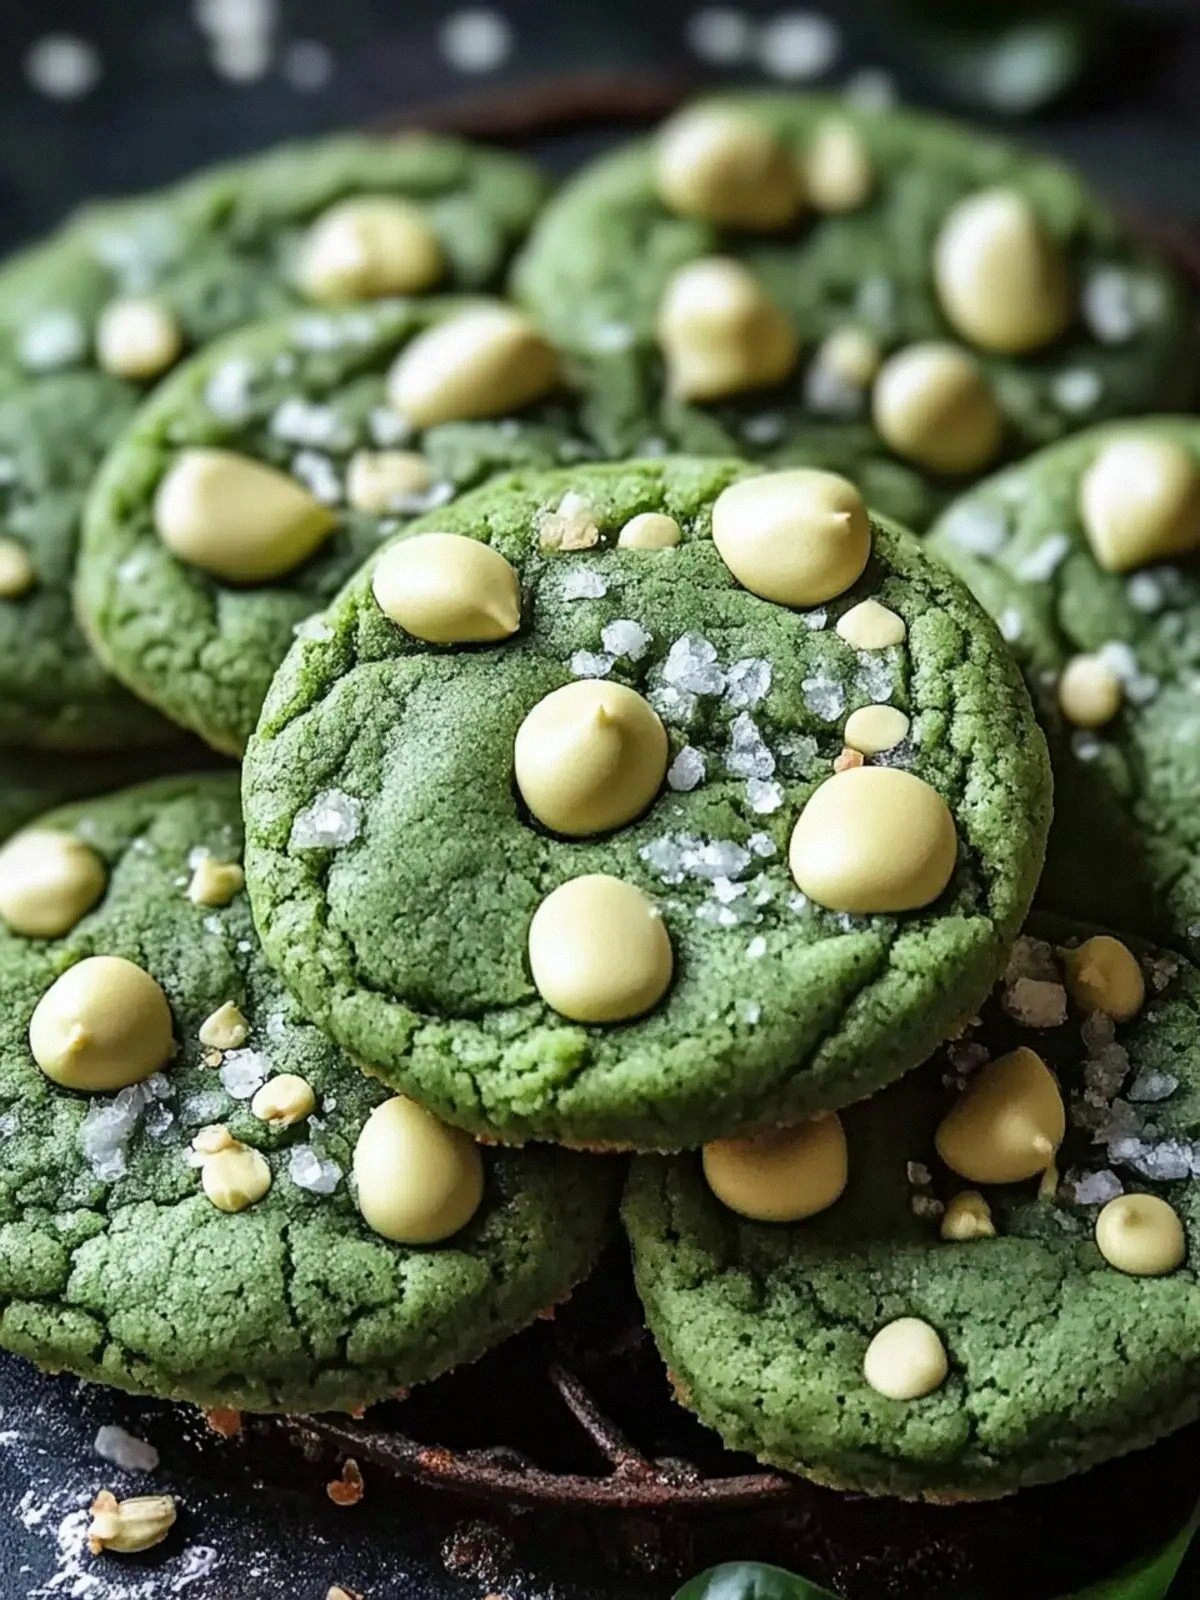
- Color: The green gel food coloring is added at the right moment to preserve its vibrancy, giving each cookie a striking, jewel‑like hue.
- Finish: The white chocolate drizzle is glossy and slightly caramelized, providing a sweet counterpoint that doesn’t overwhelm the cookie.
- Make‑ahead: Once baked, these cookies keep their softness for up to a week when stored in an airtight container, making them ideal for parties.
- Versatility: Swap the peppermint for orange or almond extract to create seasonal variations without losing the core texture.
- Ingredient Quality: Using high‑grade unsalted butter and premium cocoa powder elevates the flavor, ensuring each bite is full of depth.
- Presentation: The glossy drizzle and green color make for a showstopping dessert that’s perfect for Instagram-worthy moments.
Alright, let’s break down exactly what goes into this masterpiece…
Inside the Ingredient List
The Flavor Base
The foundation of this cookie is a marriage between flour, cocoa, baking powder, and baking soda. The flour gives structure, while the cocoa provides the deep, bittersweet undertone that’s essential for a chocolate cookie. Baking powder and soda act as leavening agents, ensuring the dough rises just enough to keep the cookies fluffy, yet not so much that they puff up like a soufflé.
If you skip the baking soda, the cookies will be flat and dense, lacking that soft bite that makes them unforgettable. If you forget the baking powder, they’ll be overly chewy and won’t rise at all. Always use room‑temperature ingredients to avoid a sudden temperature shock that could cause uneven baking.
The Texture Crew
Unsalted butter and coconut oil are the unsung heroes that bring moisture and a subtle tropical note to the dough. Butter adds richness, while coconut oil prevents the cookies from drying out, giving them that signature soft center. Cream cheese is the secret weapon; it’s the reason these cookies stay tender for days. The tang of cream cheese balances the sweetness and introduces a slight acidity that reacts with the leavening agents to create a light crumb.
Skipping the cream cheese turns the cookie into a standard chocolate cookie—tasty, but lacking the airy, melt‑in‑your‑mouth quality that sets this recipe apart. If you’re allergic to dairy, you can substitute an equal amount of dairy‑free cream cheese, but you may lose some of the depth of flavor.
The Unexpected Star
Peppermint extract is the subtle twist that gives this green velvet cookie its unique personality. A mere 1/4 teaspoon is enough to elevate the chocolate’s richness without overpowering it. The peppermint’s coolness is reminiscent of a crisp winter morning, adding a layer of freshness that keeps the cookies from feeling too heavy.
If you prefer a different flavor profile, try swapping peppermint for vanilla or orange extract. Each variation brings a new dimension to the cookie, but the peppermint keeps the original recipe’s signature cool bite.
The Final Flourish
White chocolate is not just a garnish; it’s an integral part of the flavor profile. When melted and drizzled over the warm cookies, it creates a glossy, sweet glaze that contrasts beautifully with the deep cocoa. The white chocolate’s subtle caramel notes complement the peppermint, while its creamy texture adds an extra layer of indulgence.
If you can’t find white chocolate, you can use milk chocolate or a blend of dark chocolate for a richer, more intense taste. However, the white chocolate’s light color and mild flavor are key to maintaining the “velvet” aesthetic.
Everything’s prepped? Good. Let’s get into the real action…
The Method — Step by Step
- Preheat your oven to 350°F (175°C) and line two baking sheets with parchment paper. The parchment prevents sticking and gives the cookies a clean edge. I always preheat the sheets as well; this ensures an even bake right from the start.
- In a large bowl, whisk together the flour, cocoa powder, baking powder, baking soda, and fine sea salt. The dry mix should be evenly distributed, preventing any pockets of cocoa that could cause uneven browning. If you notice any clumps, sift the mixture to create a silky base.
- In a separate bowl, cream the butter, coconut oil, and cream cheese until the mixture is light and fluffy. Use a hand mixer on medium speed for 3–4 minutes; this incorporates air and ensures a tender crumb. I dare you to taste the butter mixture before adding the sugar—it should have a buttery aroma that’s unmistakably inviting.
- Gradually add the granulated sugar to the butter mixture, beating until the sugar is fully incorporated and the mixture is slightly translucent. The sugar’s granules will dissolve, giving the dough a smooth texture. If you’re feeling adventurous, substitute half the sugar with brown sugar for a caramel note.
- Add the egg, vanilla extract, and peppermint extract to the wet mixture. Beat until fully combined, then stir in the green gel food coloring. The dough should take on a vibrant, emerald hue. Watch out: too much gel can make the dough too liquid, so add it slowly and observe the color change.
- Fold the dry ingredients into the wet mixture using a spatula. Mix just until combined—overmixing can develop gluten and make the cookies tough. The dough should be thick enough to hold its shape but still pliable. If it feels too dry, add a splash of milk to reach the right consistency.
- Using a tablespoon or a cookie scoop, drop dough onto the prepared baking sheets, spacing them about 2 inches apart. Flatten each slightly with the back of a spoon; this helps them bake evenly and prevents doming. I always mark a light line on the parchment to keep track of spacing.
- Bake for 10–12 minutes, or until the edges are set but the centers remain soft. The cookies should not be fully browned; they’ll finish baking on the wire rack. When you lift a cookie, it should still feel slightly pliant, like a fresh piece of dough.
- Remove from the oven and let the cookies cool on the sheet for 5 minutes before transferring them to a wire rack to cool completely. This short cooling period allows the cookies to firm up without becoming hard. Once cooled, melt the white chocolate in a double boiler, then drizzle over the warm cookies with a squeeze bottle or a spoon. The white chocolate will set into a glossy glaze as the cookies cool further.
That's it — you did it. But hold on, I've got a few more tricks that'll take this to another level.
Insider Tricks for Flawless Results
The Temperature Rule Nobody Follows
Most bakers bake at 350°F, but raising the temperature to 375°F for the last 2 minutes can give the cookies a slightly crisp edge while preserving a soft center. This trick creates a pleasing contrast in texture that’s perfect for impressing guests.
Why Your Nose Knows Best
The aroma of baking cookies is a reliable indicator of doneness. When the smell becomes rich and chocolatey, it’s time to pull them out. Trust your nose, especially if you’re using a home oven with uneven heat.
The 5-Minute Rest That Changes Everything
After baking, let the cookies rest on the sheet for exactly 5 minutes before moving them. This rest period allows the interior to set, preventing the cookies from cracking when they cool. I once tried skipping this step, and the cookies collapsed into a sticky mess.
Use a Squeeze Bottle for Drizzle Mastery
A squeeze bottle gives you precise control over the drizzle, creating neat lines or swirls. If you don’t have one, a plastic squeeze bottle works just as well. I’ve made a DIY version using a plastic bottle with a small hole punched in the cap.
Keep the Dough Cold, Not Hot
If you’re making a large batch, chill the dough for 30 minutes before scooping. Cold dough spreads less, leading to thicker, more decadent cookies. This trick is essential for large parties or when you want consistent results across many batches.
Why Your Cookies Stay Soft Longer
Storing cookies in an airtight container with a slice of apple or a piece of bread keeps them soft. The moisture from the apple or bread rehydrates the cookies, preventing them from drying out. I swear by this method; my friends keep asking where they get their soft cookies.
Creative Twists and Variations
This recipe is a playground. Here are some of my favorite ways to switch things up:
Minty Matcha Madness
Swap the peppermint extract for matcha powder and replace the green gel with a light green food coloring. The earthy matcha pairs beautifully with the chocolate, creating a sophisticated flavor profile that’s perfect for spring.
Nutty Delight
Add 1/2 cup chopped walnuts or pecans to the dough before baking. The nuts add crunch and a buttery flavor that complements the creamy texture of the cookie.
Chocolate Swirl
Instead of a drizzle, fold in a swirl of dark chocolate chips into the dough. The dark chocolate melts slightly during baking, creating a marbled effect that’s both visual and flavorful.
Almond Essence
Replace the vanilla extract with almond extract and add 1/4 cup almond flour. The almond flour gives the cookies a subtle nutty flavor and a slightly denser crumb.
Holiday Peppermint Crunch
Add 1/2 cup crushed candy canes to the dough. The candy cane pieces melt into a crunchy, minty texture that’s perfect for the holiday season.
Berry Burst
Fold in 1/2 cup fresh blueberries or raspberries into the dough before baking. The berries burst into juicy pockets, adding a fresh, fruity contrast to the rich chocolate.
Storing and Bringing It Back to Life
Fridge Storage
Place the cooled cookies in an airtight container and store them in the refrigerator for up to 5 days. The cool temperature keeps the cookies moist, and the flavor intensifies as the chocolate and peppermint meld together.
Freezer Friendly
Wrap the cookies individually in parchment paper and place them in a freezer bag. They’ll stay fresh for up to 3 months. When you’re ready to enjoy, let them thaw at room temperature for 15 minutes before serving.
Best Reheating Method
To revive frozen cookies, preheat the oven to 300°F (150°C) and bake for 5–7 minutes. Add a tiny splash of water to the bottom of the pan to create steam; this helps the cookies rehydrate and regain their softness. Once warmed, drizzle with a bit of melted white chocolate for that extra indulgence.