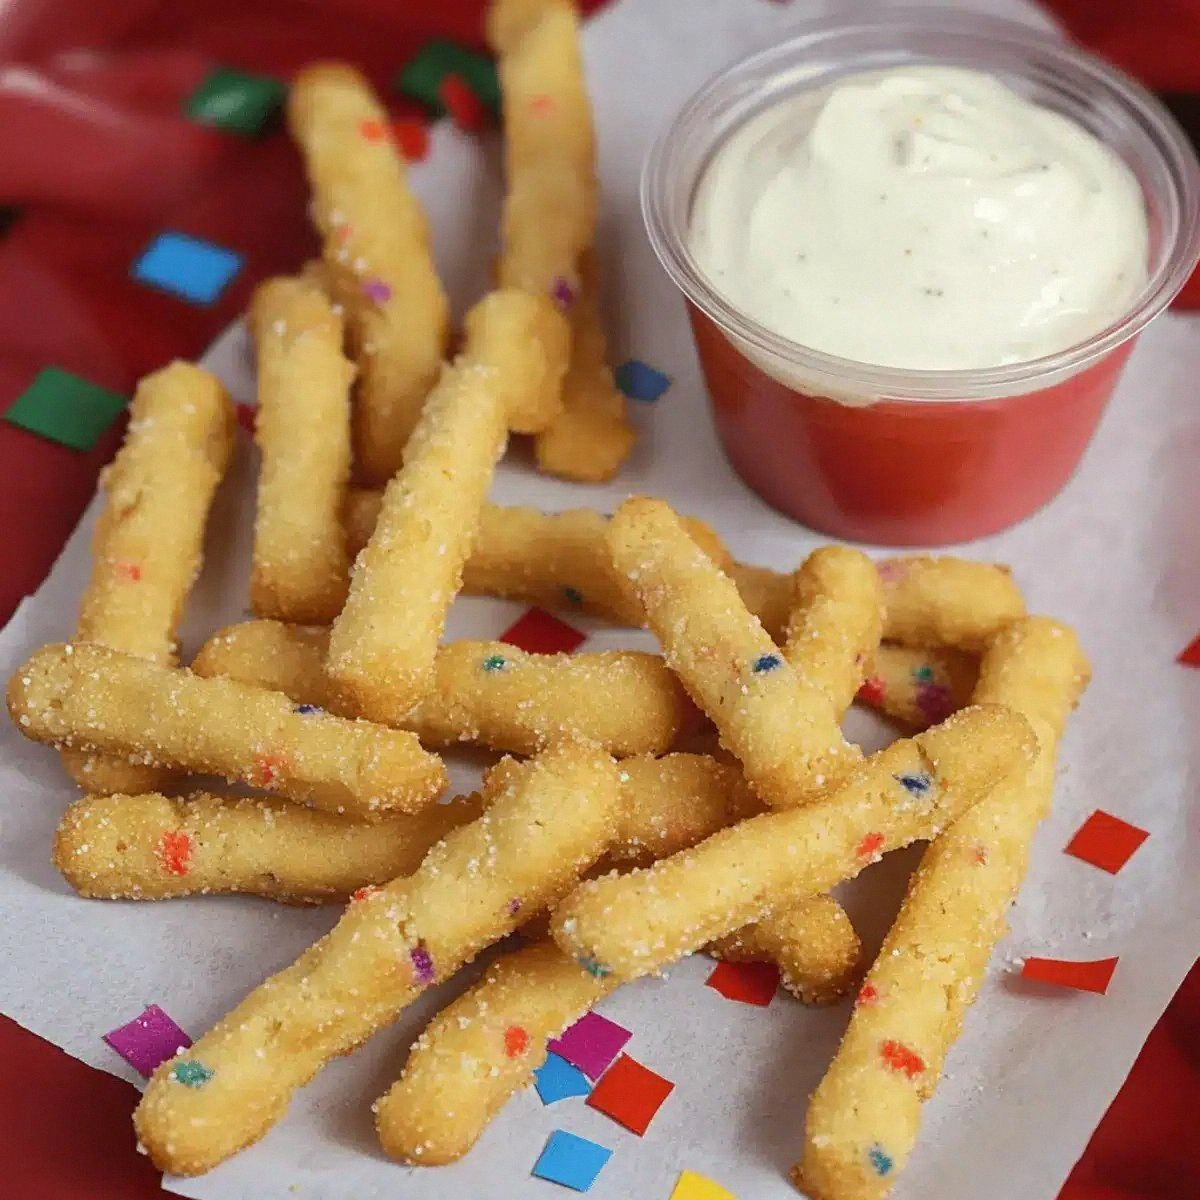
Picture this: I’m in the middle of a chaotic Saturday night, the kids are bouncing off the walls, and my partner just dared me to create something that would make the whole house stop, stare, and then devour it in one breathless gulp. I stared at my pantry, feeling the weight of countless cookie recipes that promised “soft and chewy” but delivered “meh.” Then, like a flash of neon, the idea struck – what if I took a classic cookie, sliced it into fry‑like sticks, and paired it with a frosting dip so creamy it could double as a frosting‑filled pillow? I grabbed a bag of colorful confetti sprinkles, a tub of cream cheese, and the most stubborn baking powder I could find, and the kitchen turned into a battlefield of butter, sugar, and pure anticipation.
The moment the butter hit the flour, the kitchen filled with a buttery perfume that made the whole house feel like a bakery on a Sunday morning. I could hear the gentle sizzle as the cookie dough hit the hot sheet pan, a sound like tiny fireworks announcing the start of something spectacular. The oven’s heat wrapped around the dough, turning the edges into a crisp that shivered like thin ice, while the centers stayed soft enough to melt in your mouth. When I finally lifted the tray, the golden‑brown fries glistened with a subtle sheen, each stick speckled with bright confetti that looked like edible fireworks ready to explode on your tongue.
This version stands out because it takes the nostalgia of a classic cookie and flips it—literally—into a handheld delight that’s perfect for sharing, dipping, and bragging about at any gathering. Most cookie‑fries recipes either skip the frosting dip or end up with a soggy mess; this one keeps the fries crisp, the dip velvety, and the flavors balanced like a well‑orchestrated symphony. The secret? A splash of cornstarch in the dough for that extra crunch, and a frosting made with cream cheese that hugs each fry like a warm blanket.
I’m about to spill the beans on the one technique that will change everything: chilling the dough for exactly 30 minutes before slicing. Trust me, this step is the difference between fries that crumble at the slightest touch and fries that hold their shape like miniature golden swords. I dare you to taste this and not go back for seconds. Let me walk you through every single step — by the end, you’ll wonder how you ever made it any other way.
What Makes This Version Stand Out
- Texture: The cornstarch creates a crisp outer shell while the interior stays soft and chewy, giving you that perfect contrast you crave.
- Flavor: A buttery base paired with brown sugar and vanilla creates a deep, caramel‑kissed taste that’s amplified by the bright confetti.
- Simplicity: Only twelve pantry staples are needed, and the steps are straightforward enough for a beginner yet rewarding for a seasoned baker.
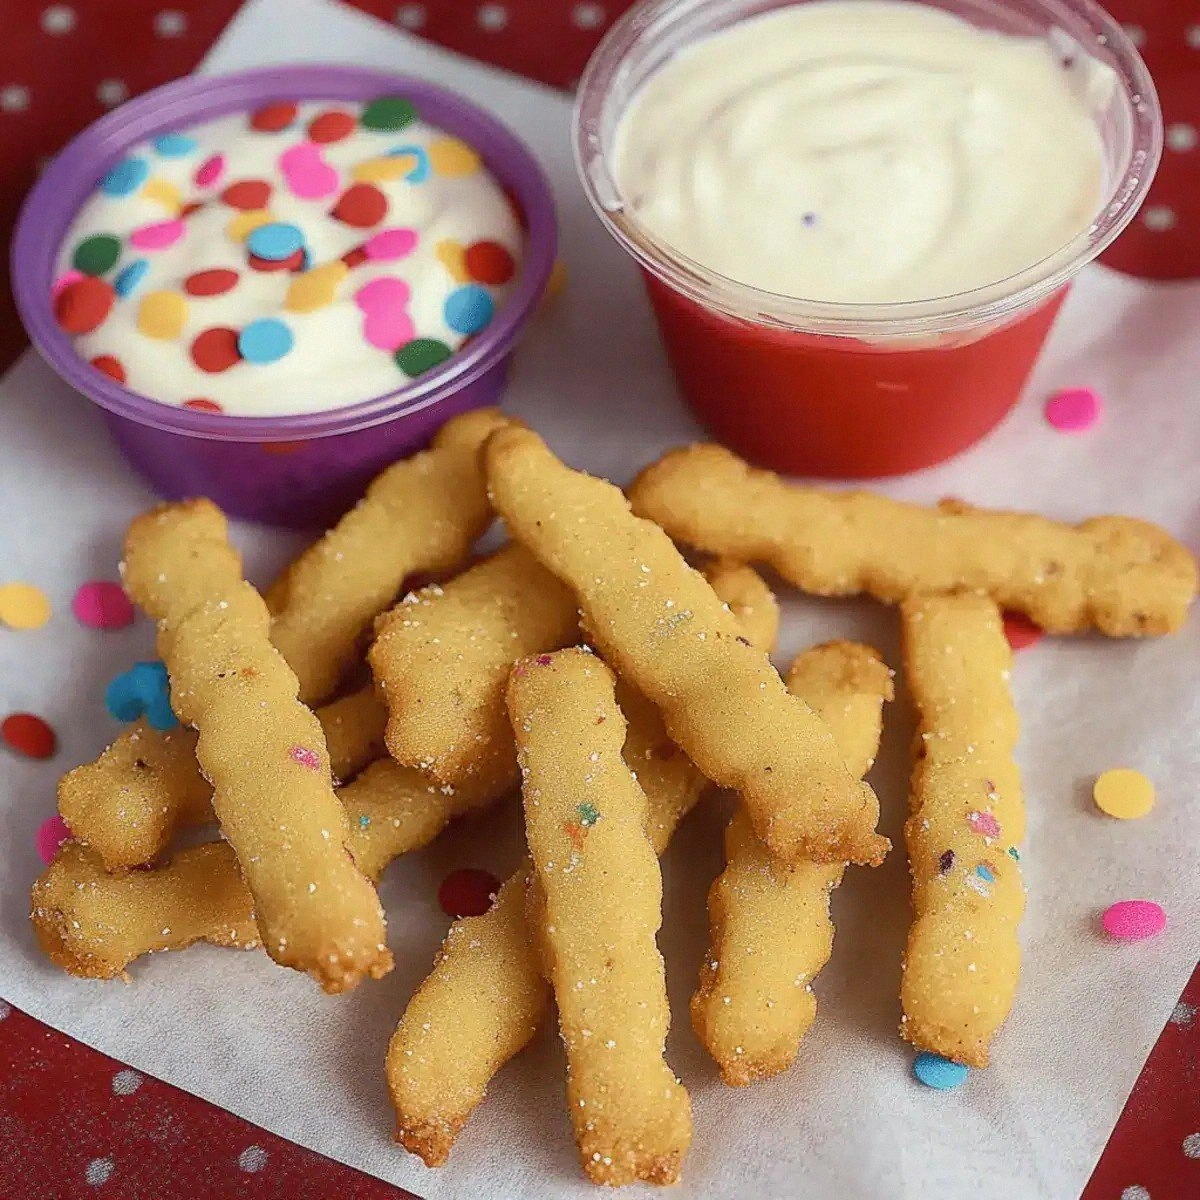
- Visual Appeal: The colorful sprinkles turn each fry into a miniature celebration, making it Instagram‑ready without any extra effort.
- Dip Perfection: The cream cheese frosting is thick enough to cling to each fry, yet smooth enough to melt on your palate.
- Make‑Ahead Potential: You can bake the fries ahead of time and store them; the dip can be refrigerated for up to three days, ready for impromptu snack attacks.
- Crowd Reaction: Expect gasps, giggles, and a line forming at the serving dish – this isn’t just a dessert, it’s a performance.
- Ingredient Quality: Using real butter and high‑quality vanilla extract makes the flavor sing, while the confetti adds a playful crunch.
Inside the Ingredient List
The Flavor Base
All‑purpose flour (2 cups): This is the structural backbone of the fries, providing gluten that holds everything together. If you skip it, the dough will crumble like dry sand, and you’ll lose that satisfying bite. For a gluten‑free twist, try a blend of rice flour and tapioca starch, but expect a slightly different texture.
Unsalted butter (½ cup): Butter adds richness and a deep, nutty aroma that sugar alone can’t achieve. Use real butter, not margarine, because the milk solids caramelize in the oven, creating that golden edge you love. If you’re dairy‑free, a solid coconut oil can substitute, though the flavor will shift toward tropical.
The Texture Crew
Cornstarch (½ cup): This is the secret weapon for crunch. It absorbs moisture and creates a delicate, airy crust that shatters like thin ice when you bite. Skipping it will give you a dense cookie‑like fry, which is nice, but not the magical snap we’re after.
Baking powder (1 tsp): A modest lift ensures the fries puff just enough to stay light without becoming cake‑like. Over‑leavening will make them too airy and cause them to fall flat once cooled.
Brown sugar (1 cup): Its molasses notes bring depth and a caramel undertone that pairs perfectly with the vanilla. White sugar would make the fries too sweet without that buttery richness.
The Unexpected Star
Colorful edible confetti or sprinkles (½ cup): Beyond the visual fireworks, the tiny sugar crystals add a subtle crunch that contrasts the soft interior. If you’re allergic to certain dyes, opt for natural confetti made from beet or spirulina powders.
Large egg (1 large): The egg binds everything, adding moisture and a golden hue. It also helps the fries hold their shape during baking. A flax egg can work for vegans, but expect a slightly different texture.
The Final Flourish
Pure vanilla extract (1 tsp): Real vanilla is the silent hero, enhancing every other flavor. Artificial vanilla can taste flat, so invest in a good bottle.
Heavy cream (1 cup) & Cream cheese (8 oz): These two combine to create the frosting dip that’s thick, tangy, and luxurious. The cream adds body while the cream cheese gives that slight tang that cuts through the sweetness.
Powdered sugar (2 cups): This sweetens the dip without adding grit, ensuring a smooth, melt‑in‑your‑mouth coating. Sift it to avoid lumps.
Everything's prepped? Good. Let's get into the real action…
The Method — Step by Step
Preheat your oven to 375°F (190°C) and line two large baking sheets with parchment paper. As the oven warms, the kitchen fills with a faint, buttery scent that hints at the magic to come. This is the moment of truth – if the oven isn’t hot enough, the fries won’t get that coveted crisp edge.
In a large mixing bowl, whisk together the flour, cornstarch, kosher salt, and baking powder until fully combined. The dry mixture should look uniform, with no specks of salt or powder left behind. Power transition: Okay, ready for the game‑changer?
In a separate bowl, cream the softened butter with the brown sugar until the mixture is light, fluffy, and the color has lightened by about two shades. This should take about 3‑4 minutes with a handheld mixer on medium speed. When you lift the beaters, the mixture should form a soft ribbon that falls back slowly.
Add the egg and vanilla extract to the butter‑sugar blend, beating until fully incorporated. The batter will look glossy and slightly thick. Watch Out: Over‑mixing at this stage can incorporate too much air, causing the fries to puff up excessively.
Gradually add the dry ingredient mixture to the wet ingredients, mixing on low speed until a cohesive dough forms. It will feel slightly sticky but should pull away from the sides of the bowl. If the dough feels too wet, sprinkle in an extra tablespoon of flour – but be careful not to over‑dry.
Fold in the colorful confetti or sprinkles, distributing them evenly. The specks should swirl through the dough like tiny fireworks, promising bursts of flavor in every bite. This is the fun part – watch those colors dance!
Transfer the dough onto a lightly floured surface and gently pat it into a ½‑inch thick rectangle. Using a sharp knife or a pizza cutter, slice the dough into 1‑inch wide sticks, resembling classic fries. Place the sticks on the prepared baking sheets, leaving about an inch of space between each.
Slide the trays into the preheated oven and bake for 12‑15 minutes, or until the edges turn a light golden brown and the tops begin to set. You’ll hear a faint crackle as the fries start to crisp – that sizzle when it hits the pan? Absolute perfection. Rotate the trays halfway through for even browning.
While the fries bake, prepare the frosting dip. In a medium bowl, beat the softened cream cheese until smooth, then gradually add the heavy cream, beating until the mixture is light and fluffy. Finally, sift in the powdered sugar and continue beating until the dip holds soft peaks. The frosting should be thick enough to hold its shape when scooped but still pourable.
Remove the fries from the oven and let them cool on a wire rack for 5 minutes. This brief rest lets the interior set while the exterior retains its crunch. Serve the fries warm, arranged in a basket or on a platter, with the frosting dip in a generous bowl at the center. And now the fun part – dunk, bite, and watch the frosting melt into the crispy crevices.
That's it — you did it. But hold on, I've got a few more tricks that'll take this to another level…
Insider Tricks for Flawless Results
The Temperature Rule Nobody Follows
Most home bakers bake at 350°F, but cranking it up to 375°F creates a rapid steam burst that gives the fries that coveted snap. I once tried 350°F and the fries turned out soft, like a cookie that never learned to be a fry. Trust the higher heat; the edges will pull away from the pan, signaling perfect crispness.
Why Your Nose Knows Best
Instead of watching the timer obsessively, learn to trust your sense of smell. When the butter‑sugar mixture starts to emit a caramel aroma and the fries release a nutty scent, you know they're nearing perfection. If you ignore this cue, you risk over‑browning and a bitter aftertaste.
The 5‑Minute Rest That Changes Everything
After baking, let the fries rest on a wire rack for exactly five minutes. This short pause allows the interior steam to redistribute, preventing the fries from becoming soggy. I tried skipping this step once; the result was a limp, sad fry that fell apart in the dip.
Double‑Dip Delight
For an indulgent twist, dip each fry first in the frosting, then quickly roll it in a second handful of confetti. The second coating sticks to the frosting, creating a crunchy, sweet shell that amplifies the visual appeal. Your guests will think you’ve hidden a secret topping inside each bite.
Freeze‑Proof Frosting
If you need to make the dip ahead of time, freeze it in ice‑cube trays. When you’re ready to serve, blend the frozen cubes with a splash of milk or extra cream to revive the silky texture. This method keeps the dip fresh for up to a week without separating.
Creative Twists and Variations
This recipe is a playground. Here are some of my favorite ways to switch things up:
Chocolate‑Covered Dream
Swap the vanilla extract for 1 tsp of almond extract and drizzle melted dark chocolate over the finished fries. The bittersweet chocolate pairs beautifully with the caramel notes, and the almond adds a subtle depth.
Spicy Cinnamon Kick
Add ½ tsp of ground cinnamon and a pinch of cayenne to the dry ingredients. The warm spice complements the brown sugar, while the cayenne provides a surprising heat that makes the dip feel cooler by contrast.
Nutty Crunch Variation
Fold in ¼ cup of finely chopped toasted almonds or hazelnuts into the dough. The nuts introduce an extra layer of crunch and a nutty aroma that elevates the overall flavor profile.
Seasonal Fruit Swirl
Incorporate ¼ cup of freeze‑dried raspberry powder into the frosting for a tangy fruit burst. The bright pink hue also makes the dip look festive for spring gatherings.
Vegan Friendly
Replace butter with coconut oil, use a plant‑based cream cheese, and swap the egg for a flax “egg” (1 tbsp ground flaxseed mixed with 3 tbsp water). The texture changes slightly, but the fries remain delightfully crisp.
Savory Sweet Fusion
Omit the confetti, add ¼ tsp of smoked paprika to the dry mix, and serve with a goat cheese dip instead of the sweet frosting. This creates a sweet‑savory snack perfect for brunch.
Storing and Bringing It Back to Life
Fridge Storage
Place the cooled fries in an airtight container lined with a paper towel to absorb excess moisture. They’ll stay crisp for up to three days. Keep the frosting dip in a separate sealed jar; stir before serving.
Freezer Friendly
Arrange the baked fries on a parchment‑lined tray and freeze until solid, then transfer to a zip‑top bag. They can be stored for up to two months. When ready, bake at 350°F for 8‑10 minutes, adding a splash of water to the pan to re‑steam the fries and restore crispness.
Best Reheating Method
For the ultimate crunch, reheat in a preheated oven at 375°F for 5‑7 minutes. Before reheating, lightly mist the fries with water; this creates steam that revives the interior while the high heat re‑crisp the exterior. Avoid microwaving – it will make them rubbery.