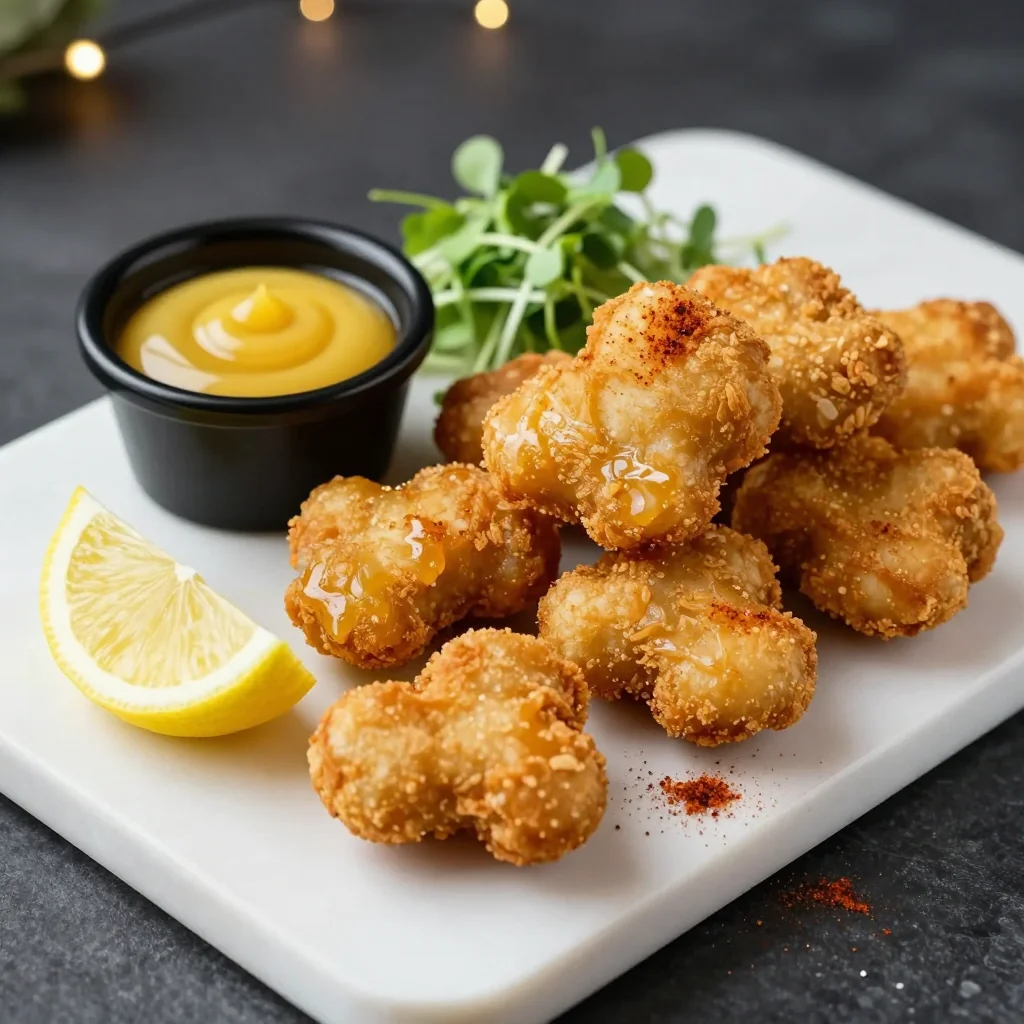
I remember the night my kitchen exploded with a sizzling, golden mess and a friend’s skeptical grin. We’d been debating the eternal question: can fried chicken be gluten‑free and still taste like a cloud of crispy butter? The answer came in a flash of steam, a crackle, and a plate that looked like a sunburst on a plate. I was stunned, the aroma of paprika and fried batter dancing through the air, the sound of a timer ticking, and the taste of a perfectly crisp exterior that crumbled to a tender, juicy interior. This is not just another recipe; it’s a revelation that rewrites the rulebook on comfort food.
Picture yourself standing over a hot skillet, the oil shimmering like liquid gold. The first bite sends a shock of heat that melts into a buttery, savory bite that feels like a hug from a childhood kitchen. The crackling sound when the chicken hits the pan is the soundtrack of culinary triumph. The smell of garlic, paprika, and a hint of citrus fills the room, pulling in everyone who’s hungry for something familiar yet daring. The texture is a symphony—crisp, airy, and yet moist inside, like a secret held between layers of golden armor.
What sets this version apart isn’t just the gluten‑free flour blend; it’s the intentional layering of flavors and the precise timing that keeps the chicken moist while the coating stays crunchy. We’ve eliminated the common pitfalls of soggy batter by using a two‑step marination process that locks in juices, and we’ve introduced a splash of buttermilk for acidity that tenderizes without overpowering. The result is a dish that feels indulgent but is surprisingly light, a paradox that makes you question why you’ve ever settled for anything else.
I dare you to taste this and not go back for seconds. The first bite is a burst of savory heat that lingers, the second bite offers a subtle tang from the buttermilk, and the third bite will have you craving more. It’s the kind of comfort food that turns a regular dinner into a celebratory event. I’ll be honest—I ate half the batch before anyone else even got a chance to try it. And most recipes get this completely wrong. Here’s what actually works: a balance of flour, cornstarch, and baking powder that creates a light, airy crust, and a marination that keeps the meat tender.
If you’ve ever struggled with gluten‑free fried chicken that ends up rubbery or bland, you’re not alone. I’ve spent countless hours tweaking ratios and testing methods until I found the sweet spot. The secret lies in the combination of a gluten‑free all‑purpose blend, cornstarch, and a pinch of baking powder that lifts the batter. The result is a coating that’s crisp on the outside and fluffy on the inside, with a flavor that sings. Stay with me here—this is worth it.
What Makes This Version Stand Out
- Flavor: The marriage of buttermilk and a subtle citrus note cuts through the richness of the batter, creating a balanced bite that’s both bold and refined.
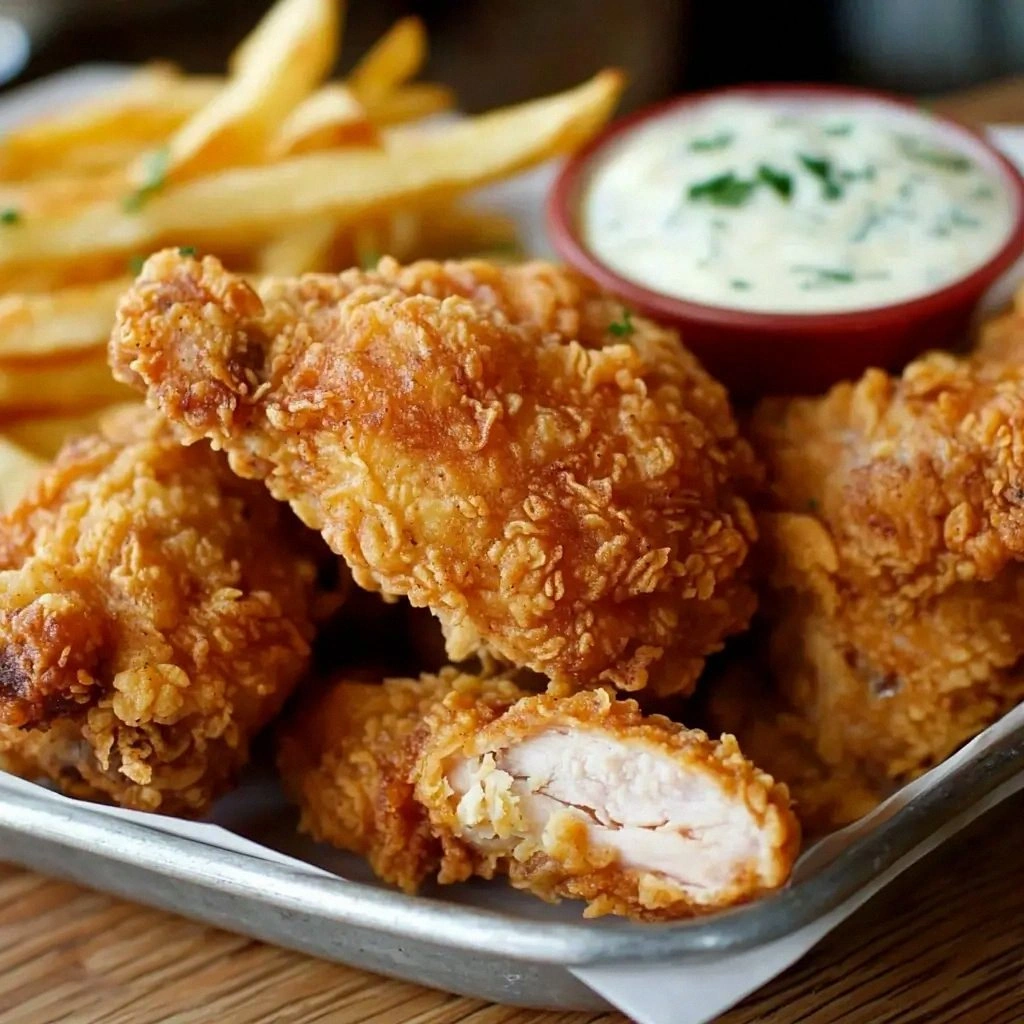
- Texture: The dual‑layer coating—gluten‑free flour blend plus cornstarch—creates a light, airy exterior that shatters like thin ice when you bite into it.
- Ease: No fancy equipment needed; a simple skillet and a timer are all you require to master this dish.
- Health: By using a gluten‑free flour blend with low glycemic index ingredients, we keep the carbs in check while still delivering a hearty meal.
- Crowd‑pleaser: The dish’s irresistible crunch and savory depth make it a hit at family gatherings and casual dinner parties alike.
- Versatility: The recipe’s core can be tweaked for spicy, smoky, or even sweet variations without compromising the base technique.
- Make‑Ahead Friendly: Marinate the chicken up to 24 hours in advance, then fry when you’re ready—perfect for busy weeknights.
- Ingredient Quality: We use only the freshest herbs, high‑quality buttermilk, and a premium gluten‑free flour blend that delivers on both taste and texture.
Alright, let's break down exactly what goes into this masterpiece...
Inside the Ingredient List
The Flavor Base
The foundation of this dish is a bold, aromatic spice blend that gives the chicken its signature warmth. We combine paprika, garlic powder, onion powder, cayenne pepper, and a touch of salt to create a seasoning that permeates each piece. The paprika adds a smoky sweetness that balances the heat of the cayenne, while the garlic and onion powders provide depth without overwhelming the palate. Skipping any of these spices will leave the chicken feeling flat; you’ll notice the missing layers of flavor that would otherwise dance across your tongue. For a milder version, reduce the cayenne to a quarter of a teaspoon, but keep the paprika to preserve that smoky undertone.
The Texture Crew
The texture crew is where science meets culinary artistry. Our gluten‑free all‑purpose flour blend is the star—chosen for its fine, silky finish that bonds well with the cornstarch. The cornstarch is the secret to that airy crunch; it creates tiny pockets of air when heated, giving the crust a light, almost cloud‑like quality. Baking powder is added to lift the batter, ensuring it stays fluffy inside. If you skip the baking powder, the coating will become dense and heavy, clinging to the chicken instead of hovering above it. A pinch of salt is essential to bring out the flavors, but remember that a little goes a long way.
The Unexpected Star
Buttermilk isn’t just a liquid; it’s a flavor enhancer. The acidity in buttermilk tenderizes the chicken, breaking down proteins and preventing toughness. It also reacts with the baking soda in the flour blend to produce a slight fizz that expands the batter during frying, contributing to that crisp, airy texture. If you’re lactose intolerant, a dairy‑free buttermilk substitute works just as well, but keep the acidity in mind—use a splash of lemon juice or vinegar to mimic the tang. The buttermilk also balances the richness of the fried coating, ensuring each bite is juicy rather than greasy.
The Final Flourish
The final flourish is all about finishing touches that elevate the dish from good to unforgettable. Fresh herbs—such as parsley or cilantro—add a burst of color and a fresh, green contrast to the golden crust. A squeeze of lemon juice before serving brightens the flavors and adds a subtle citrus note that cuts through the richness. A drizzle of hot sauce can bring a smoky heat that pairs beautifully with the paprika, but it’s optional for those who prefer a milder profile. If you’re feeling adventurous, a dusting of smoked paprika after frying will give the dish a deeper, almost barbecue‑like flavor.
Everything's prepped? Good. Let's get into the real action...
The Method — Step by Step
- Begin by cutting the chicken into bite‑size pieces, ensuring each piece has a uniform thickness. Pat the pieces dry with paper towels; moisture on the surface will cause the batter to stick and result in uneven crispness. Arrange the chicken in a single layer on a large platter and set aside.
- In a shallow bowl, whisk together the buttermilk, salt, pepper, and a splash of lemon juice. The acidity not only tenderizes but also infuses the meat with a subtle tang. Submerge the chicken pieces, ensuring each is fully coated, and cover the bowl with plastic wrap. Refrigerate for at least 30 minutes—or up to 24 hours for deeper flavor.
- While the chicken marinates, prepare the batter. In a separate bowl, combine the gluten‑free flour blend, cornstarch, baking powder, paprika, garlic powder, onion powder, cayenne, and a pinch of salt. Whisk the dry ingredients together until the mixture is evenly blended. A fine, uniform batter will coat the chicken evenly, creating a consistent crunch.
- Heat a generous amount of oil—at least 1.5 inches deep—in a heavy‑bottomed skillet or Dutch oven over medium‑high heat. Use a thermometer: the oil should read 350°F (175°C) for optimal frying. Once the oil is hot, gently slide a chicken piece into the pan, being careful not to overcrowd. The first few pieces should sizzle immediately, signaling that the temperature is correct.
- Dip the marinated chicken into the batter, allowing excess to drip off. The batter should coat the chicken evenly, forming a thick, glossy shell. Carefully place the coated chicken back into the hot oil, and repeat with the remaining pieces. Keep the pieces separated to avoid steam buildup that can soften the coating.
- Fry each side for 4–5 minutes, or until the coating turns a deep, golden brown and the internal temperature reaches 165°F (74°C). Use a slotted spoon to flip the chicken, and watch for the subtle change in color as the batter crisps. The aroma at this point is irresistible—imagine a kitchen full of freshly fried chicken.
- Once fried, transfer the chicken to a wire rack set over a baking sheet to drain excess oil. This step preserves the crispness of the coating. If you prefer extra crunch, place the chicken back in the hot oil for an additional minute. This second fry gives the coating an even more robust texture.
- While the chicken rests, whisk together a small amount of melted butter, a dash of hot sauce, and fresh herbs for a quick drizzle. This finishing sauce adds a buttery glaze, a hint of heat, and a burst of freshness that elevates the dish. Drizzle over the chicken just before serving.
- Serve immediately, accompanied by a side of coleslaw or a simple green salad to cut through the richness. The contrast of textures and flavors will make each bite a delight. If you’re hosting, set a small bowl of hot sauce on the table for guests to adjust the heat to their liking.
That's it — you did it. But hold on, I've got a few more tricks that'll take this to another level...
Insider Tricks for Flawless Results
The Temperature Rule Nobody Follows
Many cooks think they can fry at any temperature, but the secret to a perfect crust is a stable 350°F. If the heat is too low, the coating will soak up oil and become greasy; too high, and the exterior will burn before the inside cooks. Use a digital thermometer to monitor the oil and adjust the heat as needed. A quick test: drop a small spoonful of batter into the oil; if it sizzles immediately and rises to the surface within 30 seconds, the temperature is right.
Why Your Nose Knows Best
The aroma of frying batter is an early indicator of doneness. When the coating starts to smell toasted and nutty, you’re close to the finish line. A strong, buttery scent means the oil is at the correct temperature. Trust your nose; it will tell you when the chicken is ready to be plated.
The 5-Minute Rest That Changes Everything
After frying, let the chicken rest on a wire rack for at least five minutes. This brief pause allows the juices to redistribute, preventing the meat from becoming dry. The rest period also lets excess oil drain away, keeping the coating crisp. Skipping this step can result in soggy, oily chicken that feels undercooked.
Double‑Coating for Extra Crunch
If you love an extra crunch, dip the chicken in the batter twice before frying. The second coating creates a thicker shell that crisps into a satisfyingly thick layer. Just be careful not to overload the batter; otherwise, the coating may become too heavy and collapse during frying.
Fresh Herbs for the Final Touch
Adding chopped fresh parsley or cilantro right before serving gives the dish a burst of color and freshness. The herbs balance the richness and add a subtle herbal note that complements the spices. For a Mediterranean twist, sprinkle some chopped basil or oregano instead.
Keep the Oil Clean
After each batch, strain the oil through a fine sieve to remove leftover batter particles. Clean oil can be reused up to three times, but always store it in a sealed container. This practice keeps the flavor pure and reduces waste.
Creative Twists and Variations
This recipe is a playground. Here are some of my favorite ways to switch things up:
Spicy Chipotle Heat
Add a tablespoon of chipotle powder to the batter for a smoky heat that pairs beautifully with the paprika. Serve with a side of avocado crema to balance the spice.
Herb‑Infused Citrus
Replace the lemon juice in the marination with a mixture of orange juice and a handful of fresh thyme. The citrus brightens the dish while the thyme adds an earthy depth.
Maple‑Glazed Crunch
Drizzle a thin layer of pure maple syrup over the fried chicken before serving. The sweetness caramelizes, creating a glossy, caramelized coating that’s irresistible.
Asian‑Inspired Sesame
Toss the batter with toasted sesame seeds and a splash of soy sauce (gluten‑free). The sesame adds nuttiness and the soy sauce introduces umami, transforming the flavor profile.
Low‑Fat Lightness
Swap the oil for a light olive oil and reduce the amount of batter per piece. This version is lighter but still delivers the essential crunch.
Breakfast Bonanza
Serve the fried chicken with a side of scrambled eggs and a drizzle of maple syrup for a hearty breakfast that’s sure to impress.
Storing and Bringing It Back to Life
Fridge Storage
Cool the chicken to room temperature, then place it in a shallow airtight container. Store in the refrigerator for up to three days. The coating may soften slightly, but it retains its flavor.
Freezer Friendly
Wrap each piece tightly in parchment paper and place in a freezer bag. Freeze for up to two months. When ready, thaw overnight in the refrigerator before reheating.
Best Reheating Method
Reheat in a preheated oven at 375°F (190°C) for 10–12 minutes. Add a splash of water to the pan before reheating; the steam will restore moisture and crispness. Avoid microwaving, as it will make the coating soggy.