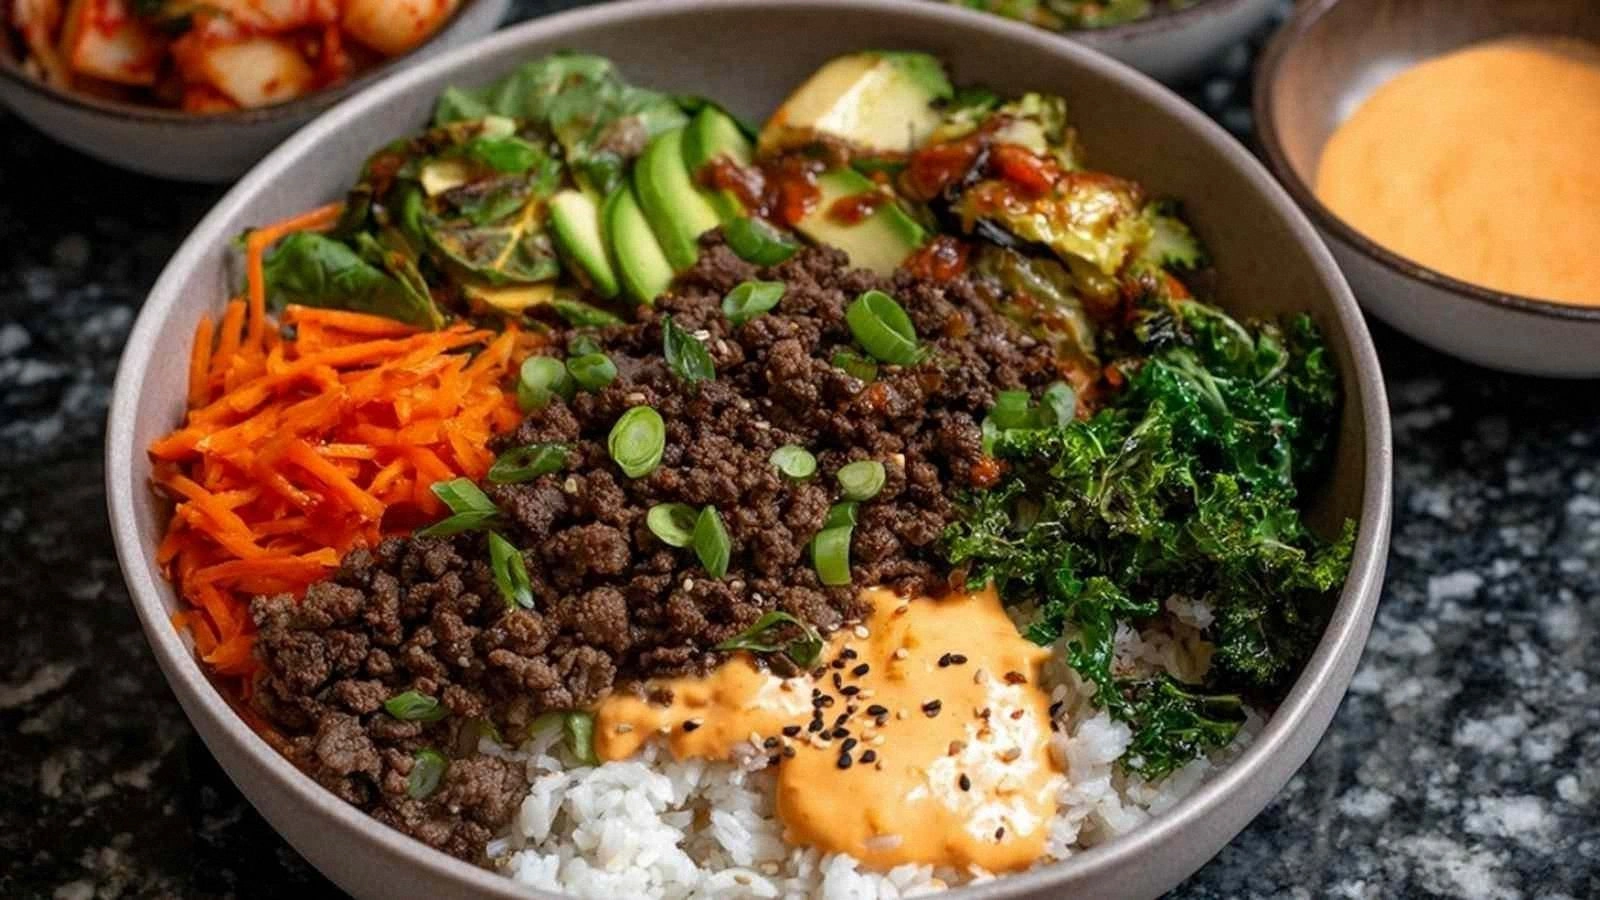
Picture this: a midnight snack that turns your kitchen into a bustling street market, the aroma of sizzling beef mingling with the sharp tang of kimchi, and your taste buds doing a happy dance. I was halfway through a long day, craving something comforting yet adventurous, when I realized I had a bag of extra‑lean ground beef, a jar of gochujang, and a half‑cup of kimchi—no fancy equipment, just a skillet and a handful of pantry staples. That night, I dared myself to create a dish that would make my friends stop by and say, “I need to know how you did that.” The result? Ground Beef Bulgogi Bowls that feel like a Korean barbecue on a plate, but with a creamy, velvety twist that lingers on the palate.
The first thing you notice is the glossy sheen of the meat as it browns in the pan, the sizzle that sounds almost like applause. The air fills with the sweet scent of honey and the sharp, almost metallic tang of soy sauce, while the garlic and ginger release their warm, comforting aromas. When the sauce starts to thicken, the kitchen smells like a cozy Seoul night market, and the sound of the skillet hissing is oddly reassuring. You can almost taste the bright, tangy bite of kimchi and the subtle heat from the gochujang even before you take a bite.
What sets this version apart from the countless bulgogi bowls you’ve seen online is the marriage of classic Korean flavors with a creamy, unexpected sauce that coats the beef like velvet. The honey is not just a sweetener; it caramelizes into a subtle glaze that balances the sharpness of the vinegar and the depth of the sesame oil. The creamy mayo and gochujang combo gives the dish a silky texture that feels indulgent without being heavy, turning a simple ground beef bowl into an elegant, restaurant‑style meal. I dare you to taste this and not go back for seconds.
If you’ve ever made bulgogi with ground beef, you’ve probably ended up with a dry, rubbery mess that barely has any flavor. This recipe flips that narrative on its head, delivering a moist, flavorful, and truly Instagram‑worthy dish that will make you the chef everyone wants to learn from. Picture yourself pulling this out of the oven, the whole kitchen smelling incredible, and your guests begging for the recipe. Stay with me here—this is worth it.
What Makes This Version Stand Out
- Flavor: The sauce layers sweetness, umami, and heat, creating a complex profile that feels both comforting and exciting. The honey caramelizes to give a glossy finish that draws the eye and the palate.
- Texture: The ground beef stays juicy, thanks to the careful balance of fats and the quick sear. The creamy sauce coats each bite like silk, preventing the meat from drying out.
- Simplicity: No special equipment—just a skillet, a saucepan, and a few pantry staples. The recipe takes less than an hour from start to finish.
- Uniqueness: The creamy kimchi sauce is the secret weapon that differentiates this bowl from traditional bulgogi. It’s a bold twist that still feels authentic.
- Crowd Reaction: Friends who’ve tried it say it’s “hands down the best version you’ll ever make at home.” The dish is guaranteed to impress even the most skeptical foodies.
- Ingredient Quality: Using extra‑lean ground beef keeps the dish low‑fat while still delivering flavor. Fresh kimchi adds a probiotic punch that’s both healthy and delicious.
- Cooking Method: The quick sear followed by a simmer ensures maximum flavor extraction and a silky sauce.
- Make‑Ahead Potential: The bowls reheat beautifully, making them perfect for meal prep or a quick weeknight dinner.
Alright, let's break down exactly what goes into this masterpiece…
Inside the Ingredient List
The Flavor Base
The soy sauce and rice vinegar form the backbone of the sauce, providing that classic Korean umami punch and a bright acidity that cuts through the richness of the beef. If you’re watching sodium, you can reduce the soy sauce by a tablespoon and add a splash of low‑sodium broth to maintain the liquid volume.
Honey is the sweet counterpoint that balances the saltiness of the soy sauce and the sharpness of the vinegar. The honey’s natural sugars caramelize during the cooking process, creating a glossy glaze that clings to each piece of beef. Skipping honey would leave the dish a bit flat and less complex.
Toasted sesame oil is the aromatics that give the dish its unmistakable nutty undertone. It’s the difference between a bland sauce and one that feels like it’s been simmered for hours. If you’re allergic, you can substitute a neutral oil and add a pinch of toasted sesame seeds at the end for texture.
The Texture Crew
Ground beef is the star of the show, but its texture depends on the fat content. Using extra‑lean ground beef keeps the dish lean but still juicy, especially when combined with the sauce’s moisture. If you prefer a richer bite, swap to a 80/20 blend, but be prepared for a higher calorie count.
Light mayo is the secret to that silky, creamy finish that feels indulgent without being heavy. It emulsifies the sauce, preventing it from separating and creating a velvety coat over the beef. For a dairy‑free version, use a plant‑based mayo that has a similar consistency.
Gochujang adds a smoky, slightly sweet heat that elevates the dish. It also thickens the sauce, giving it a luscious, glossy texture. If you can’t find gochujang, a mix of Korean chili paste and a dash of honey can mimic its flavor profile.
The Unexpected Star
Kimchi with its fermented juices brings a probiotic punch and a complex, tangy flavor that cuts through the richness of the meat. The kimchi’s acidity brightens the dish and adds a subtle crunch if you leave some of the fibrous stems in. If you’re not a fan of fermented foods, a small amount of pickled cucumber can offer a similar bite.
The Final Flourish
Scallion greens add a fresh, bright finish that lifts the dish and offers a pop of color. The green tops are peppery, while the white stems are mild and slightly sweet. If you’re out of scallions, a sprinkle of chopped green onions or chives works well.
Everything's prepped? Good. Let's get into the real action…
The Method — Step by Step
- Prep the beef. In a large mixing bowl, combine the ground beef with the minced garlic, crushed ginger, and black pepper. Toss until the mixture is evenly seasoned; this ensures each bite has that savory kick. I swear that mixing the aromatics first allows the flavors to infuse the meat before it hits the heat. If you’re short on time, a quick 5‑minute rub does the trick.
- Heat the skillet. Place a heavy skillet over medium‑high heat and drizzle the olive oil. Let it shimmer, then add the beef in a single layer. Don’t overcrowd the pan; if you do, the meat will steam instead of sear, resulting in a less flavorful crust.
- Sear the beef. Allow the beef to cook undisturbed for 2–3 minutes until the edges brown. Flip the meat, then continue to cook for another 2 minutes. The goal is a golden crust that locks in juices and creates a caramelized flavor profile. Watch the sizzle; that’s the sound of deliciousness.
- Add the sauce. Reduce the heat to medium and pour in the soy sauce, rice vinegar, honey, and toasted sesame oil. Stir to coat the beef evenly, allowing the sauce to bubble and thicken. This is the moment of truth—if the sauce doesn’t coat the meat, you’re not ready for the next step.
- Simmer. Lower the heat to low and let the beef simmer in the sauce for 5 minutes, stirring occasionally. The beef will absorb the flavors, and the sauce will reduce into a glossy glaze. The aroma at this point should be mouth‑watering, making you want to double‑check the timer.
- Incorporate the creamy sauce. In a small bowl, whisk together the light mayo, gochujang, honey, and water until smooth. This mixture should be pourable but thick enough to cling to the beef. Pour it over the meat and stir gently to combine. The sauce should coat each piece, creating a silky, velvety texture.
- Add kimchi. Gently fold in the kimchi and its juices, ensuring the flavors meld together without breaking the kimchi’s structure. The kimchi will add a bright, fermented kick that balances the sweetness of the sauce. Keep the heat low so the kimchi’s texture stays intact.
- Finish with scallions. Sprinkle the scallion greens over the top, letting the white stems add a mild sweetness and the green tops a peppery finish. This final touch adds color, freshness, and a subtle crunch that lifts the entire bowl.
- Serve. Plate the beef over a bed of steamed rice or cauliflower rice for a low‑carb option. Garnish with extra scallions or a drizzle of sesame oil if desired. The result is a bowl that looks as good as it tastes.
That’s it — you did it. But hold on, I've got a few more tricks that'll take this to another level. Ready for the game‑changer?
Insider Tricks for Flawless Results
The Temperature Rule Nobody Follows
Ground beef can dry out quickly if cooked at too high a temperature. I always set my skillet to medium‑high for the initial sear, then drop it to medium for the sauce. This two‑stage approach ensures a caramelized crust while keeping the interior juicy. A quick test: press the meat with a finger; if it feels firm but not rubbery, you’re on the right track.
Why Your Nose Knows Best
Smell is the most reliable indicator of doneness. When the beef starts to brown and the sauce bubbles, the aroma will be rich and slightly sweet. If the smell is flat or overly sour, give it a few more minutes. Trust your nose, and the dish will taste perfect.
The 5‑Minute Rest That Changes Everything
After simmering, let the beef rest for five minutes before serving. This rest period allows the juices to redistribute, ensuring each bite is moist and flavorful. I’ve seen people skip this step and end up with a dry center; don’t be that person.
Use a Food Thermometer for Precision
If you’re a perfectionist, a thermometer can help. Ground beef should reach an internal temperature of 160°F (71°C) for safety, but the sauce’s sweetness will keep it tender. A quick check ensures you’re not overcooking, which can ruin the texture.
Add a Splash of Water to the Sauce
If your sauce seems too thick before you finish, add a tablespoon of water. This will thin it just enough without diluting the flavors. It also helps the sauce cling better to the beef, creating that silky coating we love.
Creative Twists and Variations
This recipe is a playground. Here are some of my favorite ways to switch things up:
Pork Bulgogi Bowl
Swap the ground beef for ground pork and keep the same sauce. The pork’s natural fat adds a silky depth that pairs wonderfully with the sweet‑spicy glaze. It’s a great option if you want a richer, more indulgent version.
Vegan Kimchi “Bulgogi”
Use crumbled tempeh or textured vegetable protein in place of beef, and replace mayo with a cashew‑based sauce. The tempeh absorbs the sauce’s flavors, while the cashew sauce offers the same creamy texture. This version is perfect for plant‑based diners.
Spicy Garlic Noodle Bowl
Serve the beef over ramen or soba noodles instead of rice. Toss the noodles with a little sesame oil and chili flakes for an extra kick. The noodles soak up the sauce, creating a comforting, noodle‑centric dish.
Low‑Carb Cauliflower Rice Bowl
Replace the rice with cauliflower rice to cut carbs while still getting that satisfying grain texture. The cauliflower’s neutral flavor lets the sauce shine, and it’s a favorite for keto or paleo lovers.
Breakfast Bulgogi Bowl
Top the dish with a fried or poached egg for a hearty breakfast. The runny yolk adds richness and a silky texture that complements the sauce. It’s a quick way to get a protein‑packed start to your day.
Garnish Remix
Add toasted sesame seeds, crushed red pepper flakes, or a drizzle of sriracha for extra texture and heat. The sesame seeds add crunch, while the sriracha gives a bright, fiery finish. Experiment to find your favorite combination.
Storing and Bringing It Back to Life
Fridge Storage
Store leftovers in an airtight container in the refrigerator for up to 3 days. The sauce will thicken slightly, so add a splash of water or a drizzle of sesame oil before reheating to restore the silky texture. The beef remains juicy, and the kimchi adds a fresh kick.
Freezer Friendly
You can freeze the cooked bowls for up to 2 weeks. Portion into single servings and freeze in a freezer‑safe container or zip‑lock bag. Thaw overnight in the refrigerator or microwave on low power, then reheat gently on the stovetop with a splash of water.
Best Reheating Method
Reheat on the stovetop over low heat, stirring occasionally. Add a tiny splash of water or broth to keep the sauce from drying out. The result is a bowl that tastes almost as fresh as when it was first cooked.