Picture this: a Saturday morning, the kitchen lights flicker, and you’re staring at a bag of stale Hawaiian rolls that have seen better days. I was in a culinary bind, craving something sweet, savory, and utterly breakfast‑worthy, when I realized those rolls could be the secret to an instant crowd‑pleaser. I pulled a bag of fresh rolls from the freezer, because, let’s face it, nothing beats the aroma of warm bread when it starts to steam. I dared myself to turn that simple loaf into a breakfast slider that would make your taste buds do a happy dance, and the result was nothing short of a revelation. I dare you to taste this and not go back for seconds. That’s the kind of confidence that comes from a kitchen where creativity meets practicality. Most recipes get this completely wrong. They either over‑season or under‑cook the fillings, but I’ve cracked the code to keep each bite perfectly balanced. Picture yourself pulling this out of the oven, the whole kitchen smelling incredible, the sliders golden and the fillings steaming—just the way you want it. Let me walk you through every single step — by the end, you'll wonder how you ever made it any other way.
What Makes This Version Stand Out
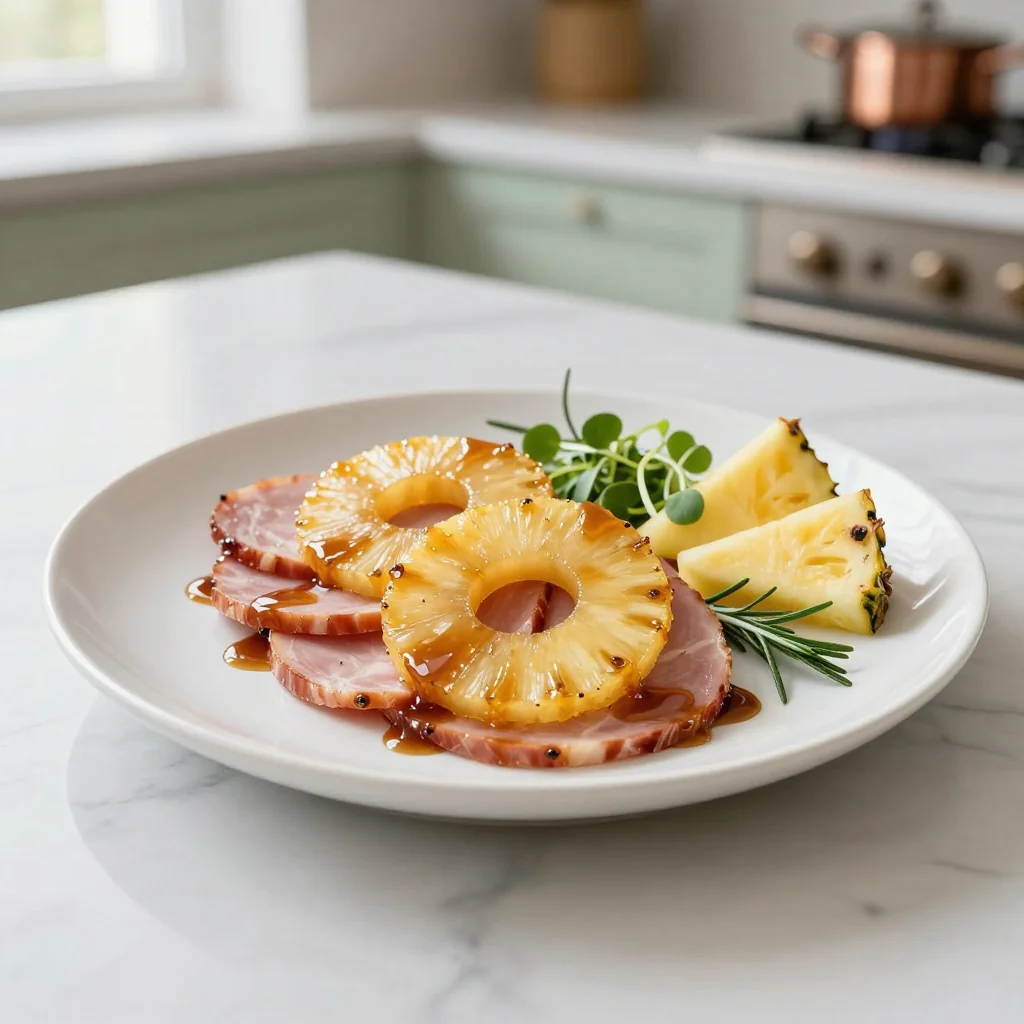
- Flavor Fusion: The marriage of sweet pineapple, salty ham, and savory cheese creates a taste profile that feels like a tropical vacation in your mouth. It’s not just breakfast; it’s a mini adventure that wakes up all five senses.
- Texture Triumph: The soft, pillowy Hawaiian roll contrasts with the crispy edges of bacon and the gooey melt of cheese, giving each bite a satisfying crunch that shatters like thin ice.
- Time Efficiency: This recipe takes less than 45 minutes from start to finish, making it perfect for busy mornings or last‑minute brunches.
- Ingredient Quality: Using high‑grade ham and real pineapple chunks elevates the dish from ordinary to extraordinary, ensuring every component shines.
- Make‑Ahead Flexibility: Assemble the sliders a day ahead, refrigerate, and finish cooking just before serving—no fuss, no waste.
- Audience Appeal: From kids who love the sweet‑savory combo to adults craving a hearty breakfast, these sliders win at family tables and dinner parties alike.
- Visual Appeal: The golden crusts, bright fruit, and melted cheese make for Instagram‑ready food that practically sells itself.
Alright, let's break down exactly what goes into this masterpiece...
Inside the Ingredient List
The Flavor Base
The foundation of any great slider is its flavor base, and in this case, it’s the sweet and salty duo of pineapple and ham. The pineapple brings a natural sweetness that cuts through the richness of bacon and cheese, creating a balanced bite. If you skip the pineapple, the sliders become heavy and one‑dimensional, lacking that bright pop that keeps guests coming back for more. A great swap is using diced mango for a tropical twist, but keep the pineapple for the original experience. When buying pineapple, look for pieces that are firm yet slightly soft—this indicates juiciness without a mushy texture.
The Texture Crew
Texture is everything in a slider. The Hawaiian roll, known for its soft crumb and slightly sweet flavor, serves as the perfect vessel. The bacon provides a crispy, savory crunch that contrasts beautifully with the melt of cheese. If you’re vegan or vegetarian, consider using tempeh bacon or a plant‑based cheese to mimic the same mouthfeel. Remember, the roll should be fresh enough to hold fillings without becoming soggy; a slightly stale roll can absorb excess moisture and ruin the bite.
The Unexpected Star
The unexpected star of this recipe is the subtle kick of a hint of garlic powder in the egg mixture. A whisper of garlic elevates the savory profile without overpowering the sweet elements. Some chefs add a dash of hot sauce for a fiery finish, but the original version keeps it mellow. If you prefer a completely savory slider, you can replace the pineapple with sautéed mushrooms, which add umami depth. The key is to maintain the sweet‑savory balance that defines breakfast sliders.
The Final Flourish
The final flourish comes in the form of a light drizzle of honey or a smear of Dijon mustard, depending on your preference. Honey adds a caramelized sweetness that pairs with the cheese, while mustard introduces a tangy bite that cuts through the richness. If you’re looking to keep it simple, a small dollop of mayo or aioli works wonders, giving a creamy texture that ties everything together. Always taste before adding the final touch—balance is the name of the game.
Everything's prepped? Good. Let's get into the real action...

The Method — Step by Step
- Preheat and Prep: Heat your oven to 375°F (190°C) and line a baking sheet with parchment paper. While the oven warms, slice the Hawaiian rolls in half, creating a sturdy base and a top that will hold the fillings. This is the moment of truth—your bread must be fresh enough to hold everything without cracking. If the rolls feel too dry, lightly mist them with water before slicing.
- Cook the Bacon: In a large skillet over medium heat, cook the bacon slices until they’re crisp and golden. As the bacon renders, the fat will seep into the pan, creating a flavorful base for the eggs. Once done, transfer the bacon to a paper towel to drain. The residual grease will be used for cooking the eggs, ensuring a richer taste.
- Whisk the Eggs: In a mixing bowl, whisk together the eggs, a pinch of salt, pepper, and a dash of garlic powder. Add a splash of milk for extra fluffiness. This egg mixture will act as the binder, keeping the ham, cheese, and pineapple together. Beat until the whites and yolks are fully incorporated—no streaks allowed.
- Combine Fillings: In the same skillet, after draining the bacon fat, sauté the diced ham for 2 minutes until it starts to brown slightly. Then, add the pineapple chunks and cook until they’re just warmed through. The combination of ham and pineapple creates a savory-sweet harmony that’s central to the slider’s flavor.
- Cook the Egg Mixture: Pour the whisked eggs into the skillet with the ham and pineapple. Stir gently, allowing the eggs to scramble around the fillings. Cook until the eggs are just set, then remove from heat. The goal is a fluffy, lightly set texture that holds the fillings together without becoming rubbery.
- Assemble the Sliders: Place a generous spoonful of the egg and filling mixture onto the bottom half of each roll. Sprinkle a slice of cheese over the top of the mixture, allowing it to melt slightly from the residual heat. Then, add a strip of bacon for that crisp, salty finish.
- Bake to Perfection: Arrange the assembled sliders on the prepared baking sheet. Slide the sheet into the preheated oven and bake for 8–10 minutes, or until the cheese is melted and the roll tops are golden brown. Keep an eye on the sliders—if the tops brown too quickly, reduce the temperature slightly.
- Finish with a Finish: Remove the sliders from the oven and let them rest for 2 minutes. While they’re still warm, drizzle a thin line of honey or spread a light smear of Dijon mustard on top. This final flourish adds a subtle sweetness or tang that ties all the flavors together.
- Serve Immediately: Slice each slider in half if desired, and serve hot. The combination of warm, melty cheese, crisp bacon, and juicy pineapple will keep guests reaching for more. That’s it — you did it. But hold on, I've got a few more tricks that'll take this to another level…
Insider Tricks for Flawless Results
The Temperature Rule Nobody Follows
Many cooks swear by a low oven temperature, but the secret to a perfect slider is a moderate heat that allows the cheese to melt without the roll becoming soggy. Aim for 375°F (190°C) and keep a close eye on the sliders—if they start to brown too quickly, reduce the heat by 25°F. This small tweak ensures a golden crust while preserving the inner moisture.
Why Your Nose Knows Best
Smell is a powerful indicator of doneness. When the sliders are ready, the aroma of melted cheese, sizzling bacon, and sweet pineapple will mingle in a heavenly perfume. Trust your nose; if it smells toasty and inviting, the sliders are ready to serve. This sensory checkpoint saves you from overcooking.
The 5-Minute Rest That Changes Everything
Letting the sliders rest for 5 minutes after baking allows the fillings to settle and the cheese to firm up slightly. This short pause prevents the fillings from sliding off when you cut into them. A friend once tried cutting immediately, and the result was a messy, collapsed slider—lesson learned.
Use Fresh Pineapple for a Sweet Kick
The freshness of pineapple determines the slider’s sweet balance. A fresh pineapple will provide a juicy burst that complements the savory components. If fresh pineapple is out of season, canned pineapple in juice (not syrup) works, but drain well to avoid sogginess.
Cheese Choice Matters
While cheddar melts beautifully, a sharper cheese like Gruyère adds a nutty depth that elevates the dish. If you’re aiming for a milder flavor, mozzarella offers a gooey texture without overpowering the other ingredients. Experimentation is key—your palate will thank you.
Keep the Rolls Warm Until Serving
Place the finished sliders on a wire rack over a baking sheet and keep the oven on low (200°F/90°C) for a few minutes. This keeps the rolls from cooling too quickly, maintaining that desirable softness. If you’re serving later, wrap the sliders in foil and reheat at 350°F for 5 minutes.
Creative Twists and Variations
This recipe is a playground. Here are some of my favorite ways to switch things up:
Veggie‑Loaded Slider
Swap the ham for sautéed spinach and mushrooms, and replace the cheese with a sprinkle of feta. The earthy flavors pair beautifully with the sweet roll, creating a vegetarian delight that still feels indulgent.
Spicy Jalapeño Kick
Add thinly sliced jalapeños to the egg mixture and drizzle a dash of sriracha on top before baking. The heat cuts through the richness and adds a memorable bite that keeps guests coming back for more.
Smoked Salmon Version
Replace the bacon with smoked salmon, and use cream cheese instead of cheddar. The smoky flavor of the salmon and the creamy texture of the cream cheese create a sophisticated breakfast slider that feels brunch‑worthy.
Breakfast Burrito Slider
Use scrambled eggs, diced bell peppers, and black beans as fillings, and top with a dollop of salsa. The result is a mini burrito in slider form—perfect for a quick, handheld breakfast.
Cheesy Garlic Bread Slider
Omit the ham and pineapple entirely; instead, spread a garlic butter mixture on the roll halves and top with mozzarella. Bake until golden, and you’ll have a savory slider that feels like a cheesy garlic bread on a stick.
Sweet Cinnamon Roll Slider
Use a cinnamon‑sugar filling in place of the savory mix, and top with a drizzle of caramel sauce. This sweet version turns the slider into a dessert‑style treat that’s perfect for a brunch gathering.
Storing and Bringing It Back to Life
Fridge Storage
Store finished sliders in an airtight container in the refrigerator for up to 3 days. Keep the rolls separate from the fillings by layering a sheet of parchment paper between them. This prevents the rolls from absorbing moisture and becoming soggy.
Freezer Friendly
For longer storage, wrap each slider tightly in foil and place them in a freezer bag. They will stay fresh for up to 2 weeks. When ready to serve, thaw overnight in the refrigerator, then reheat in a 350°F oven for 10 minutes.
Best Reheating Method
Reheat the sliders in a preheated oven at 350°F (175°C) for 5–7 minutes, or until the cheese is bubbling again. Add a splash of water to the baking sheet to create steam; this keeps the rolls from drying out. The final trick: finish with a quick broil for 1 minute to restore that golden crust.