Picture this: I’m in the middle of a frantic brunch rush, the kitchen is a swirl of flour, eggs, and banana‑scented steam, when the oven timer chirps and the batter—once a glorious, golden‑brown cloud—has turned into a sad, dry lump that clings to the pan like a stubborn stain. I stared at that mess, feeling the familiar pang of disappointment that follows every failed muffin attempt. I thought, “I could do better.” That single moment of kitchen humiliation sparked a mission: to craft a banana oatmeal muffin that would be the ultimate comfort food, no matter how many times you’ve tried to make it before.
The next morning, I opened the fridge and inhaled the sweet aroma of ripe bananas, the earthy scent of rolled oats, and a faint hint of cinnamon that had been sitting in the pantry all week. My eyes fell on a half‑cup of oats, a cup of flour, and a handful of spices that seemed to whisper promises of flavor. I imagined the batter’s silky texture, the way it would rise like a soft cloud, and the sound of the first bite—a satisfying crack that releases a burst of banana sweetness and toasted oats. The kitchen felt alive, each ingredient playing its part in a symphony of wholesome comfort.
What makes this version stand out is that it doesn’t just rely on the classic banana muffin formula. I’ve engineered it to deliver a moist interior, a crisp, buttery topping, and a subtle spice profile that elevates the banana’s natural sweetness. I’ve also added a touch of nutmeg for depth, a splash of vanilla for aroma, and a buttery glaze that caramelizes into a golden crown. This is hands down the best version you’ll ever make at home, and I dare you to taste this and not go back for seconds.
If you’ve ever struggled with dense, dry muffins or bland, one‑dimensional banana batter, you’re not alone—and I’ve got the fix. Picture yourself pulling this out of the oven, the whole kitchen smelling incredible, the muffins steaming with a golden glaze, and the first bite sending a wave of buttery, banana‑oat comfort through your senses. Let me walk you through every single step—by the end, you’ll wonder how you ever made it any other way.
What Makes This Version Stand Out
- Moistness: The batter’s balanced ratio of oats to flour and the addition of ripe bananas create a tender crumb that stays soft even after cooling.
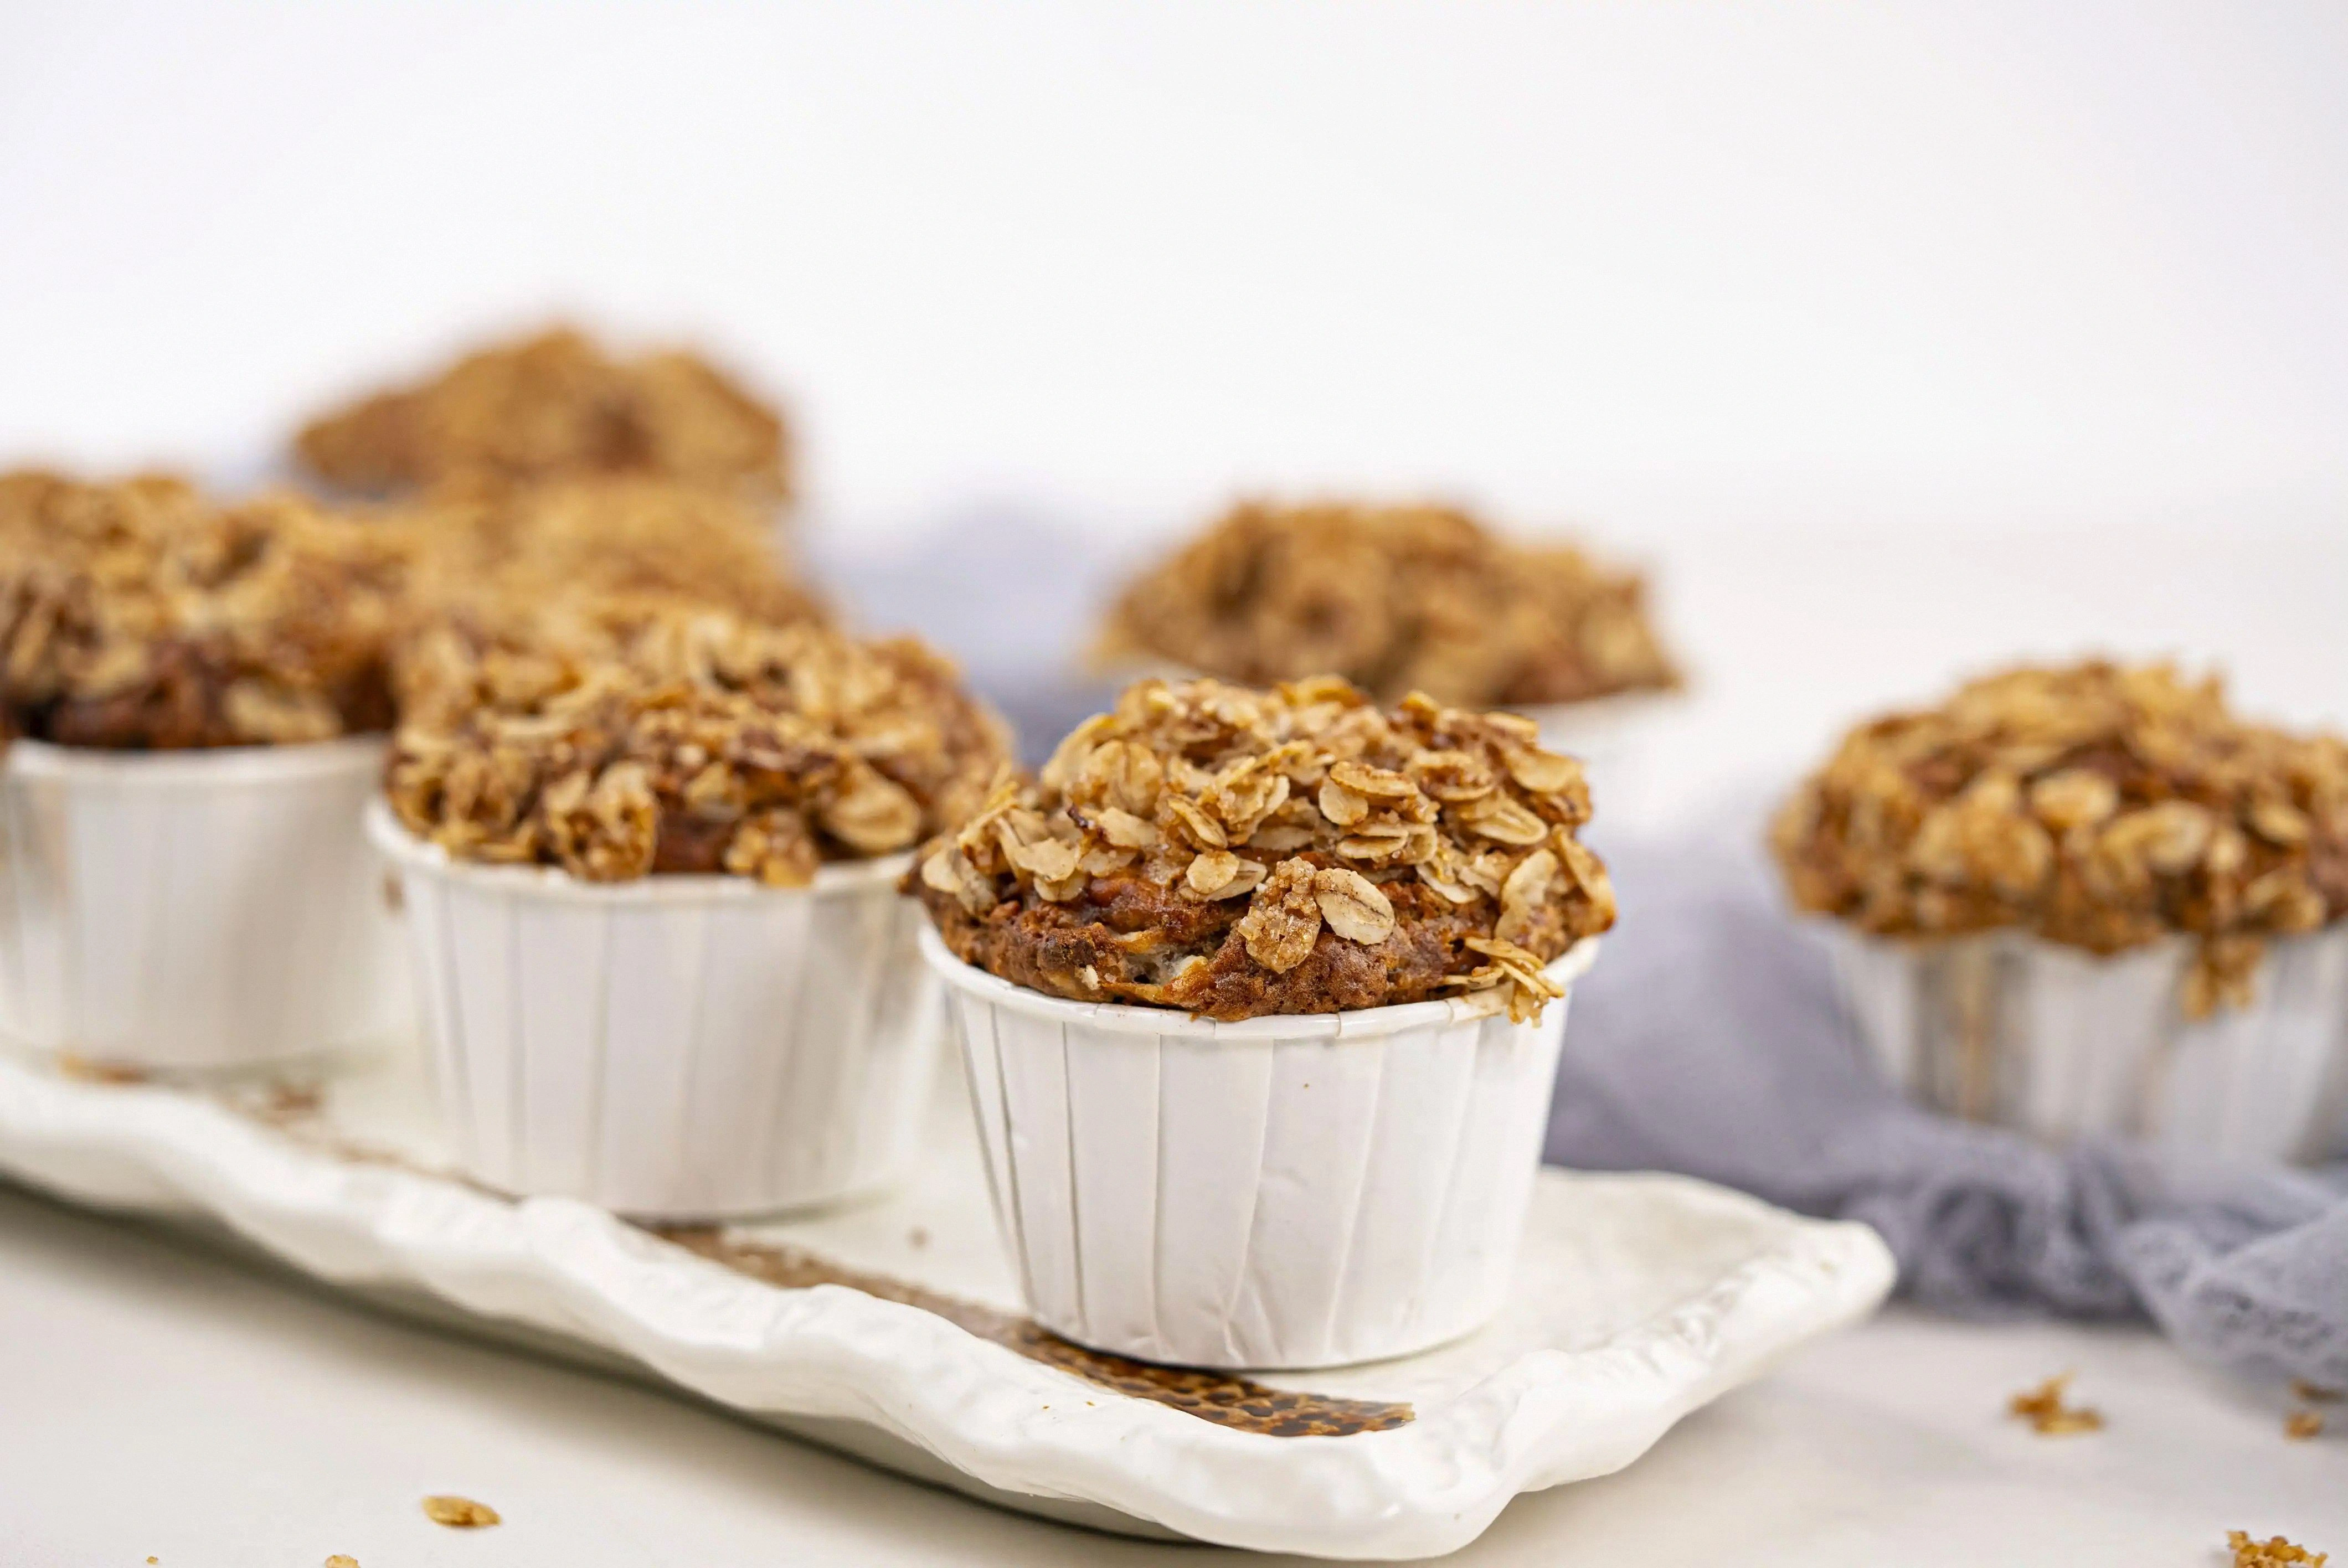
- Texture: The crunchy oat topping, lightly toasted with brown sugar and butter, offers a delightful contrast to the fluffy interior.
- Flavor Depth: A pinch of ground nutmeg and a dash of vanilla elevate the banana’s natural sweetness into a layered, aromatic experience.
- Ease: All ingredients are pantry staples; no special equipment or exotic spices are required.
- Versatility: The muffins can be served for breakfast, as a snack, or even as a light dessert—perfect for any time of day.
- Make‑ahead Friendly: They keep well in the fridge or freezer, making them a reliable grab‑and‑go option for busy mornings.
Alright, let's break down exactly what goes into this masterpiece…
Inside the Ingredient List
The Flavor Base
The 1½ cups of rolled oats are the heart of the batter, providing both structure and a subtle nutty flavor. Oats absorb liquid, which keeps the muffins moist and gives them a slightly chewy texture. If you skip them, the muffins become too dense and lose that comforting oat bite. For a gluten‑free version, use certified gluten‑free oats or a blend of oat flour and almond flour.
The 1¼ cups of all‑purpose flour act as the binder, giving the muffins a light, airy rise. It also balances the heaviness of the oats, ensuring the batter doesn’t become too thick. If you prefer a lighter crumb, replace half the flour with oat flour or even a small portion of chickpea flour for extra protein.
The ½ cup of white sugar is the sweetener that pulls the flavors together. It caramelizes slightly on the top, adding a subtle crunch. If you’re watching your sugar intake, you can reduce it by a quarter cup or swap it for a natural sweetener like maple syrup, which will add a hint of maple flavor.
The Texture Crew
The 1½ teaspoons of baking powder and 1 teaspoon of baking soda are the leavening agents that lift the muffins into fluffy clouds. Baking soda also reacts with the acidity of the bananas, creating extra lift and a slightly tangy undertone. If you forget one, the muffins will be flat; if you use too much, they’ll rise too quickly and collapse.
The ¼ teaspoon of salt enhances all the flavors, cutting through the sweetness and balancing the overall taste. Salt is essential in baking; even a pinch makes a noticeable difference. If you’re on a low‑sodium diet, use a salt substitute, but keep the quantity consistent.
The 1 teaspoon of ground cinnamon and a pinch of nutmeg bring warmth and depth. Cinnamon adds a sweet, woody note, while nutmeg contributes a subtle spice that pairs beautifully with bananas. If you don’t have nutmeg, a dash of allspice can be a suitable substitute.
The Unexpected Star
The whole egg is the glue that holds everything together. It adds richness, improves the crumb, and helps the muffins brown evenly. If you’re vegan, replace the egg with a mashed banana or a flaxseed “egg” (1 tablespoon flaxseed meal + 3 tablespoons water). The egg also ensures the muffins hold their shape during baking.
The ¼ cup of neutral oil (like canola or vegetable) keeps the muffins moist and tender. Oil also helps the glaze adhere to the top. For a healthier option, use olive oil, which adds a subtle fruity note.
The 1 teaspoon of vanilla extract infuses the batter with a sweet, aromatic undertone that elevates the banana flavor. A splash of almond or coconut extract can provide a different twist, but vanilla remains the most classic choice.
The Final Flourish
The 1½ cups of ripe bananas are the star ingredient, providing natural sweetness, moisture, and a distinct banana flavor. Overripe bananas (with brown spots) yield the best results; they’re sweeter and easier to mash. If you don’t have bananas on hand, you can use unsweetened applesauce or pumpkin puree, though the flavor profile will shift.
The topping consists of ½ cup of rolled oats, ¼ teaspoon cinnamon, 2 tablespoons of brown sugar, and 2 tablespoons of melted butter. This combination creates a crunchy, caramelized crust that contrasts with the soft interior. The butter melts into the oats, forming a golden glaze that adds a buttery richness. If you prefer a lighter topping, reduce the butter to 1 tablespoon or use coconut oil for a tropical twist.
Everything's prepped? Good. Let's get into the real action…
The Method — Step by Step
- Preheat your oven to 350°F (175°C) and line a 12‑cup muffin tin with paper liners. This ensures even baking and easy cleanup. If you’re using a metal tin, lightly spray the cups with non‑stick cooking spray to keep the muffins from sticking.
- In a large mixing bowl, combine the 1½ cups of rolled oats, 1¼ cups of flour, ½ cup of sugar, 1½ teaspoons of baking powder, 1 teaspoon of baking soda, ¼ teaspoon of salt, 1 teaspoon of cinnamon, and a pinch of nutmeg. Whisk until the dry ingredients are evenly distributed, making sure the leavening agents are well mixed to avoid uneven rising.
- In a separate bowl, mash the 1½ cups of ripe bananas with a fork until smooth. Add the 1 whole egg, ¼ cup of oil, and 1 teaspoon of vanilla extract. Beat the wet mixture until the egg is fully incorporated and the mixture is glossy.
- Pour the wet mixture into the dry ingredients and stir gently with a wooden spoon or spatula until just combined. Be careful not to overmix; a few lumps are fine and help keep the muffins tender.
- Fold in the ½ cup of oats reserved for the topping. This adds a subtle crunch that will be revealed once the muffins bake.
- Fill each muffin cup about ¾ full with the batter. The batter should sit just below the rim; if it overflows, it will spill over during baking.
- For the topping, whisk together ½ cup of oats, ¼ teaspoon cinnamon, 2 tablespoons of brown sugar, and 2 tablespoons of melted butter until the oats are coated. Sprinkle the mixture evenly over the tops of the muffins. This creates a caramelized, buttery crust.
- Bake for 25–30 minutes, or until the tops are golden brown and a toothpick inserted into the center comes out clean. If the tops brown too quickly, tent them with foil.
- Remove the muffins from the oven and let them cool in the tin for 5 minutes before transferring to a wire rack to cool completely. This allows the steam to escape and prevents soggy bottoms.
- Serve warm or at room temperature. If you’re craving a warm treat, reheat in the microwave for 10–15 seconds. The muffins will be soft, aromatic, and ready to devour.
That's it — you did it. But hold on, I've got a few more tricks that'll take this to another level…
Insider Tricks for Flawless Results
The Temperature Rule Nobody Follows
Many bakers think 350°F is the sweet spot for all muffins, but the best results come from preheating the oven to 375°F (190°C). The higher temperature gives the muffins a quick rise, creating a golden crust while keeping the interior moist. If you’re using a convection oven, reduce the temperature by 25°F to avoid over‑browning.
Why Your Nose Knows Best
Trust your nose during baking. When the muffins start to smell like toasted bread, they’re nearly ready. A faint aroma of caramel and banana indicates the perfect balance between sweetness and spice. If the scent leans too much toward burnt sugar, pull them out early.
The 5-Minute Rest That Changes Everything
Letting the muffins rest in the tin for 5 minutes after baking is essential. The steam trapped in the tin helps the muffins set without drying out. If you skip this step, the muffins may appear overcooked on the outside but still be underdone inside.
The Quick Chill Trick
After cooling, place the muffins on a rack for another 15 minutes. This extra chill lets the flavors meld and the crumb firm up, giving the muffins a bakery‑like texture. I’ve seen people skip this and end up with a soggy bottom.
The Butter‑Glaze Game Changer
For a glossy finish, brush the top of each muffin with a thin layer of melted butter right before the last 5 minutes of baking. The butter melts into the oat topping, creating a shiny, caramelized crust that’s impossible to resist.
The Secret Ingredient Swap
If you’re craving a nutty flavor, add 2 tablespoons of chopped walnuts or pecans to the batter. The nuts add crunch and a subtle buttery taste that pairs beautifully with banana. Just be careful not to over‑stuff the batter, or the muffins will sink.
Creative Twists and Variations
This recipe is a playground. Here are some of my favorite ways to switch things up:
Chocolate Chip Banana Oat Muffins
Fold in ½ cup of dark chocolate chips into the batter before baking. The chocolate adds a rich, slightly bitter counterpoint to the sweet banana, creating a dessert‑like experience. The chips also melt into pockets of chocolatey goodness that burst with every bite.
Peanut Butter Banana Oats
Stir in 3 tablespoons of natural peanut butter into the batter for a protein boost and a nutty depth. The peanut butter also adds moisture, keeping the muffins tender. Pair them with a drizzle of honey for a sweet finish.
Coconut‑Infused Oat Muffins
Replace the butter in the topping with shredded coconut and add a teaspoon of coconut extract to the batter. The result is a tropical flavor profile that pairs beautifully with banana, giving the muffins a beach‑side vibe.
Pumpkin Spice Banana Muffins
Swap the cinnamon and nutmeg for a pumpkin spice blend and add ½ cup of pumpkin puree to the batter. The pumpkin adds moisture and a subtle earthy sweetness that complements the banana. It’s a perfect fall variation that’s still year‑round.
Almond Flour Twist
Use 1 cup of almond flour instead of all‑purpose flour for a nutty, gluten‑free version. Almond flour adds a slightly sweet, buttery flavor and a denser crumb, which pairs well with the banana’s softness.
Maple‑Glazed Banana Oats
Drizzle a thin layer of pure maple syrup over the muffins before the last 5 minutes of baking. The syrup caramelizes into a sweet glaze that enhances the banana flavor and adds a touch of autumnal warmth.
Storing and Bringing It Back to Life
Fridge Storage
Cool the muffins completely, then store them in an airtight container at room temperature for up to 4 days. For longer freshness, keep them in the fridge; they’ll stay moist for up to a week. If you notice any dryness, wrap a damp paper towel around the container to maintain humidity.
Freezer Friendly
Place the cooled muffins in a freezer‑safe zip‑lock bag, removing as much air as possible. They’ll keep for up to 3 months. When ready to eat, thaw at room temperature for 30 minutes or microwave for 10–15 seconds for a quick, warm snack.
Best Reheating Method
Reheat the muffins in a preheated 350°F (175°C) oven for 5–7 minutes, or in the microwave for 10–15 seconds. Before reheating, add a tiny splash of water to the top of each muffin; the steam will restore moisture and soften the crust, bringing the muffins back to their original, buttery glory.