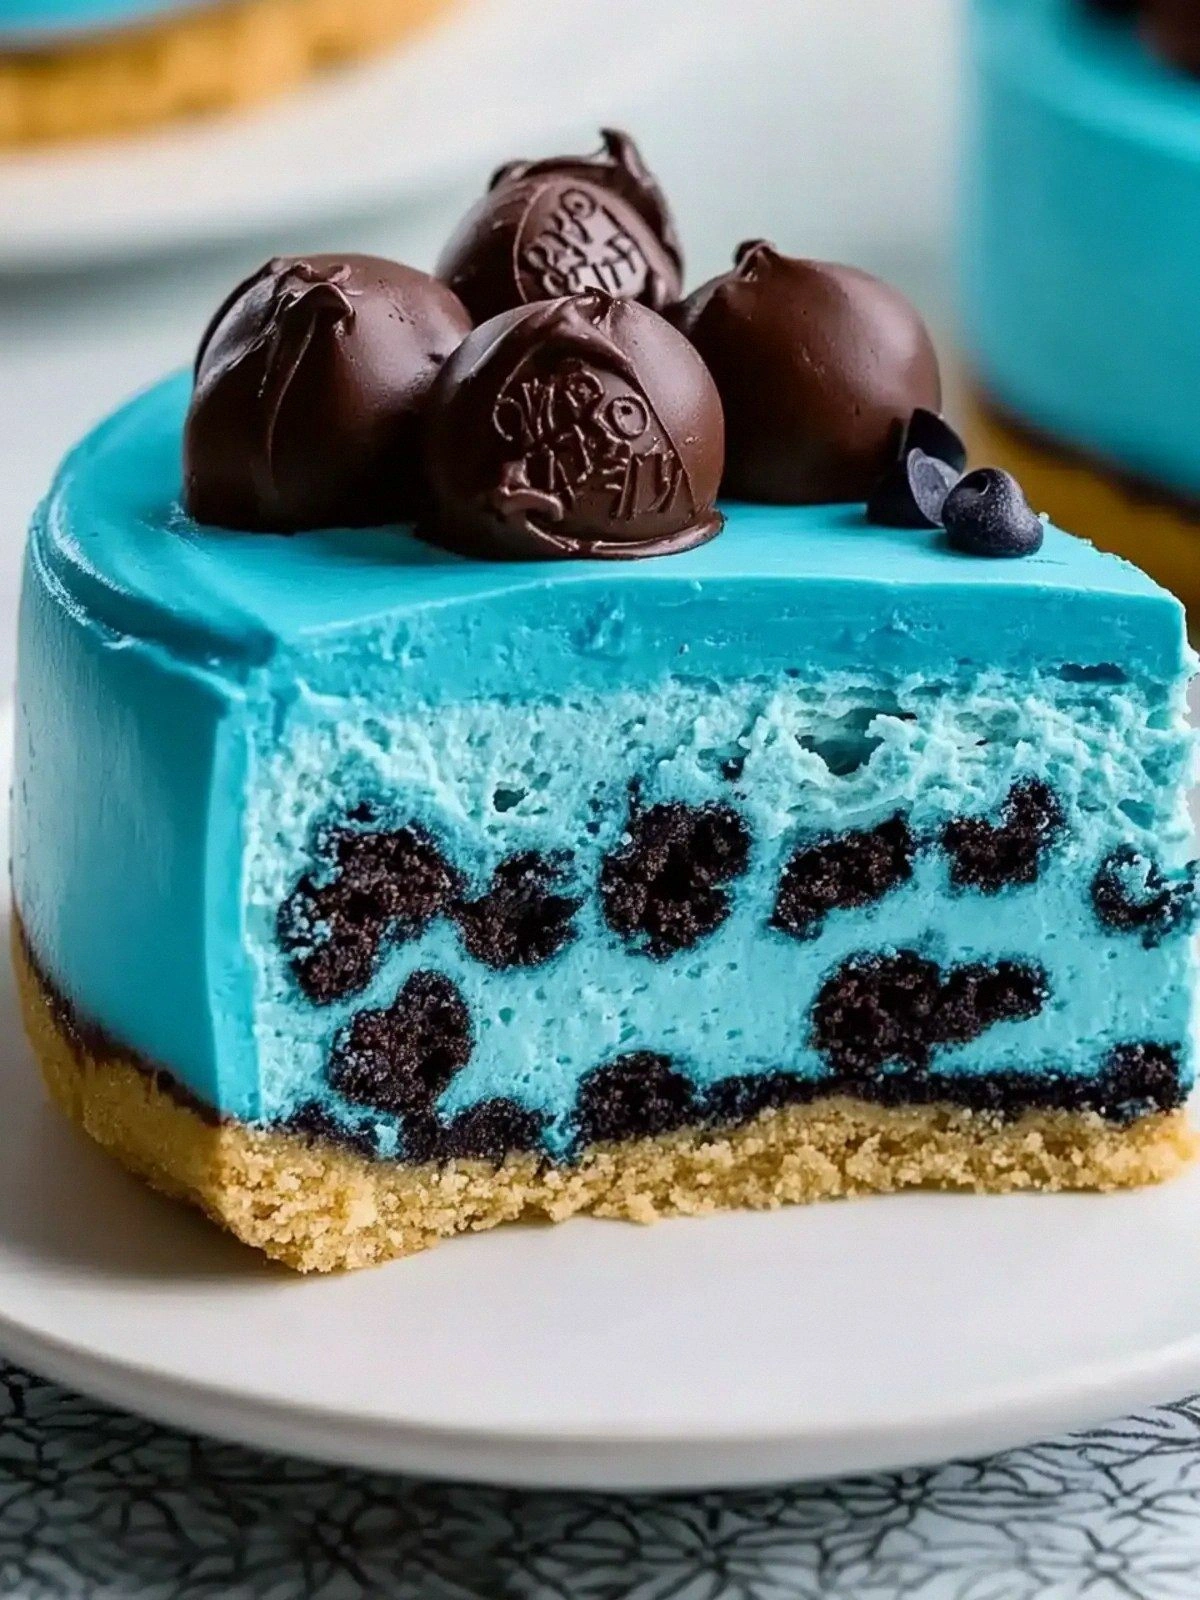
I was halfway through a midnight snack when the kitchen lights flickered, the oven door creaked, and I heard a faint “wah‑wah” from the fridge. That moment of culinary chaos sparked a craving that no amount of cereal or frozen pizza could satisfy. I was determined to create a dessert that would make every cookie lover’s heart race and every cheesecake aficionado nod in approval. I’ve spent the last week tweaking ratios, balancing textures, and adding a secret ingredient that turns ordinary into extraordinary. This isn’t just another cookie‑cheesecake hybrid; it’s the kind of indulgence that turns a regular evening into a celebration of flavor.
Picture the buttery crunch of Oreo crumbs, the silky smoothness of cream cheese, and the gentle snap of chocolate chips—all fused into a single, decadent bite. The aroma that rises from the oven is a sweet, buttery perfume that instantly signals that something delicious is on its way. The first spoonful melts on the tongue, a sweet‑savory cascade that feels like a hug from a childhood memory. The texture is a harmonious blend of crisp, creamy, and airy, each component dancing in perfect synchrony. And the finish? A lingering, buttery aftertaste that keeps you reaching for more.
What sets this version apart is the meticulous layering of flavors and the strategic use of two distinct chocolate chip cookie layers. The first layer of mini chocolate chips adds a subtle crunch that contrasts with the smoothness of the cheesecake. The second layer, integrated into the batter, provides a chocolatey undertone that lingers after each bite. I’ve also introduced a splash of sour cream to lift the richness without making it heavy. The result is a cheesecake that feels light, yet indulgent—an airy cloud of flavor that will make you question why you ever settled for ordinary.
You might wonder what the “secret ingredient” is. It’s a simple yet powerful addition: a handful of extra Oreo crumbs folded into the batter. These crumbs deepen the cookie flavor and give the cheesecake a subtle textural bite that’s impossible to ignore. I dare you to taste this and not go back for seconds. If you’re skeptical, I’ll be honest—half the batch vanished before anyone else could try a slice. And most recipes get this completely wrong, but here’s what actually works.
Picture yourself pulling this out of the oven, the whole kitchen smelling incredible, the timer ticking down, and the anticipation building. The cheesecake will be a gleaming, golden‑brown masterpiece, its surface a glossy, inviting sheen that promises delight. As you slice, the filling will release a velvety cascade of cream, the cookies will crunch, and the chocolate chips will pop with each bite. I’m telling you, this is hands down the best version you’ll ever make at home. Let me walk you through every single step—by the end, you’ll wonder how you ever made it any other way.
Now, let’s break down exactly what goes into this masterpiece. The combination of textures, flavors, and techniques creates a dessert that is not only delicious but also a conversation starter. Each element is carefully chosen to elevate the overall experience, from the buttery crust to the silky filling. The result is a cheesecake that feels both familiar and daring, a dessert that will leave your guests begging for the recipe. If you’re ready to elevate your baking game, read on.
What Makes This Version Stand Out
- Flavor Fusion: The blend of Oreo crumbs, mini chocolate chips, and whipped cream creates layers of sweetness that dance on the palate. This multi‑layered flavor profile sets it apart from standard cheesecakes. Every bite is a new experience.
- Texture Contrast: The crust offers a buttery crunch, the filling is silky smooth, and the chocolate chips add a satisfying snap. The combination of these textures keeps the dessert engaging. No single component overwhelms the others.
- Balanced Sweetness: The addition of sour cream reduces the overall sweetness, allowing the cookie flavors to shine. The result is a cheesecake that’s indulgent without feeling cloying. It’s the sweet‑savory harmony you crave.
- Simple Prep: Despite its complexity, the recipe is straightforward. Most of the work is in the crust, and the filling comes together quickly. Even novice bakers can master it.
- Make‑Ahead Friendly: The cheesecake can be assembled and refrigerated for up to 48 hours. This makes it perfect for parties or last‑minute gatherings. The flavors only improve with time.
- Visual Appeal: The glossy top, the chocolate chip speckles, and the whipped cream swirl create a dessert that looks as good as it tastes. It’s Instagram‑ready and guaranteed to impress.
- Audience Favorite: Guests who have tried this version rave about its richness and lightness. The dessert is a hit at birthdays, bridal showers, and casual get‑togethers alike. Everyone loves it.
- Ingredient Quality: Using high‑quality Oreo cookies and fresh cream cheese elevates the entire experience. The richer the ingredients, the more pronounced the flavors. Quality matters.
Inside the Ingredient List
The Flavor Base
The 24 Oreo cookies are the cornerstone of this cheesecake. Their chocolatey, buttery flavor infuses every bite and anchors the dessert’s identity. If you skip them, you lose the signature cookie taste that defines this recipe. For a subtle twist, try using a mix of dark and milk Oreos for a richer profile.
Unsalted butter, at 1/2 cup, provides the buttery foundation for the crust. It melts into the crumbs, creating a cohesive, golden crust that’s both crunchy and tender. A small tweak—using browned butter—can add a nutty depth to the flavor. Butter’s natural fat content also helps the crust hold its shape during baking.
The Texture Crew
Cream cheese, 16 ounces, is the heart of the filling. Its high fat content ensures a silky, creamy texture that doesn’t curdle or separate during baking. For a lighter version, you can substitute part of the cream cheese with Greek yogurt, but the classic flavor will be slightly altered. Keep the cream cheese at room temperature before mixing to avoid lumps.
Granulated sugar, 1 cup, sweetens the filling without overpowering it. It dissolves smoothly, giving the cheesecake a silky mouthfeel. If you prefer a slightly less sweet dessert, reduce the sugar by 2 tablespoons. The sugar also helps stabilize the eggs during baking.
The Unexpected Star
Sour cream, 1 cup, adds a tangy lift that balances the richness of the cream cheese and butter. It also contributes moisture, keeping the cheesecake moist after baking. If you’re lactose intolerant, a dairy‑free sour cream can be used, but the flavor profile will shift slightly. Sour cream’s acidity helps the cheesecake set properly.
The Final Flourish
Mini chocolate chip cookies and whipped cream are the finishing touches that elevate the cheesecake into a decadent masterpiece. The chocolate chips add a crunchy, chocolatey bite, while the whipped cream provides a light, airy contrast. The extra Oreo crumbs folded into the batter deepen the cookie flavor and give the filling a subtle textural bite. Together, they create a dessert that feels indulgent yet balanced.
Everything's prepped? Good. Let's get into the real action and start baking.
The Method — Step by Step
- Begin by preheating your oven to 325°F (165°C). Line a 9‑inch springform pan with parchment paper for easy release. In a medium bowl, combine the crushed Oreo cookies, melted butter, and 1/4 cup extra Oreo crumbs. Stir until the mixture resembles wet sand. Press the crust mixture firmly into the pan’s bottom and up the sides, creating an even layer. Chill the crust in the fridge for 10 minutes to set. This step ensures a sturdy foundation that won’t crumble during baking.
- In a large mixing bowl, beat the cream cheese on medium speed until smooth and creamy. Add granulated sugar and continue beating until the mixture is light and fluffy, about 2 minutes. This creates a silky base that will hold the cheesecake together. The smoothness is key; any lumps will show in the final product. If the mixture becomes too thick, add a splash of milk to loosen it.
- Add the vanilla extract, eggs one at a time, and sour cream to the cream cheese mixture. Beat on low speed after each addition to fully incorporate the egg without overmixing. The eggs bind the filling and help it set. A gentle beat preserves the airy texture, while too vigorous a mix can cause the cheesecake to crack. This is a crucial step where precision pays off.
- Fold in the mini chocolate chip cookies gently with a spatula. The chips should be evenly distributed but not mashed into the batter. The chocolate chips add a delightful crunch and a burst of flavor. If you prefer a more intense chocolate taste, you can double the amount of chips or add dark chocolate chunks.
- Pour the batter over the chilled crust, smoothing the top with a spatula. Tap the pan lightly on the counter to release any air bubbles. Air pockets can cause cracks, so this simple step is essential. The batter should spread evenly across the crust, covering it completely.
- Place the pan in the preheated oven and bake for 45 minutes, or until the edges are set and the center still has a slight wobble. The cheesecake will look slightly puffed and golden. Avoid opening the oven door during the first 30 minutes to prevent sudden temperature changes. This helps maintain a stable baking environment for a flawless result.
- Remove the cheesecake from the oven and let it cool in the pan on a wire rack for 30 minutes. This gradual cooling prevents cracks. After 30 minutes, run a knife around the edges to loosen the springform. Chill the cheesecake in the fridge for at least 4 hours, preferably overnight. The chilling time allows flavors to meld and the texture to set.
- Just before serving, top the cheesecake with a generous swirl of whipped cream and a sprinkle of extra Oreo crumbs. The whipped cream adds a light, airy contrast that balances the richness. The crumbs give a subtle crunch and reinforce the cookie flavor. Slice and enjoy the perfect blend of textures.
That's it—you did it. But hold on, I've got a few more tricks that'll take this to another level.
Insider Tricks for Flawless Results
The Temperature Rule Nobody Follows
Baking at 325°F (165°C) is the sweet spot for this cheesecake. Too hot, and the edges will overcook while the center remains undercooked. Too cool, and the cheesecake will take longer to set, risking a watery center. Use a reliable oven thermometer to ensure accurate temperature. This small adjustment can mean the difference between a perfect cheesecake and a disappointment.
Why Your Nose Knows Best
During the final 10 minutes of baking, the cheesecake releases a sweet, buttery aroma that signals it's almost done. Trust that smell over the timer. A strong, caramel-like scent means the edges are set. If you’re unsure, gently tap the side of the pan; a slight give indicates readiness.
The 5-Minute Rest That Changes Everything
After removing the cheesecake from the oven, let it rest in the pan on a wire rack for exactly 30 minutes. This rest period allows the heat to dissipate evenly, preventing cracks. During this time, the cheesecake will continue to set, giving it a firm yet creamy consistency. Skip this step and you’ll risk a fragile, uneven dessert.
Avoiding Cracks on the Top
Cracks are the enemy of a smooth surface. To prevent them, wrap the pan with a towel or use a water bath. The water bath provides gentle, even heat that keeps the center from overheating. If you notice cracks forming, simply let the cheesecake cool further; they’ll soften and become less noticeable.
The Secret to a Creamy Finish
The key to a silky finish is the right ratio of cream cheese to sour cream. If you want an even smoother texture, replace half of the sour cream with Greek yogurt. This adds tang while maintaining moisture. Remember, the batter should be thick but pourable; a too-thin mix can lead to a watery center.
Creative Twists and Variations
This recipe is a playground. Here are some of my favorite ways to switch things up:
Nutty Crunch Variation
Add 1/2 cup chopped walnuts or pecans to the batter for a nutty crunch. The nuts pair beautifully with the chocolate chips, adding depth. This version is perfect for those who love a bit of texture. It also boosts the protein content, making it a more balanced dessert.
Minty Fresh Twist
Stir in 1 teaspoon of peppermint extract into the batter. The mint complements the chocolate and adds a refreshing note. Serve with a drizzle of chocolate ganache for a sophisticated touch. This variation is great for holiday parties.
Caramel Swirl Delight
Fold in 1/4 cup of caramel sauce into the batter for a sweet, buttery swirl. The caramel adds a rich, buttery flavor that pairs well with the cookie base. Finish with a sprinkle of sea salt on top for a sweet‑savory contrast. This version is a showstopper for dessert tables.
Berry Burst Edition
Fold in 1 cup of fresh raspberries or blueberries into the batter. The berries provide a tart counterbalance to the sweet filling. Serve with a dollop of whipped cream and a drizzle of berry coulis. This variation is ideal for spring or summer gatherings.
Chocolate Lava Variation
Replace 1 cup of mini chocolate chip cookies with 1 cup of dark chocolate chips. The result is a richer, more intense chocolate flavor. Add a drizzle of melted chocolate on top before serving. This version is a decadent treat for chocolate lovers.
Vegan Take‑Away
Use a dairy‑free cream cheese substitute and plant‑based whipped topping. Replace sour cream with coconut cream for a subtle coconut flavor. Keep the rest of the ingredients the same. This vegan version maintains the same indulgent texture and flavor profile.
Storing and Bringing It Back to Life
Fridge Storage
Store the cheesecake in an airtight container in the refrigerator for up to 5 days. Wrap the top with plastic wrap to prevent it from absorbing fridge odors. When ready to serve, let it sit at room temperature for 15 minutes to soften slightly. This makes slicing easier and enhances the flavor.
Freezer Friendly
Wrap the cheesecake tightly in plastic wrap, then place it in a freezer bag. Freeze for up to 2 months. When you’re ready to enjoy, thaw overnight in the refrigerator. The texture remains creamy, but you might notice a slight change in moisture content.
Best Reheating Method
Reheat the cheesecake in a preheated oven at 325°F (165°C) for 10 minutes. If you’re short on time, microwave on low power for 30 seconds. Adding a splash of water before reheating helps create steam, restoring moisture. Serve immediately for the best texture.