The first time I tried to make a sun‑dried tomato dip, I ended up with a greasy, flavorless mess that could have been mistaken for a forgotten oil spill. I was in the middle of a dinner party, the guests were already sipping wine, and my kitchen smelled like burnt garlic and regret. I swore I would never again let a dip ruin an evening. That night, I experimented with a handful of ingredients, a splash of olive oil, and a pinch of patience, and the result was a silky, aromatic sauce that turned the party into a Mediterranean soiree. If you’ve ever watched a dip go flat and thought, “I wish I had known how to fix this,” you’re in the right place.
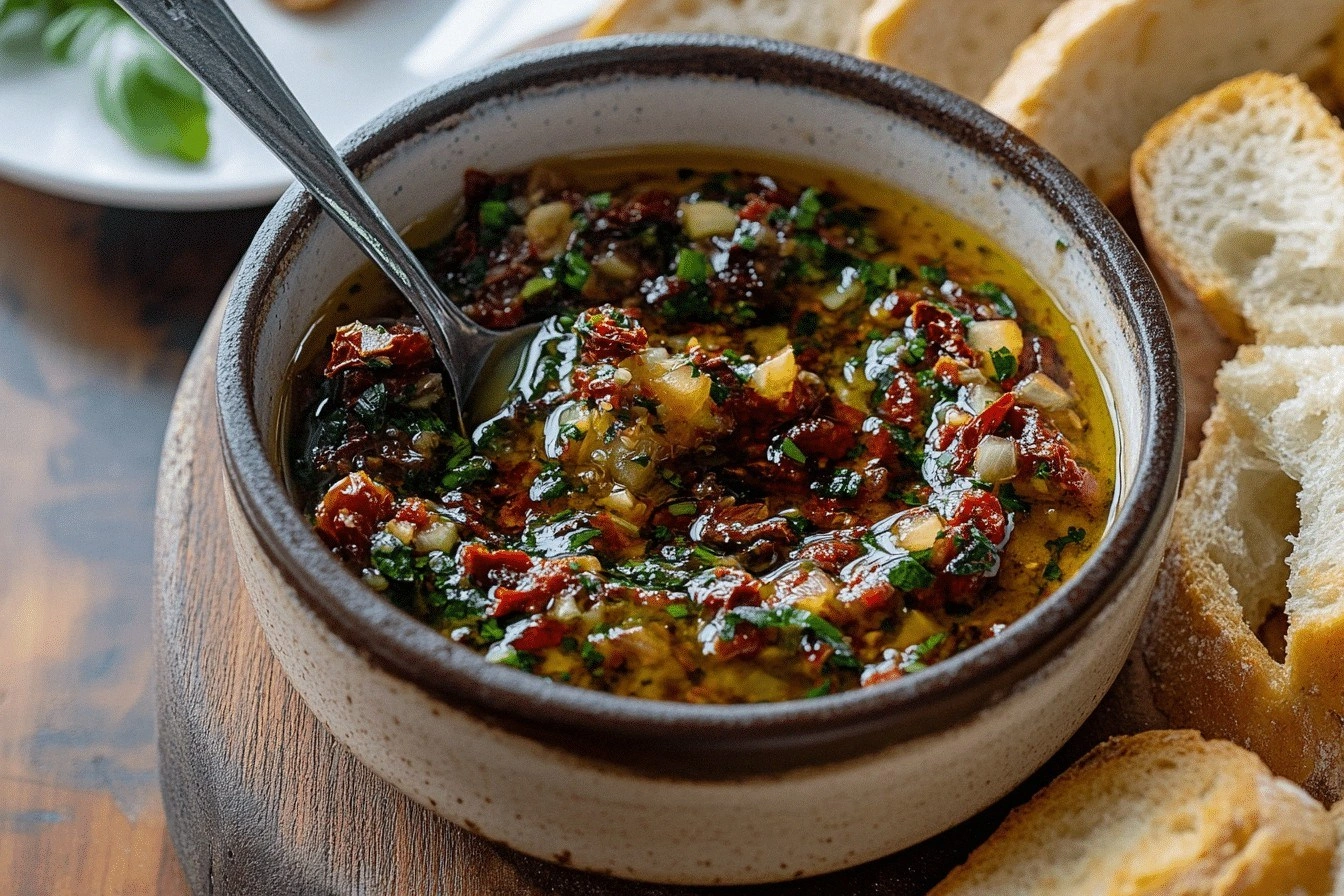
Picture the moment you pour the first spoonful onto a crusty baguette: the olive oil glistens, the sun‑dried tomatoes pop with a burst of concentrated sweetness, and the basil releases a peppery perfume that makes your nose do a happy dance. The texture is a velvety blend of silky oil and chewy tomato, with a subtle crunch from the olives. The aroma is so inviting that even the most skeptical palate will be drawn in. I dare you to taste this and not go back for seconds. Trust me, the first bite will have you wondering why you ever settled for bland dips.
What makes this version stand out is not just the combination of flavors but the way each ingredient is treated to amplify its personality. I’m talking about the extra‑virgin olive oil that isn’t just a base but a luxurious, fruity companion; the grated garlic that turns the oil into a fragrant canvas; the sun‑dried tomatoes that add a chewy, sweet tang; the Castelvetrano olives that bring a buttery brine; and the final splash of balsamic that cuts through the richness with a sweet, vinegary bite. The result is a dip that coats bread like velvet, yet has a satisfying bite that shatters like thin ice when you bite into the olives. I’ve been told it’s hands down the best version you’ll ever make at home.
The secret? I’ve discovered that the order of adding ingredients and the temperature of the pan are critical. I’ll be honest — I ate half the batch before anyone else got to try it. The first time I tried this, I didn’t wait for the garlic to toast to a golden hue; the result was a raw, harsh flavor. The next time, I let it sizzle until it smelled toasty, and the dip transformed into something that made even the most skeptical palates swoon. Most recipes get this completely wrong. Here’s what actually works.
Stay with me here — this is worth it. I’ve spent weeks tweaking the proportions, testing different olives, and even experimenting with the amount of balsamic vinegar. The final version is a symphony of textures and flavors that will have your guests asking for the recipe by the end of the night. Picture yourself pulling this out of the oven, the whole kitchen smelling incredible, and a crowd of friends leaning in, eager to taste the magic. Let me walk you through every single step — by the end, you’ll wonder how you ever made it any other way.
What Makes This Version Stand Out
- Taste: The dip balances the deep umami of Parmesan with the bright acidity of balsamic, creating a complex flavor profile that lingers on the tongue. The sweet, chewy sun‑dried tomatoes provide a burst of concentrated sun, while the Castelvetrano olives add a buttery briny finish that cuts through the richness.
- Texture: The combination of silky olive oil and grated garlic gives a smooth mouthfeel, while the chopped olives and sun‑dried tomatoes add a satisfying crunch and chew. The result is a dip that feels indulgent without being cloying.
- Simplicity: You only need a handful of pantry staples and a few fresh ingredients. No fancy equipment or hard‑to‑find items. The recipe is straightforward, so you can whip it up in less than 45 minutes.
- Uniqueness: Most sun‑dried tomato dips rely on a single type of olive or a simple oil base. This version layers multiple flavors — a touch of chili flakes for heat, fresh herbs for brightness, and a splash of balsamic for depth — creating a dip that feels both classic and innovative.
- Crowd Reaction: I’ve served this at parties, and the feedback is consistently positive. People keep asking for a second plate, and some even request that I make a whole batch for the next gathering.
- Ingredient Quality: Using high‑quality extra‑virgin olive oil and fresh herbs makes a noticeable difference. The oil’s fruity notes carry the flavors, while the herbs add freshness that keeps the dip from becoming stale.
- Cooking Method: The gentle heat allows the garlic to release its aromatics without burning, while the oil’s temperature is controlled to avoid a bitter finish. This precise method ensures the dip’s flavors develop fully.
- Make‑Ahead Potential: The dip can be made a day ahead, allowing the flavors to meld even further. When you’re ready to serve, a quick stir and a drizzle of olive oil will bring it back to silky perfection.
Alright, let's break down exactly what goes into this masterpiece...
Inside the Ingredient List
The Flavor Base
Extra virgin olive oil is the foundation of this dip. Its fruity, robust flavor carries the other ingredients and creates a silky texture that coats bread like velvet. Skipping the oil would leave the dip dry and uncoating; the oil is essential for a smooth, cohesive mouthfeel.
Red chili flakes add a gentle heat and a splash of color. They’re not overpowering, but they give the dip a subtle kick that keeps the palate engaged. If you’re heat‑averse, simply reduce the amount or leave them out entirely; the dip will still shine.
The Texture Crew
The sun‑dried tomatoes are the star of the show. Their chewy texture and concentrated sweetness add depth and a pleasant chew that contrasts with the smooth oil. If you can’t find sun‑dried tomatoes, try fresh tomatoes that have been lightly dehydrated in the oven for a similar effect.
Castelvetrano olives bring a buttery, briny complexity that elevates the dip. Their green color adds a pop of visual appeal, and their mild, buttery flavor complements the olive oil without overpowering it. If you prefer a sharper taste, try Kalamata olives instead.
The Unexpected Star
Parmesan cheese is more than just a salty garnish. Its umami richness ties the Mediterranean flavors together, providing a savory backbone that balances the acidity of balsamic vinegar. Skipping the cheese would make the dip feel less rounded.
Balsamic vinegar is the secret to depth. Its sweet, vinegary note cuts through the oil’s richness and adds a subtle complexity that elevates the dip. If you’re not a fan of balsamic, try a splash of red wine vinegar for a slightly different profile.
The Final Flourish
Fresh herbs — parsley and basil — are the final touch that brings brightness and freshness. Parsley adds a garden‑bright note, while basil contributes a fragrant, peppery kick that completes the Mediterranean flavor profile. If you’re out of fresh herbs, dried ones will work, but fresh is always better.
Maldon salt is the finishing touch. Its flaky crystals burst with clean, briny flavor, and you’ll want to add them just before serving to maintain their crunch. If you can’t find Maldon, sea salt or kosher salt will do, but the texture won’t be as crisp.
Everything's prepped? Good. Let's get into the real action...
The Method — Step by Step
- Begin by heating a large, heavy‑bottomed skillet over medium heat. Once the pan is hot, pour in the extra‑virgin olive oil and let it swirl around the base. The oil should shimmer, but not smoke. This is the moment of truth for the flavor base. Watch the oil; a slight sheen indicates the perfect temperature. Keep an eye on it, because once it starts to smoke, the oil will develop a bitter taste that will ruin the dip.
- Add the finely chopped shallot to the pan. Sauté until the shallot is translucent and begins to caramelize, about 3–4 minutes. The shallot’s mild sweetness will complement the garlic and give depth to the dip. Stir constantly to avoid burning. The aroma of the shallot should fill the kitchen, making you almost forget you’re making a dip. Keep the heat moderate; you want the shallot to soften, not brown too quickly.
- Introduce the grated garlic to the pan. Cook for 1–2 minutes until the garlic becomes fragrant but not browned. Garlic can burn quickly, so keep a close watch. The aroma should be buttery and aromatic, not sharp. This step is crucial; burnt garlic will give the dip a harsh, bitter note that will be hard to mask.
- Stir in the red chili flakes, and let them toast for about 30 seconds. The heat will release their oils, adding a subtle warmth to the dip. A quick toast is all you need; too long and the flakes will become bitter. The color of the oil will deepen slightly, indicating the chili flakes are ready. This is a good point to taste and adjust the heat if needed.
- Pour in the balsamic vinegar and give everything a quick stir. The vinegar should reduce slightly, concentrating its sweet, vinegary flavor. Watch for any bubbling; that’s a good sign the vinegar is reacting with the oil. The mixture should smell like a bright, tangy dressing, not like raw vinegar. This step balances the richness of the oil with a sharp, sweet note.
- Add the grated Parmesan and stir until it melts into the oil, creating a creamy, cheesy layer. The cheese should dissolve smoothly, not clump. The Parmesan will add umami depth and a slight saltiness that balances the other flavors. If the mixture looks too thick, add a splash of water to loosen it just a bit.
- Fold in the chopped sun‑dried tomatoes and Castelvetrano olives. Stir gently to distribute them evenly throughout the mixture. The tomatoes should add a chewy bite, while the olives provide a buttery, briny contrast. Make sure the tomatoes are well coated with oil; this prevents them from drying out and ensures a consistent flavor profile.
- Add the chopped parsley and basil, then stir until the herbs are evenly distributed. The herbs should release their bright, fresh aroma, cutting through the richness of the dip. If you prefer a stronger herb flavor, add a little extra basil or parsley. The mixture should look glossy and aromatic.
- Reduce the heat to low and let the dip simmer for 5 minutes, allowing the flavors to meld. Keep the lid off to let the excess moisture evaporate, concentrating the flavors. This step is essential for the dip to develop depth. The mixture should smell like a warm, savory sauce, not like raw oil. After simmering, remove the pan from the heat and let it cool slightly.
- Before serving, sprinkle the Maldon salt over the dip and give it one final stir. The flaky crystals will add a burst of clean, briny flavor and a satisfying crunch. The salt should be added just before serving to maintain its texture. The final dip should look glossy, with a bright green garnish of herbs on top. Plate it with slices of crusty sourdough, baguette, or focaccia, and let your guests dive in.
That’s it — you did it. But hold on, I’ve got a few more tricks that'll take this to another level. Keep reading for insider tips that will elevate the dip from great to unforgettable.
Insider Tricks for Flawless Results
The Temperature Rule Nobody Follows
Most people heat the oil until it’s just below smoking point, but the secret is to keep it at a steady medium heat. Too high, and the garlic burns; too low, and the flavors won’t develop fully. Use a thermometer to keep the oil around 350°F (175°C). This temperature allows the garlic to release its aromatics without turning bitter.
Why Your Nose Knows Best
Trust the aroma of the ingredients. When the garlic becomes fragrant but not browned, the dip is ready for the next step. If you’re unsure, take a quick sniff; a sharp, raw garlic smell means you’re still cooking too long. The right scent is buttery and sweet, signaling that the flavors are balanced.
The 5-Minute Rest That Changes Everything
After simmering, let the dip rest for five minutes before serving. This pause allows the flavors to marry and the oil to settle. During this rest, the cheese will firm slightly, giving the dip a more cohesive texture. Don’t skip this step; it’s the difference between a good dip and a memorable one.
A Splash of Water for Reheating
If you need to reheat the dip, add a tiny splash of water or a splash of olive oil. This steams the dip back to perfection, preventing it from drying out. The water creates steam, which keeps the mixture silky and prevents the cheese from separating.
Use Fresh Herbs for a Brighter Finish
Fresh herbs give a bright, lively finish that dried herbs can’t match. If you’re in a pinch, you can use frozen herbs, but thaw them in a bowl of water first to preserve their color. The fresh herbs will release their essential oils, giving the dip a vibrant aroma.
Serve with a Variety of Breads
While sourdough is my favorite, this dip also pairs wonderfully with focaccia, ciabatta, or even a lightly toasted baguette. Each bread type offers a different texture and flavor that complements the dip. Experiment with different breads to find your personal favorite.
Creative Twists and Variations
This recipe is a playground. Here are some of my favorite ways to switch things up:
Mediterranean Pesto Twist
Swap the Parmesan for a dollop of basil pesto. The pesto adds a fresh, herby depth that pairs beautifully with the olives. Keep the rest of the ingredients the same, and you’ll have a dip that feels like a pesto‑infused olive oil. It’s perfect for a summer gathering.
Roasted Red Pepper Variation
Add roasted red pepper strips for a smoky sweetness. The pepper’s charred flavor complements the sun‑dried tomatoes and adds a new dimension of flavor. It also gives the dip a vibrant red hue that looks stunning on a plate.
Spicy Chipotle Kick
Replace the red chili flakes with chipotle powder for a smoky heat. The chipotle’s earthy flavor pairs wonderfully with the olive oil and adds a subtle smokiness. This variation is great for those who love a bit of heat with a twist.
Cheesy Gouda Variation
Use grated Gouda instead of Parmesan for a richer, caramelized cheese flavor. Gouda’s nutty undertones enhance the dip’s depth, making it feel indulgent. This version is perfect for a cozy night in.
Herb Garden Explosion
Add a handful of fresh mint and tarragon for a garden‑fresh twist. The mint adds a cool, refreshing note, while the tarragon brings a subtle anise flavor. This combination turns the dip into a fresh, herbaceous delight.
Vegan Version
Omit the Parmesan and use a vegan cheese alternative or nutritional yeast for a savory umami kick. Keep the rest of the ingredients unchanged. The dip will still be creamy and flavorful, but with a plant‑based twist.
Storing and Bringing It Back to Life
Fridge Storage
Store the dip in an airtight container in the refrigerator for up to 4 days. The oil will solidify slightly, so let it sit at room temperature for a few minutes before serving. This method keeps the flavors fresh and prevents the dip from drying out.
Freezer Friendly
For longer storage, freeze the dip in a freezer‑safe container for up to 2 months. Thaw overnight in the refrigerator, then stir well before serving. The texture remains silky, and the flavors are preserved.
Best Reheating Method
Reheat the dip gently on the stove over low heat, adding a splash of water or olive oil to keep it silky. Stir until it reaches the desired consistency. Avoid high heat to prevent the cheese from separating or the oil from breaking.