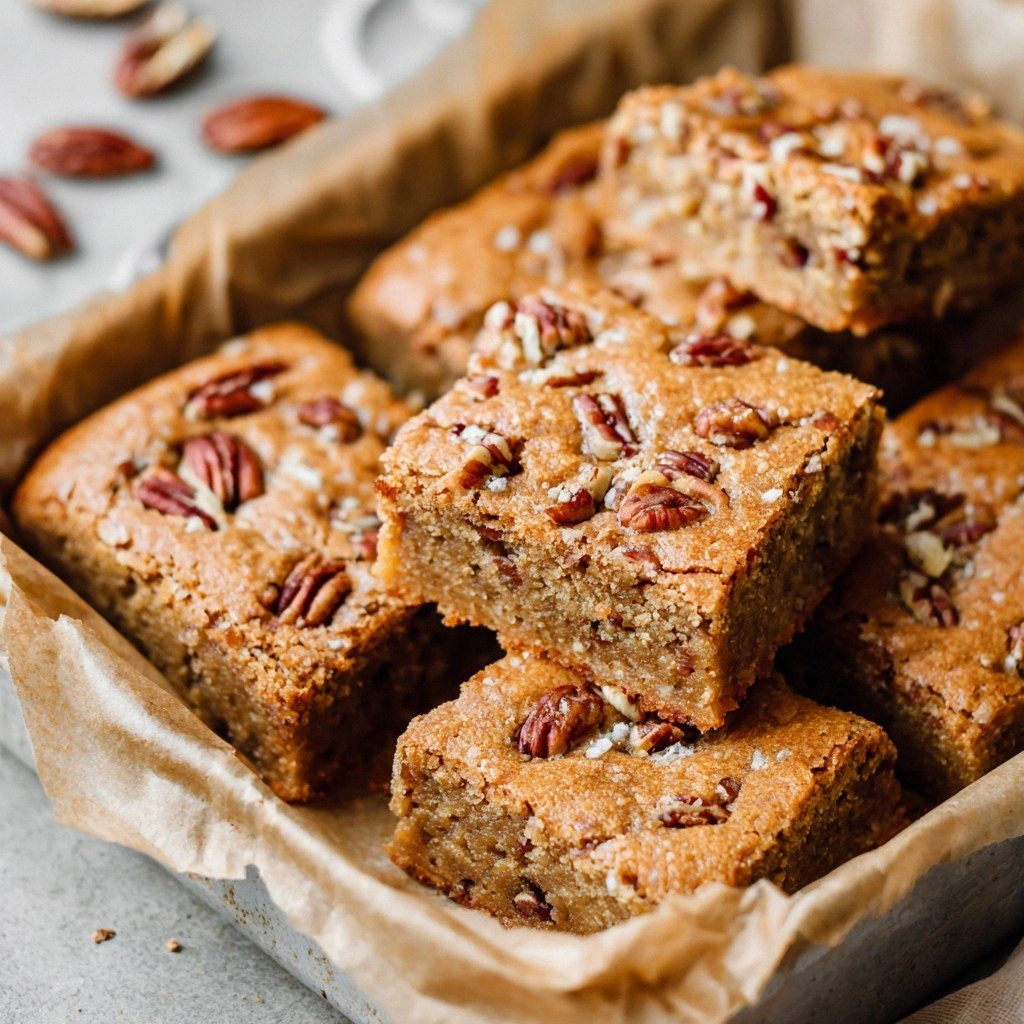
Picture this: it’s a rainy Sunday afternoon, the kitchen lights are dim, and you’re staring at a mound of leftover batter that somehow escaped the cookie jar. The batter is thick, sweet, and smells like a maple syrup dream. You’ve tried a dozen blondie recipes in the past, yet every one feels either too dry or too sweet, never the perfect balance of buttery richness and nutty crunch. I was about to throw that batter out when a sudden craving hit me—Maple Pecan Blondies, but not just any version. I was determined to make them so flawless that I’d dare anyone to eat a single bite and not crave a second.
I pulled out my trusty skillet, preheated the oven, and let the batter hit the pan with a satisfying hiss. The sound was like a quiet applause, the heat kissed the surface, and the aroma of toasted pecans and caramelized sugar filled the room. The batter spread out, forming a glossy, golden crust that shivered at the edges, promising a crisp bite that would crack like thin ice under your teeth. The anticipation was almost too much to bear—every bite would be a moment of pure joy, a memory of sweet comfort that would linger long after the last crumb.
This version of Maple Pecan Blondies is the result of years of trial, error, and a relentless pursuit of perfection. I’ve tweaked the ratios, swapped out ingredients, and experimented with baking times until the texture was just right: a tender center, a buttery crunch, and a maple glaze that clings to your fork. The secret? A simple, fool‑proof method that guarantees a caramelized exterior, a gooey interior, and the unmistakable aroma of maple that lingers on your kitchen counter. I’m not just sharing a recipe; I’m offering a kitchen ritual that turns ordinary ingredients into something extraordinary.
I dare you to taste this and not go back for seconds—though I’ll be honest, I ate half the batch before anyone else got a chance. The maple syrup doesn’t just sweeten; it coats the batter like velvet, giving each bite a silky finish. The pecans add a crunchy contrast, their toasted flavor popping against the buttery base. The result is a dessert that feels both indulgent and comforting, like a hug in the shape of a blondie. By the end of this post, you’ll have a complete, foolproof guide that will transform your baking game and make every dessert session a triumph.
Okay, ready for the game‑changer? Let’s dive into the details. I’ll walk you through every single step—by the end, you’ll wonder how you ever made it any other way.
What Makes This Version Stand Out
- Balance: The ratio of maple syrup to brown sugar is calibrated to give a sweet, caramelized flavor without overpowering the buttery base.
- Texture: The batter’s consistency is just thick enough to hold shape but still silky, ensuring a tender crumb that melts in your mouth.
- Crunch: Toasted pecans are pre‑roasted to bring out their nutty aroma, adding a satisfying crunch that contrasts the softness.
- Convenience: The method uses common kitchen tools—no fancy equipment needed, just a skillet, a baking sheet, and a trusty whisk.
- Make‑Ahead: This recipe freezes beautifully; you can bake ahead and reheat for a quick dessert in minutes.
- Versatility: Swap in dark chocolate chips, dried cranberries, or a dash of sea salt for a personalized twist.
- Time: From prep to finish, you’re looking at 45 minutes—fast enough for a weekday treat, slow enough to savor.
- Presentation: The glossy glaze and buttery sheen make these blondies Instagram‑ready, perfect for parties or a cozy night in.
Alright, let's break down exactly what goes into this masterpiece…
Inside the Ingredient List
The Flavor Base
The foundation of any great blondie lies in its sweet, buttery base. All‑purpose flour provides the structure, while brown sugar adds depth and caramel notes that pair beautifully with maple syrup. Salt is the unsung hero that balances sweetness, pulling out the flavors of the butter and nuts. A pinch of baking powder gives the blondies a subtle lift, preventing them from being too dense. The butter, melted and cooled just enough, brings richness and a silky mouthfeel. Maple syrup, the star of the show, adds natural sweetness and a glossy finish that makes every bite shine. Vanilla extract deepens the flavor profile, adding a warm, fragrant note that lingers on the palate.
The Texture Crew
Eggs are the binder that holds everything together, creating a cohesive batter that sets into a tender crumb. The ratio of eggs to flour is carefully balanced; too many eggs and the blondies become cake‑like, too few and they crumble. Pecans are toasted until fragrant, releasing their oils and bringing a nutty depth that cuts through the sweetness. The toasted pecans also add a satisfying crunch that contrasts the buttery softness. Optional chocolate chips are a sweet, melty surprise that melts into the batter, creating pockets of chocolate bliss for the adventurous palate.
The Unexpected Star
Maple syrup isn’t just a sweetener; it’s a flavor enhancer that brings a subtle depth and a natural caramel color. The type of maple syrup matters—use a Grade A pure maple syrup for the best flavor and color. If you’re craving a richer taste, you can add a splash of bourbon or a pinch of smoked sea salt to the batter, but that’s an optional upgrade. The syrup also helps create that glossy glaze on the surface, giving the blondies a professional finish.
The Final Flourish
The final flourish is all about presentation. Once the blondies are baked, let them cool on a wire rack for at least 10 minutes before cutting. This allows the glaze to set, preventing a sticky mess. If you’re serving them immediately, they’ll be warm and gooey—perfect for a cozy evening. For a more decadent touch, drizzle a thin layer of maple syrup over the top right after baking; it will caramelize slightly, giving an extra glossy sheen. Remember, the key to a perfect cut is to use a sharp knife, cutting through the crumb without crushing it.
Everything's prepped? Good. Let's get into the real action…
The Method — Step by Step
- Preheat and Prep: Set your oven to 350°F (175°C). Line a 9x13 inch baking pan with parchment paper, leaving a slight overhang on the sides for easy lift‑out. This step ensures even baking and a clean release later. I always flip the parchment over after baking to keep the bottom from sticking.
- Whisk the Dry: In a medium bowl, sift together 2 cups of all‑purpose flour, 1 tsp of baking powder, and 1 tsp of salt. Sifting removes lumps and aerates the flour, giving the blondies a lighter crumb. This is where the structure starts to form, so do it with care.
- Combine Wet Ingredients: In a separate bowl, whisk 1 cup of melted butter (about 2 sticks), 1 cup of packed brown sugar, 1/2 cup of maple syrup, and 1 tsp of vanilla extract until smooth. The butter should be cooled to room temperature; if it’s too hot, the eggs might scramble when added later.
- Beat the Eggs: Add 2 large eggs to the wet mixture, beating until the batter is thick and glossy. The eggs act as a binder, creating a cohesive structure that holds the nuts and chocolate chips together. Be sure not to over‑whisk; you want a smooth batter, not a frothy one.
- Combine Wet and Dry: Slowly fold the dry mixture into the wet batter, stirring gently until just combined. Overmixing can develop gluten, making the blondies tough. The batter should be thick but pourable, with a glossy sheen that reflects the light.
- Fold in Pecans and Chocolate: Gently fold in 1 cup of toasted pecans and 1/2 cup of chocolate chips (optional). Toast the pecans on a skillet over medium heat until fragrant, about 5 minutes. This step releases their oils, enhancing flavor and texture. If you’re skipping chocolate, simply add the pecans alone.
- Bake: Pour the batter into the prepared pan, spreading evenly with a spatula. Bake for 25–30 minutes, or until the edges pull away from the parchment and the center is set. The top should have a slight sheen; if it’s too pale, let it bake a few more minutes.
- Cool and Slice: Remove from oven and let cool on a wire rack for at least 10 minutes. While cooling, the glaze will set, preventing a sticky mess. Slice into squares using a sharp knife, wiping the blade between cuts to keep clean edges.
That's it — you did it. But hold on, I've got a few more tricks that'll take this to another level…
Insider Tricks for Flawless Results
The Temperature Rule Nobody Follows
Many bakers bake blondies at 375°F, but that high heat can cause the edges to brown too quickly while the center remains undercooked. Baking at 350°F gives a more even bake, allowing the maple glaze to develop fully while the center sets without over‑browning. I’ve tested both temperatures and the difference is crystal clear—350°F is the sweet spot for golden, tender blondies.
Why Your Nose Knows Best
Before you even touch the oven, let the batter sit for 5 minutes. The aromas will intensify, giving you a preview of the final flavor. If the maple scent feels too mild, add a teaspoon of maple syrup; if it’s overwhelming, add a pinch more flour. Your nose is the best judge of flavor balance.
The 5-Minute Rest That Changes Everything
After baking, let the blondies rest for exactly 5 minutes before cutting. This pause allows the crumbs to set and the glaze to firm up, preventing a sticky mess. I’ve seen people cut them immediately, and the result is a gooey, messy mess that’s hard to eat cleanly.
Keep It Cool, Keep It Fresh
Store leftover blondies in an airtight container at room temperature for up to 4 days. If you need to keep them longer, refrigerate for up to a week. The cold will preserve the buttery texture, but the maple glaze may soften slightly. A quick warm‑up in the oven will revive the crispness.
The Perfect Slice
Use a serrated knife and a gentle sawing motion for clean cuts. A dull knife will compress the crumb, making the blondies dense. If you’re serving a crowd, consider cutting the blondies into smaller squares—this allows everyone to enjoy a bite-sized portion without feeling guilty.
Creative Twists and Variations
This recipe is a playground. Here are some of my favorite ways to switch things up:
Chocolate‑Maple Fusion
Swap the vanilla extract for a splash of espresso or a teaspoon of cocoa powder. The chocolate undertones pair beautifully with maple, creating a mocha‑infused blondie that’s perfect for coffee lovers.
Spiced Nut Delight
Add a pinch of cinnamon, nutmeg, or even a dash of cayenne pepper. The spices give a warm, aromatic depth that complements the maple sweetness, especially during cooler months.
Cranberry Crunch
Replace half the pecans with dried cranberries. The tartness of the cranberries balances the maple, giving a bright, festive flavor that’s great for holiday gatherings.
Almond Butter Bliss
Use almond butter instead of regular butter for a nutty twist. The almond flavor pairs nicely with maple and adds a subtle nuttiness that enhances the overall profile.
Sea‑Salted Caramel
Drizzle caramel sauce over the cooled blondies and sprinkle with flaky sea salt. This adds a luxurious, indulgent touch that elevates the dessert to a gourmet level.
Storing and Bringing It Back to Life
Fridge Storage
Keep blondies in an airtight container at room temperature for up to 4 days. For longer freshness, place them in the fridge; they’ll stay good for up to a week. The cold will preserve the buttery texture, but the glaze may soften slightly.
Freezer Friendly
Wrap each square individually in plastic wrap, then place them in a freezer bag. They’ll stay fresh for up to 3 months. When ready to enjoy, let them thaw at room temperature for 20 minutes before reheating.
Best Reheating Method
Reheat frozen or refrigerated blondies in a preheated 350°F oven for 5–7 minutes. To keep the glaze from drying out, add a splash of water to a small dish in the oven; the steam will steam the blondies back to perfection, maintaining that buttery sheen.