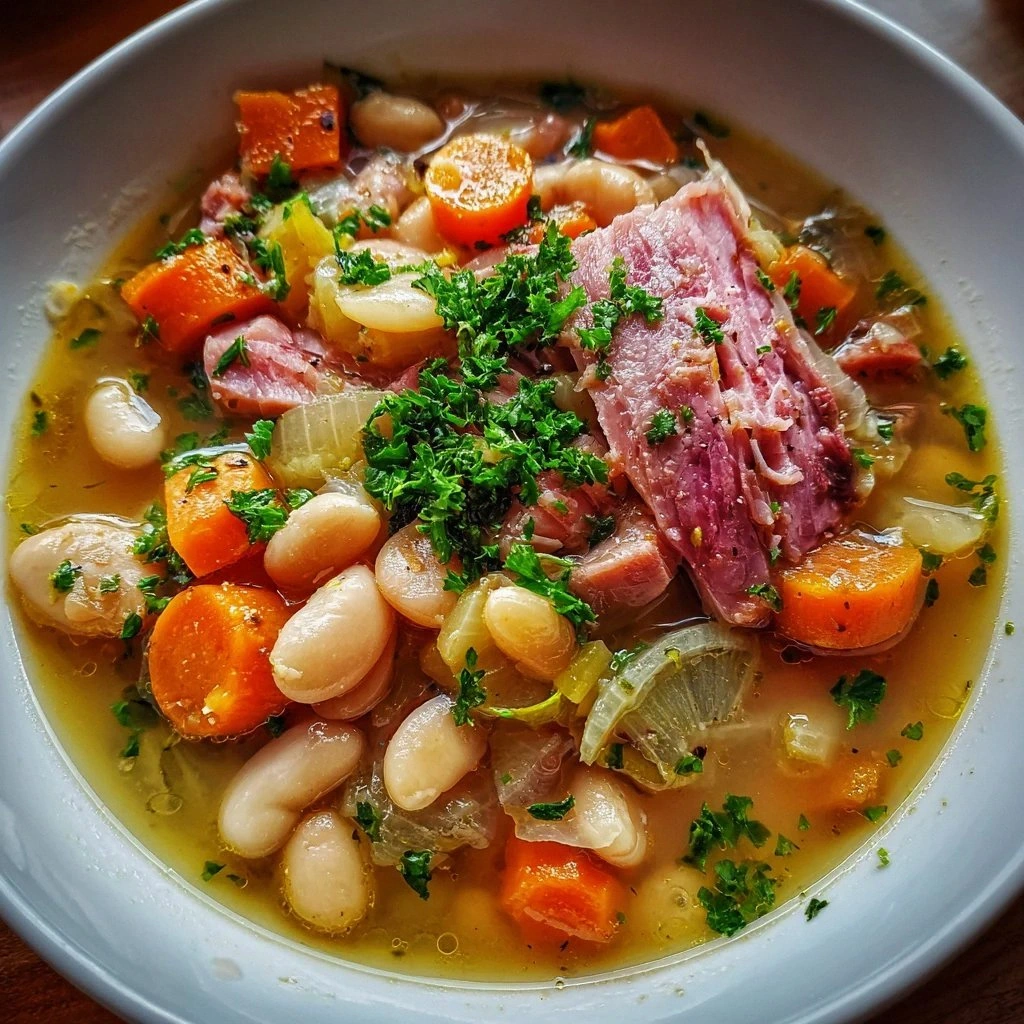
Last Tuesday I was staring at a ham bone the size of a toddler's forearm, wondering if I could get away with tossing it in the trash without my grandmother's ghost appearing with a wooden spoon. The thing had been lurking in my fridge since Easter, wrapped in foil like some sort of meaty time capsule, and I was this close to pretending it didn't exist. But then the weather turned nasty, my apartment dropped to a temperature that made my toes curl, and suddenly that ham bone looked less like garbage and more like destiny. Three hours later, I was ladening soup into bowls while my neighbor banged on the door demanding to know what smelled like heaven had collided with a smokehouse. I fed her two bowls, sent her home with a quart container, and spent the rest of the night fielding texts from her roommates begging for the recipe. This, my friends, is how Navy Bean Ham Bone Soup becomes legendary.
Most recipes treat this like some sort of sad leftover situation — toss beans in water with a ham bone, boil until everything tastes like disappointment, then serve with a side of "well, at least we're not wasting food." That's not cooking; that's culinary surrender. What I'm about to show you is how to coax every molecule of smoky, porky, creamy comfort from humble ingredients until you're left with something that makes grown adults close their eyes and sigh. The secret isn't fancy ingredients or twelve-hour simmering sessions (though patience helps). It's understanding that a ham bone isn't just flavor — it's a time machine that transforms dried beans into silk while creating a broth so rich you'll want to bathe in it. Okay, maybe don't actually bathe in it, but I won't judge if you sneak spoonfuls straight from the pot.
Picture this: outside, rain lashes against the windows while wind rattles the glass like an impatient visitor. Inside, your kitchen becomes a sanctuary of bubbling pots and intoxicating aromas. The beans have been soaking since morning, plumping into smooth white pearls while you went about your day. Now they're tumbling in a broth that smells like every good memory of Sunday dinners and holiday gatherings rolled into one. That ham bone, once picked clean, has given up its treasure — collagen that thickens the soup, marrow that enriches it, and bits of meat that surprise you with bursts of salty satisfaction. This isn't just dinner; it's edible hygge, the Danish concept of cozy contentment distilled into a bowl.
Let me walk you through every single step — by the end, you'll wonder how you ever made it any other way.
What Makes This Version Stand Out
Smoky Depth: Instead of just simmering that ham bone, we roast it first to intensify the smoky flavors and render any remaining fat. This creates a fond on the bottom of your pot that deglazes into liquid gold, giving the soup layers of complexity that most recipes miss entirely. The difference between roasted and unroasted ham bone is like comparing a campfire to a scented candle — both smell nice, but only one makes you want to build a blanket fort and stay forever.
Bean Perfection: Most recipes either turn beans into mush or leave them chalky. We soak them with salt (not just water) which seasons them inside and out while maintaining their structural integrity. Then we cook them low and slow with aromatics, but add acid at exactly the right moment to keep the skins from blowing out. The result? Beans that are creamy inside but still hold their shape, swimming in a broth that's thick enough to coat your spoon but not so heavy it feels like bean paste.
Vegetable Magic: While the ham bone gets star billing, the supporting cast of vegetables gets the star treatment too. We caramelize the onions until they're jammy and sweet, roast the carrots for concentrated flavor, and add garlic at two different stages for both mellow and punchy garlic notes. It's like having a backup band where every member could front their own show — each vegetable contributes something essential while playing beautifully together.
Texture Play: Here's where we get sneaky. We puree a cup of the cooked beans with some broth and stir it back in, creating a velvety base that makes the soup feel richer than cream without any dairy. Then we add fresh parsley at the end for brightness and a handful of leftover ham pieces for chewy contrast. Every spoonful has something interesting happening — smooth, chunky, herby, meaty, all dancing together like a well-choreographed flash mob in your mouth.
Make-Ahead Champion: This soup actually improves after a day in the fridge when the flavors have time to marry and deepen. It freezes like a dream, reheats beautifully, and can be stretched to feed a crowd or portioned into individual servings for emergency comfort food. I've made this on Sunday and eaten it for lunch all week, and by Friday I'm still not tired of it. That's the hallmark of a truly great recipe — it becomes a friend you want to visit again and again.
Pantry-Friendly Flexibility: No navy beans? Use Great Northern or cannellini. Don't have a ham bone? A smoked ham hock works, or even bacon in a pinch. The recipe adapts to what you have without losing its soul. It's like the culinary equivalent of that friend who can make any party better just by showing up — doesn't matter what they're wearing or who else is there, they just work.
Alright, let's break down exactly what goes into this masterpiece...
Inside the Ingredient List
The Foundation Builders
Let's start with the beans because they're the canvas everything else paints on. Navy beans are my go-to here — they're small enough to cook evenly but sturdy enough to hold up to long simmering. Their thin skins mean they absorb flavors like tiny sponges while their creamy interior melts into the broth. If you can't find navy beans, Great Northern are your next best bet; they're slightly larger but have a similar mild, nutty flavor that plays well with ham. Cannellini work in a pinch, though they'll give you a more rustic, Italian vibe that changes the soup's personality from New England comfort to Tuscan countryside.
The ham bone is where things get interesting. You want one with plenty of meat still clinging to it, plus that knobby joint that holds all the collagen. This isn't the time for a pristine, picked-clean bone — ask your butcher for the ones they save for dogs (but don't tell Fido). The meaty bits will render and become those glorious little nuggets of hammy goodness scattered throughout, while the joint will break down and give your broth body. If your bone is from a honey-baked ham, the caramelized exterior will add subtle sweetness that balances the salt.
The Aromatics Alliance
Yellow onions form the aromatic foundation, but we're not just throwing them in raw. We cook them low and slow until they turn the color of antique mahogany and taste like onion jam. This caramelization process creates hundreds of new flavor compounds that add depth you can't get any other way. Don't rush this step — if you're not willing to invest fifteen minutes in onions, you're making bean water, not soup. The transformation from sharp raw onion to sweet, sticky perfection is pure kitchen alchemy.
Carrots aren't just for color; they bring natural sweetness that balances the ham's saltiness. I like to cut them into small dice so they cook quickly but still have presence in the final soup. The key is adding them after the onions are nearly done so they absorb some of that caramelized flavor but don't turn to mush. Think of them as the bridge between the savory ham and the earthy beans, creating harmony in every spoonful.
The Flavor Amplifiers
Garlic gets added in two waves — first, we sauté minced garlic until fragrant, then we add more near the end for that bright, punchy note. This gives you both the mellow, sweet flavor of cooked garlic and the sharp, almost spicy kick of garlic that's just hit hot liquid. It's like having your garlic cake and eating it too. If you're a garlic lover, you might be tempted to add more, but resist — the ham should be the star here, and too much garlic will bully it off the stage.
Kosher salt and black pepper seem basic, but they're crucial. The ham bone will add salt, but beans need seasoning from the beginning to avoid bland centers. We salt the soaking water and the sauté, then adjust at the end. Freshly ground black pepper adds warmth and complexity without heat. If you want to get fancy, white pepper gives you the flavor without the specks, but I like seeing those little black flecks — they remind me this is real food, not something from a can.
The Liquid Assets
Chicken broth forms the soup's base, but we're not using just any broth. Homemade is ideal, but if you're using store-bought, go for low-sodium so you can control the salt level. The broth should taste good enough to drink on its own because it's going to reduce and concentrate. If it tastes flat now, it'll taste like disappointment later. I keep cartons of good quality broth in my pantry specifically for soups like this — it's not the place for that questionable powder you found in the back of your spice cabinet.
Water might seem redundant when you have broth, but it's essential for getting the right consistency. The beans will absorb liquid and release starch, thickening the soup. Starting with all broth would give you something too rich and salty by the end. Think of water as giving the flavors room to develop and mingle, like a good host who introduces everyone but doesn't dominate the conversation.
Everything's prepped? Good. Let's get into the real action...
The Method — Step by Step
-
Start the night before by sorting through your beans like you're looking for treasure among rocks. Spread them on a baking sheet and pick out any shriveled ones, small stones, or mystery objects that don't look like beans (I've found everything from pebbles to beads). Rinse them under cold water until it runs clear, then place in a large bowl with enough water to cover by two inches. Add a generous pinch of kosher salt — this seasons the beans from the inside and helps them cook evenly. Cover with a plate and let them soak overnight on the counter. The salt brine works magic, and you'll wake up to beans that look plumper and happier than when you started.
-
When you're ready to cook, drain and rinse the beans. They should have doubled in size and feel smooth and cool to the touch. Set them aside while you prep the ham bone. If it's been in the fridge, let it sit at room temperature for 30 minutes — this prevents it from shocking when it hits the hot pot. Heat your oven to 400°F and place the ham bone on a foil-lined baking sheet. Roast for 20 minutes until the meat starts to crisp and render. Your kitchen will smell like a smokehouse, and neighbors might start showing up with empty bowls. This step isn't optional — it's what separates good soup from life-changing soup.
Kitchen Hack: Don't throw away the rendered fat from the roasted ham bone. Pour it into the soup pot when you start sautéing the vegetables. Liquid gold, people. Liquid. Gold. -
While the ham bone roasts, heat a heavy-bottomed soup pot or Dutch oven over medium heat. Add the butter and swirl until it foams and just starts to turn golden. This isn't just for flavor — the milk solids in butter will help create a beautiful fond on the bottom of the pot. Add the chopped onions with a pinch of salt and stir to coat. Now comes the test of your patience: cook these onions for 15-20 minutes, stirring every few minutes, until they turn the color of maple syrup. They'll shrink dramatically and smell like the best French onion soup you've never had. Don't rush this. If they start to burn, lower the heat. If they're not browning after 10 minutes, raise it slightly. You're building flavor that will carry the entire soup.
-
When the onions are properly caramelized, push them to the sides of the pot and add the carrots in the center. Let them sit for 2 minutes without stirring — we want them to pick up some color from the hot pot bottom. Then stir everything together and cook for another 5 minutes until the carrots start to soften. Add the minced garlic and cook for just 30 seconds until fragrant. Garlic burns faster than a bad first date, so don't walk away. The moment it smells like you want to eat it raw, it's ready. Your kitchen should smell like the best diner in the world right now.
Watch Out: If your ham bone is particularly salty, taste the rendered fat before adding it to the vegetables. Some cured hams can be salt bombs that will ruin your soup. When in doubt, use half and save the rest for seasoning later. -
Add the drained beans to the pot and stir to coat them with the onion mixture. Pour in the chicken broth and water, then nestle the roasted ham bone in the center like it's taking a hot bath. The liquid should just cover everything — add more water if needed. Bring to a gentle simmer, not a rolling boil. Boiling will break the beans and make them mealy. Once it simmers, reduce the heat to low, cover partially, and let it bubble away for about 90 minutes. Stir occasionally, maybe every 20 minutes, and add more liquid if it starts looking thick. The beans should be tender but not falling apart, and the broth should be starting to thicken from the bean starch.
-
After 90 minutes, check the beans by fishing out a few and blowing on them. If the skins wrinkle and split, they're ready. If they still feel firm in the center, give them another 15-20 minutes. Remove the ham bone to a cutting board and let it cool slightly. Increase the heat under the soup to a gentle simmer. Once the ham bone is cool enough to handle (but still warm — you want to work with it while the fat is liquid), pick off all the meat and set it aside. Don't be fussy about getting every bit; the small pieces will add texture. Return any bones or cartilage to the pot — they'll continue to give up collagen and flavor.
-
Now we create the signature texture that makes this soup special. Ladle out about a cup of beans with some broth into a blender and puree until smooth. If you have an immersion blender, you can use that instead, but don't overdo it — we want some beans whole for texture. Stir this bean puree back into the soup. It will thicken everything and create a silky base that makes the soup feel luxurious without any cream. This is the moment when your soup transforms from rustic to restaurant-quality. The color will deepen, the texture will become velvety, and suddenly you'll understand why this step is non-negotiable.
Kitchen Hack: If your soup is too thick, thin it with hot water or broth. If it's too thin, mash some beans against the side of the pot with a spoon and stir — they'll break down and thicken the broth naturally. -
Add the reserved ham meat back to the pot along with the remaining minced garlic and chopped parsley. Simmer for another 10 minutes to let the flavors meld. Taste and adjust seasoning — you'll likely need pepper, but taste before adding salt since the ham varies in saltiness. The soup should coat the back of a spoon but still be pourable. If you drag your spoon through it, the line should hold for a moment before filling in. That's when you know it's perfect. Serve hot with crusty bread for sopping up every last drop, or let it cool and refrigerate — it gets better overnight.
That's it — you did it. But hold on, I've got a few more tricks that'll take this to another level...
Insider Tricks for Flawless Results
The Temperature Rule Nobody Follows
Here's the thing about bean soups — they're incredibly forgiving, but there's one rule that separates good from transcendent: never let it boil after the first hour. A gentle simmer, where bubbles barely break the surface, keeps the beans intact while allowing them to release their starch slowly. Boiling makes the beans explode and turns your soup into bean paste with meat chunks. I keep my burner on the lowest setting and partially cover the pot. If it's bubbling too vigorously, place a flame tamer or even a cast iron pan underneath to diffuse the heat. Your patience will be rewarded with beans that are creamy inside but still hold their shape, swimming in a broth that's thick but not gloppy.
Why Your Nose Knows Best
After making this soup dozens of times, I've learned to trust my nose more than any timer. When the onions are perfectly caramelized, they'll smell sweet and slightly jammy, not sharp or raw. The garlic should hit your nose immediately when it hits the pot — if you don't smell it within 30 seconds, your heat is too low. When the soup is done, it should smell like Sunday dinner at your grandmother's house, assuming your grandmother was a culinary genius who understood the power of low and slow cooking. If it smells flat or one-note, it probably needs more time for the flavors to develop. This is where cooking becomes intuitive rather than mechanical.
The 5-Minute Rest That Changes Everything
After the soup finishes cooking, turn off the heat and let it rest for five minutes before serving. This isn't just about avoiding burned tongues — it's about allowing the flavors to settle and integrate. During cooking, everything is moving and changing rapidly. That brief rest lets the temperature equalize, the starch fully hydrate, and the flavors marry. It's like the difference between a first date and a couple that's been together for years — everything becomes more comfortable and well-rounded. If you're making this for company, use this time to warm bowls, slice bread, or pour wine. Your guests will think you're incredibly organized when really you're just letting chemistry do its thing.
The Ham Bone Gold Standard
Not all ham bones are created equal, and knowing how to pick them makes a massive difference. Look for bones with plenty of meat still attached, especially around the joint where collagen lives. A bone from a spiral-cut ham works beautifully because the slices expose more surface area for browning. If you can, ask your butcher for the hock end rather than the shank — it has more connective tissue that breaks down into gelatin. And here's a pro tip: if you're buying ham specifically for this soup, get one with the bone in, serve the ham for dinner, and save the bone for soup. The bone from a honey-baked ham adds subtle sweetness, while one from a country ham will give you more intense, salty flavor.
The Storage Secret
This soup thickens dramatically as it cools, transforming into something that resembles bean pudding. Don't panic — this is exactly what you want. The starch continues to absorb liquid even after cooking. When reheating, add water or broth until it reaches your desired consistency. I keep a container of the cooking liquid (or just water) next to the leftover soup for this exact purpose. And here's the beautiful part: because it thickens so much, you can use it as a base for other dishes. Thin it slightly and it becomes soup. Keep it thick and it becomes a fantastic sauce for roasted vegetables or pasta. My favorite trick is using leftover thick soup as a spread for sandwiches — it's like bean hummus with ham, and it's absolutely addictive.
Creative Twists and Variations
This recipe is a playground. Here are some of my favorite ways to switch things up:
The Spanish-Inspired Version
Swap the ham bone for a smoked ham hock and add a teaspoon of smoked paprika with the onions. Throw in a bay leaf while simmering, and replace half the parsley with fresh thyme. The result tastes like something from a Spanish grandmother's kitchen — deeper, more mysterious, with a smoky complexity that makes you want to plan a trip to Barcelona. Finish with a drizzle of good olive oil and serve with crusty bread rubbed with tomato and garlic. It's the same comfort but with a passport stamp.
The Vegetarian (But Still Hearty) Adaptation
Skip the ham bone and use a parmesan rind instead — it gives you that umami depth without any meat. Add a tablespoon of white miso paste when you puree the beans for extra savoriness. Use vegetable broth instead of chicken, and throw in a handful of dried porcini mushrooms for that earthy, meaty flavor. The mushrooms rehydrate in the soup and add little pockets of umami bombs. It's not the same as the original, but it's so good that even dedicated carnivores ask for seconds.
The Spicy Southern Take
Add a diced ham steak along with the bone for extra meat, and throw in a ham hock for good measure. Add a teaspoon of cayenne pepper and a diced jalapeño with the garlic. Finish with a splash of hot sauce and serve over rice with cornbread on the side. This version eats like a meal that could fuel a farmhand through a twelve-hour day. It's the kind of soup that makes you sweat slightly while eating it, then leaves you feeling invincible against winter weather.
The French Countryside Version
Add two diced potatoes and a cup of chopped kale during the last 30 minutes of cooking. Replace half the parsley with fresh tarragon, and finish with a swirl of crème fraîche. The potatoes add extra body, the kale gives you something green to feel virtuous about, and the tarragon adds an anise note that makes the whole thing taste sophisticated. Serve in wide, shallow bowls with a slice of baguette and you'll feel like you're in a cottage in Provence rather than your own kitchen.
The Smoky Bacon Explosion
Start by rendering diced bacon in the pot until crispy. Remove the bacon bits (save them for garnish) and use the bacon fat instead of butter for the onions. Add a ham bone plus a smoked ham hock for maximum pork flavor. The result is a soup that's unapologetically rich and smoky, the kind of thing that makes vegetarians reconsider their life choices. Garnish with the reserved bacon bits and prepare for people to ask if you added liquid smoke (you didn't — it's just that good).
The Light and Bright Spring Version
Use a smoked turkey leg instead of the ham bone for a lighter, less salty flavor. Add a cup of fresh peas and some chopped fresh mint during the last five minutes of cooking. Replace half the parsley with fresh chives, and finish with lemon zest and juice. This version tastes like spring in a bowl — still comforting and warm, but with bright, fresh flavors that wake up your palate. It's perfect for those in-between days when you want soup but winter is finally loosening its grip.
Storing and Bringing It Back to Life
Fridge Storage
This soup keeps beautifully in the refrigerator for up to five days, and honestly, day three might be the sweet spot. Store it in airtight containers — I like glass because it doesn't absorb odors and you can see what you have. Let it cool completely before refrigerating, but don't leave it at room temperature for more than two hours. The soup will thicken dramatically as it chills, becoming almost solid. This is normal and actually protects the texture of the beans. When you're ready to eat, portion out what you need and thin it with water or broth as you reheat. Never reheat the entire batch multiple times — it breaks down the beans and dulls the flavors.
Freezer Friendly
This soup freezes like a dream for up to three months. I portion it into quart-sized freezer bags, squeeze out the air, and lay them flat to freeze — they stack like books and thaw quickly. Pro tip: freeze some in individual portions for emergency comfort food. Label with the date and contents because frozen bean soup looks remarkably like frozen everything else. To thaw, either leave it in the fridge overnight (best method) or submerge the sealed bag in cold water for faster thawing. Never microwave from frozen — it heats unevenly and can make the beans grainy. Once thawed, use within three days and never refreeze.
Best Reheating Method
The key to reheating is gentle heat and patience. Place the soup in a pot with a splash of water or broth and heat slowly over medium-low, stirring occasionally. If you're in a hurry, you can microwave it, but do so in 30-second bursts, stirring between each burst. The soup will likely need thinning — add liquid gradually until it reaches the consistency you like. Taste and adjust seasoning after reheating; you might need a pinch of salt or a grind of pepper to wake it up. A fresh sprinkle of parsley or a squeeze of lemon juice at the end makes reheated soup taste almost as good as fresh. Almost.