I still remember the first time I made quesadillas for my college roommates—what started as a desperate attempt to use up leftover tortillas and cheese turned into a weekly tradition that had people knocking on our door every Tuesday night. The aroma of melting cheese mingling with toasted tortillas would drift down the dorm hallway like a siren song, drawing in hungry students like moths to a flame. That first batch was far from perfect—half of them leaked cheese everywhere, creating what we affectionately dubbed "cheese lace" on the pan—but the crispy edges and gooey centers were so addictive that we devoured them straight off the cutting board, burning our tongues in our haste.
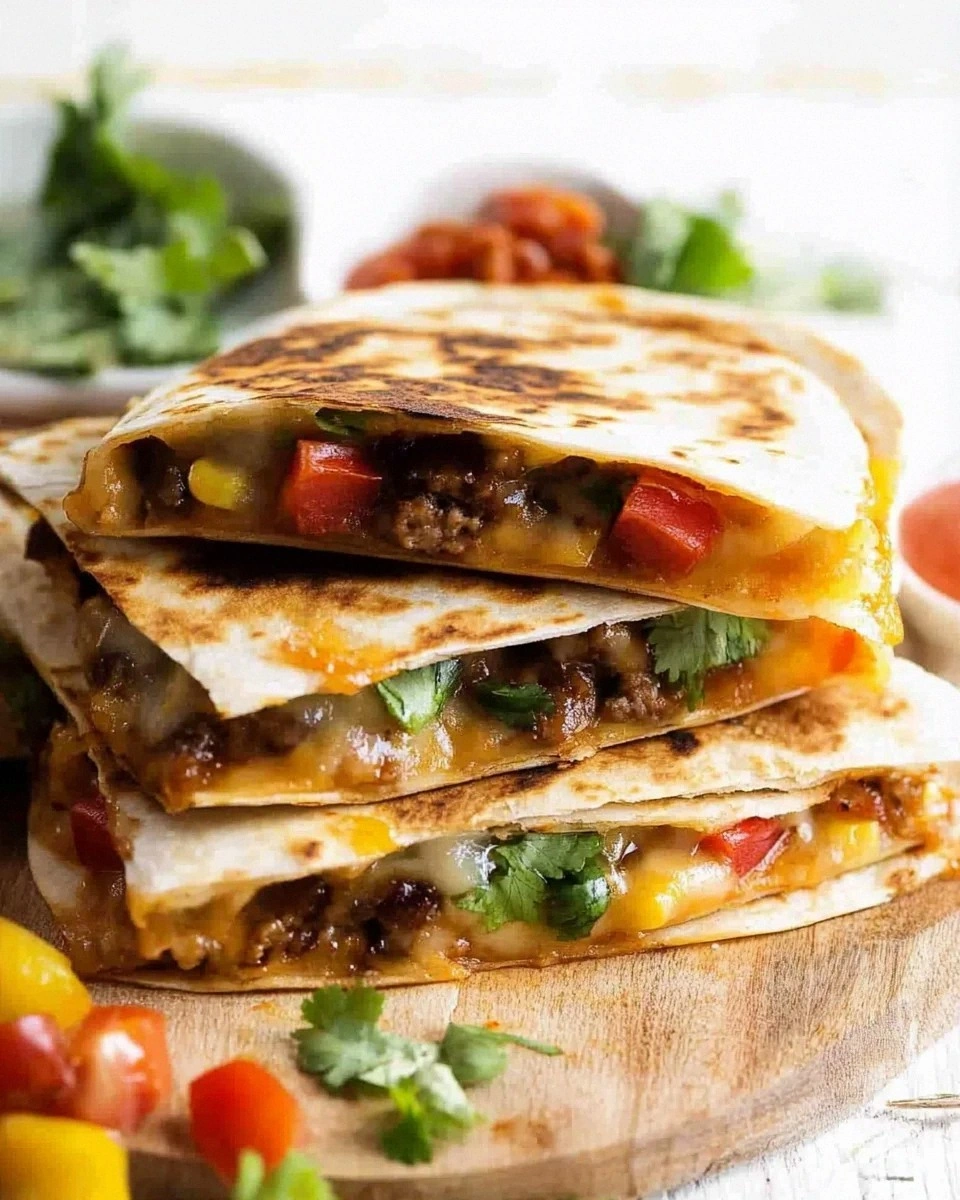
Fast forward fifteen years, and I've turned that chaotic dorm room experiment into what friends now call "the quesadilla that ruined all other quesadillas." This isn't your average throw-some-cheese-on-a-tortilla affair. We're talking about perfectly golden-brown exteriors that shatter like delicate pastry, revealing layers of molten cheese that stretch into Instagram-worthy strands. The secret lies in a technique that most recipes completely miss—a simple step that transforms humble ingredients into something that tastes like it came from the best street vendor in Mexico City.
Picture this: it's 2 AM, you're in your pajamas, and you pull a quesadilla off the pan. The first bite hits you with that satisfying crunch, followed by the slow release of aromatic steam carrying hints of toasted corn, melted cheese, and whatever genius fillings you've chosen. The edges are caramelized and crispy, while the center remains tender and pliable. It's comfort food elevated to an art form, yet it requires nothing more than a pan, some tortillas, and a handful of well-chosen ingredients.
I'll be honest with you—I ate three of these while writing this article. The smell wafting from my kitchen was simply too much to resist, and I don't regret a single bite. What I'm about to share with you isn't just a recipe; it's a masterclass in creating the perfect quesadilla, from selecting the right cheese blend to achieving that elusive golden-brown crust that makes the difference between good and legendary. Let me walk you through every single step—by the end, you'll wonder how you ever made it any other way.
What Makes This Version Stand Out
Cheese Cascade: We use a three-cheese blend that creates different melting points and textures. The Oaxaca cheese provides those incredible stretchy strands, the sharp cheddar adds depth and tang, and a touch of Manchego brings a nutty complexity that makes people ask "what's in this?" after every bite.
Toast Technique: Most recipes rush the toasting process, resulting in pale, flabby quesadillas. We use a medium-low heat that allows the tortilla to crisp slowly while the cheese melts evenly, creating that perfect textural contrast between shatteringly crisp edges and tender centers.
Butter Magic: Instead of oil, we use clarified butter brushed directly on the tortilla. It creates a richer flavor and more even browning than oil, plus it won't burn at higher temperatures like regular butter would.
Steam Control: Here's the game-changer—we cover the pan for the first half of cooking. This trapped steam ensures the cheese melts completely without overcooking the tortilla. Uncover for the final minute to achieve that perfect golden crunch.
Fillings Strategy: We keep fillings minimal and strategic. Too many ingredients make the quesadilla soggy and prevent proper crisping. Each addition is chosen for its ability to complement, not compete with, the star of the show—the cheese.
Cutting Technique: Instead of cutting with a knife, we use kitchen shears. This prevents the cheese from squishing out and creates clean, restaurant-quality edges that stay sealed. It's a small detail that makes a huge difference in presentation.
Make-Ahead Magic: These quesadillas reheat beautifully, maintaining their crisp texture when reheated in a dry pan. Make a double batch on Sunday, and you'll have lunch sorted for the entire week.
Alright, let's break down exactly what goes into this masterpiece...
Inside the Ingredient List
The Foundation Players
Let's start with the canvas of our masterpiece—the tortillas. Not all tortillas are created equal, and using the wrong one is like trying to paint the Mona Lisa on notebook paper. Look for fresh corn tortillas if you want authentic flavor, but flour tortillas work better for achieving that perfect golden-brown exterior. The key is finding ones that are pliable and fresh, not the cracked, dried-out discs that have been sitting on the shelf for weeks. Size matters too—eight-inch tortillas hit the sweet spot between manageable and satisfying, giving you enough surface area for proper cheese distribution without becoming unwieldy in the pan.
The cheese selection will make or break your quesadilla, and I've tested dozens of combinations to find the holy trinity. Oaxaca cheese is traditional for good reason—it melts into those Instagram-worthy strings that stretch for days. If you can't find it, substitute with mozzarella, but know that you're missing the subtle tang that makes Oaxaca special. Sharp aged cheddar brings complexity and that addictive umami note that keeps people reaching for "just one more bite." Don't go mild here—the aging process concentrates flavors that complement the other ingredients beautifully. Finally, a small amount of Manchego adds a nutty, almost caramel-like depth that elevates the entire experience from good to unforgettable.
The Flavor Enhancers
Here's where we get sneaky with flavor. A whisper of smoked paprika in the cheese blend adds warmth without overwhelming the pure cheese flavor. It's like adding a bass note to a song—you feel it more than taste it directly. A touch of garlic powder works similar magic, creating depth that makes people ask for your secret ingredient. Fresh cracked black pepper is non-negotiable—it cuts through the richness and adds a subtle heat that builds with each bite. The trick is using just enough to enhance, not dominate.
Butter might seem basic, but clarified butter is the unsung hero here. By removing the milk solids, we get pure butterfat that can handle higher heat without burning. This means we can achieve deeper browning and richer flavor than regular butter or oil would allow. Make your own by gently melting butter and skimming off the foam, or save time and buy ghee from Indian grocery stores. The nutty aroma it creates when it hits the hot pan is pure kitchen alchemy.
The Texture Team
Crispy edges are what separate a transcendent quesadilla from a merely good one, and achieving them requires understanding how moisture moves during cooking. Too much cheese, and you get a soggy center that never crisps properly. Too little, and you're basically eating a toasted tortilla. We use exactly 1/3 cup of cheese per eight-inch tortilla—enough to create that molten center without overwhelming the structure. The cheese should be grated fine, not shredded, so it melts evenly and quickly.
Fresh herbs might seem counterintuitive in a quesadilla, but a sprinkle of cilantro stems (not the leaves) adds a bright note that cuts through the richness. The stems have more concentrated flavor and better texture when heated. If you're one of those people who think cilantro tastes like soap, substitute with epazote or even a tiny bit of fresh oregano. The key is using herbs sparingly—they should whisper, not shout.
The Unexpected Stars
Here's where we get controversial—pickled jalapeños. Not fresh, not canned in vinegar, but the kind packed in oil with carrots and onions. They bring heat, yes, but also acidity and a subtle sweetness that balances the rich cheese. Chop them finely and distribute sparingly; you want pops of flavor, not a mouthful of pickle. The oil they're packed in is liquid gold—drizzle a tiny bit on the tortilla before adding cheese for an extra layer of flavor complexity.
Finally, the most overlooked ingredient: time. A perfect quesadilla cannot be rushed. Medium-low heat might test your patience, but it's the difference between raw dough in the center and burned edges, versus the perfect golden-brown we're after. Think of it like building a relationship—slow and steady creates something lasting and beautiful, while rushing leads to disappointment and regret.
Everything's prepped? Good. Let's get into the real action...
The Method — Step by Step
-
Start with your mise en place—everything in its place. Grate your cheeses and mix them in one bowl. Clarify your butter if you haven't already, and have your pickled jalapeños chopped and ready. There's nothing worse than realizing your cheese isn't grated when your pan is already hot and your first tortilla is toasting. Lay out your tortillas on the counter and let them come to room temperature if they've been refrigerated—cold tortillas crack when folded, and we're not making tacos here. This prep work takes five minutes but saves you from the chaos of scrambling while your perfect quesadilla burns.
Heat your largest heavy-bottomed skillet or griddle over medium-low heat. I cannot stress this enough—medium-low, not medium, not medium-high. We're playing the long game here, and patience is your secret weapon. The pan is ready when you can hold your hand six inches above it and feel gentle warmth, not searing heat. If your butter sizzles aggressively when it hits the pan, your heat is too high. You want a gentle sizzle, like a content cat purring, not an angry hiss.
-
Brush one side of your first tortilla with clarified butter, making sure to get right to the edges. Flip it over and sprinkle your cheese blend evenly, leaving a half-inch border around the edge. This border prevents cheese from oozing out and creating that dreaded "cheese lace" that burns and sets off smoke alarms. Add your chopped pickled jalapeños now—three to four small pieces distributed evenly is plenty. Remember, we're building layers of flavor, not making a jalapeño sandwich.
Fold the tortilla in half, pressing gently to distribute the cheese evenly. The key here is confidence—hesitant folding leads to cracks and breaks. Think of it like closing a book; smooth and deliberate. If your tortilla cracks, it's too cold or too old. Warm it slightly in a dry pan for ten seconds to make it pliable again. This is not the time for brute force—gentle pressure and warm tortillas are your friends.
-
Now for the magic moment—slide your folded quesadilla into the pan. You should hear a gentle sizzle, like applause from a respectful audience. Cover the pan with a lid immediately. This is where most recipes go wrong—they leave it uncovered, and the cheese never melts properly before the tortilla burns. The trapped steam creates a mini-oven environment that melts cheese evenly while the bottom toasts to golden perfection. Set a timer for two minutes, but don't walk away—these minutes are crucial.
After two minutes, lift the edge with a spatula and peek. You're looking for a pale golden color, like a perfectly toasted marshmallow. If it's still pale, give it another thirty seconds. Once you see that gentle color, it's time to flip. This is where confidence matters again—slide your spatula under, lift confidently, and flip in one smooth motion. If cheese escapes, don't panic; just tuck it back in. Cover again for another ninety seconds to two minutes, depending on your pan and heat level.
Kitchen Hack: Use two spatulas for flipping—one to lift and support, one to guide and catch. It's like having an extra hand in the kitchen, and you'll never lose a quesadilla to the floor again. -
The final step is where we achieve quesadilla nirvana. Remove the lid for the last minute of cooking. This allows any trapped steam to escape, ensuring your tortilla stays crispy rather than soggy. You're watching for that deep golden-brown color, like perfectly tanned skin after a beach vacation. The edges should look slightly darker, almost caramelized, and the surface should have tiny bubbles that indicate proper crisping. Press down gently with your spatula—this helps the cheese adhere to both sides and prevents the dreaded cheese slide when you cut into it.
Remove to a cutting board and let rest for exactly two minutes. I know, I know—fresh quesadillas are calling your name, but this rest is crucial. It allows the cheese to set slightly, preventing molten cheese lava from burning your mouth. Plus, it gives the tortilla time to crisp up even more as it cools. Use this time to start your next quesadilla—by the time you've got the next one in the pan, the first is ready to cut. This rhythm is what separates the pros from the amateurs.
-
Cutting technique matters more than you'd think. Kitchen shears are your best friend here—they create clean cuts without squishing out the cheese like a knife would. Cut into quarters for appetizer portions, or halves for a meal. The cut should be decisive—hesitation leads to cheese squishing and structural integrity failure. If you hear a satisfying crunch when the shears hit the board, you've achieved quesadilla perfection. That sound is the sound of crispy edges giving way to molten cheese, and it's music to any food lover's ears.
Serve immediately on warm plates. Cold plates steal heat faster than a pickpocket in a tourist district. If you're making multiple quesadillas, keep the finished ones warm in a 200°F oven on a wire rack—not directly on a pan, which creates steam and ruins the crisp. A wire rack allows air circulation, maintaining that hard-won crunch while you finish the batch. But honestly, in my house they never make it to the oven—standing around the stove, grabbing pieces as they come off the pan, is half the fun.
That's it—you did it. But hold on, I've got a few more tricks that'll take this to another level...
Insider Tricks for Flawless Results
The Temperature Rule Nobody Follows
Here's the thing about quesadillas that drives me absolutely bonkers when I see people mess it up—they treat temperature like a suggestion, not a science. Your pan should stay consistently between 325°F and 350°F throughout the entire cooking process. How do you know if you're in the sweet zone? The butter should sizzle gently when it hits the pan, not smoke or sit there looking bored. If you have an infrared thermometer, this is its time to shine. Otherwise, the hand test works—hold your palm six inches above the pan, and you should feel warmth that makes you want to pull away after about five seconds. Too hot, and your tortilla burns before the cheese melts. Too cool, and you get a sad, greasy quesadilla that tastes like disappointment and broken dreams.
The real secret? Adjust your heat as you go. The first quesadilla usually needs slightly higher heat because the pan is still coming up to temperature. By the third one, you'll probably need to dial it back slightly as the pan retains more heat. This is why restaurant quesadillas are consistently perfect—the cooks have that muscle memory for heat management that comes from making hundreds a day. After your first batch, you'll start developing that same intuition. Trust me, once you nail this temperature sweet spot, you'll never go back to winging it again.
Why Your Nose Knows Best
Your nose is actually the most sophisticated tool in your kitchen, and when it comes to quesadillas, it's more reliable than any timer. When your quesadilla is ready to flip, you'll smell a toasty, almost nutty aroma wafting up from the pan. It's subtle but distinct—like the smell of perfectly toasted bread or popcorn that isn't quite ready yet. This happens right before the visual cues appear, giving you a thirty-second head start on achieving that perfect golden color. Most people rely too heavily on their eyes and miss these olfactory signals that separate good cooks from great ones.
I learned this from my abuela, who never used timers or thermometers but produced consistent results that made grown men weep with joy. She taught me to trust these sensory cues, and now I can cook quesadillas with my eyes closed—literally. The smell changes again when it's time to remove the lid, becoming slightly sharper as the steam escapes and the tortilla begins its final crisping phase. It's like the quesadilla is telling you its life story through aroma, and all you have to do is listen with your nose.
The 5-Minute Rest That Changes Everything
Okay, ready for the game-changer? After you remove your quesadilla from the pan, let it rest on a wire rack for exactly five minutes before cutting. I know this seems like torture when you're staring at molten cheese through crispy tortilla, but this rest does magical things. The cheese sets to the perfect consistency—molten enough to create those gorgeous cheese pulls for photos, but firm enough that it won't all squish out when you take a bite. The tortilla continues to crisp as steam escapes, achieving a texture that's impossible to get if you cut immediately.
During this rest, the flavors also meld and intensify. It's like the difference between a freshly mixed cocktail and one that's been sitting for a few minutes—the individual components have time to marry and create something greater than their sum. Plus, and this is crucial, you won't burn the roof of your mouth with cheese that's roughly the temperature of the sun's surface. I've seen too many people scar their mouths permanently because they couldn't wait two minutes. Trust the process—your patience will be rewarded with the best quesadilla you've ever tasted.
The Pan Choice That Makes or Breaks You
Your choice of cooking vessel matters more than most people realize. Cast iron is traditional and retains heat beautifully, but it can be unforgiving if your heat management isn't perfect. I've found that a heavy-bottomed stainless steel or carbon steel pan actually gives more consistent results for beginners. The key is avoiding non-stick pans—they prevent proper browning and you'll never achieve those gorgeous crispy edges that make quesadillas addictive. Non-stick also tends to create a weird steamed texture rather than the toasted crunch we're after.
Size matters too—your pan should be large enough to fit the quesadilla flat with room around the edges for steam to escape, but not so large that heat distributes unevenly. For eight-inch tortillas, a ten-inch pan is perfect. It allows for easy flipping without folding, and the extra space creates better air circulation. If you're making multiple quesadillas for a crowd, a large griddle is your best friend, but maintain that medium-low heat and work in batches rather than overcrowding. Overcrowding drops the pan temperature and leads to greasy, sad quesadillas that nobody wants to eat.
The Cheese Ratio Secret
Here's what separates amateur quesadillas from legendary ones—the ratio of cheese to tortilla surface area. Too much cheese and you get a soggy, greasy mess that falls apart when you pick it up. Too little and you're essentially eating a toasted tortilla with cheese sprinkles. The magic ratio is one-third cup of cheese blend for an eight-inch tortilla, distributed evenly but not packed down. This gives you that molten center without overwhelming the structure of the tortilla. It's like finding the perfect balance in a relationship—enough to be satisfying without being smothering.
Distribution technique matters too. Don't just dump the cheese in a pile and hope for the best. Sprinkle it in a light, even layer that reaches the edges but leaves that crucial half-inch border we talked about earlier. Think of it like adding toppings to a pizza—you want every bite to have the perfect balance of ingredients. When you fold the tortilla, the cheese should shift slightly but not clump in the center. This even distribution ensures consistent melting and prevents those disappointing bites that are all tortilla or all cheese.
Creative Twists and Variations
This recipe is a playground. Here are some of my favorite ways to switch things up:
The Breakfast Champion
Add a layer of scrambled eggs with a touch of cream cheese mixed in for extra richness. The cream cheese keeps the eggs moist and prevents them from drying out during the final crisping phase. Include some crumbled chorizo and a sprinkle of queso fresco for a breakfast quesadilla that puts all others to shame. The key is keeping the egg layer thin—too much and you'll overwhelm the cheese, creating a texture that's more omelet than quesadilla. This version is particularly dangerous because you'll find yourself making it for dinner too, and before you know it, you're having breakfast quesadillas at every meal.
The Mushroom Maven
Sauté a mix of wild mushrooms—shiitake, oyster, and cremini—with garlic and thyme until they're deeply caramelized. The trick is cooking them until they're almost crisp, then mixing them with the cheese. The mushrooms rehydrate slightly during melting, creating little pockets of earthy flavor that complement the richness of the cheese. Add a sprinkle of truffle salt if you're feeling fancy, but honestly, the mushrooms bring enough umami on their own. This vegetarian version is so satisfying that even die-hard meat lovers ask for seconds.
The Seafood Sensation
Mix some cooked shrimp with a touch of chipotle mayo and fresh cilantro. The shrimp should be chopped small and distributed sparingly—think of it as accent, not main ingredient. The chipotle mayo adds smoke and heat while helping everything adhere together. This version works particularly well with a Mexican cheese blend that includes some asadero for extra meltiness. It's surprisingly light yet satisfying, perfect for those days when you want something different but still crave that quesadilla comfort.
The Sweet Ending
Here's where we get really creative—dessert quesadillas. Use a blend of cream cheese and mascarpone with a touch of cinnamon and sugar. Add some thinly sliced strawberries or peaches, but pat them dry first to prevent excess moisture. The cooking process is the same, but reduce the heat slightly since the sugar in the cheese mixture can burn more easily. Serve with a drizzle of honey and a sprinkle of cinnamon sugar. It's like a cheesecake and a quesadilla had a beautiful baby that somehow works perfectly.
The Green Goddess
Mix some sautéed spinach with garlic and nutmeg into your cheese blend. The spinach should be squeezed completely dry—wet spinach is the enemy of crispy quesadillas. Add some crumbled feta for tang and a handful of fresh herbs like dill and parsley. This version is surprisingly addictive, even for people who claim they don't like spinach. The key is seasoning the spinach well during cooking—underseasoned greens will make the whole quesadilla taste flat and boring.
The Pizza Mashup
Channel your inner Italian-Mexican fusion with mozzarella, pepperoni, and a touch of pizza sauce. Use the sauce sparingly—too much and you'll have a soggy mess. Add some fresh basil and a sprinkle of oregano. The pizza sauce should be reduced until thick, almost like a paste, so it doesn't make the tortilla soggy. This sounds weird but trust me—it's like the best parts of pizza and quesadilla combined into one perfect package. Kids especially go crazy for this version.
Storing and Bringing It Back to Life
Fridge Storage
Here's the thing about leftover quesadillas—they're actually better the next day if you reheat them properly. Store cooled quesadillas in an airtight container with parchment paper between layers to prevent them from sticking together. They'll keep for up to four days in the refrigerator, though honestly, they've never lasted more than two days in my house. The key is letting them cool completely before storing—trapping steam in the container creates condensation that ruins the crispy texture we worked so hard to achieve. If you're planning to store them, undercook slightly—pull them from the pan when they're just golden rather than deeply browned.
Don't even think about microwaving these beauties—it creates a rubbery, sad texture that undoes all your hard work. The microwave turns the tortilla gummy and the cheese into an unpleasant, congealed mass. If you absolutely must use a microwave (emergency lunch at work, perhaps), wrap the quesadilla in a barely damp paper towel and microwave for 30-45 seconds, then finish in a dry pan. But honestly, just wait until you can reheat it properly. Your taste buds will thank you for the patience.
Freezer Friendly
Quesadillas freeze beautifully if you do it right. Cook them completely, let them cool, then wrap each one individually in plastic wrap followed by aluminum foil. They'll keep for up to three months in the freezer. The trick is flash-freezing them first on a baking sheet for an hour before wrapping—this prevents them from sticking together and maintains their shape. Label them with the date and type, because three months from now you won't remember if these are the regular ones or the mushroom masterpieces.
From frozen, let them thaw in the refrigerator overnight for best results. If you're in a rush, you can reheat from frozen, but add an extra minute to the covered cooking time to ensure the center heats through completely. Frozen quesadillas are perfect for emergency meals, late-night cravings, or when friends drop by unexpectedly. Keep a batch in your freezer and you'll never be more than ten minutes away from hot, crispy, cheesy perfection.
Best Reheating Method
The absolute best way to reheat a quesadilla is in a dry pan over medium-low heat. Place the quesadilla in the pan and cover for two minutes, then flip and cook uncovered for another minute. This method restores the crispy texture better than any other technique I've tried. The covered period creates steam that refreshes the tortilla without making it soggy, while the uncovered final minute crisps everything back up. It's like giving your quesadilla a spa day—it comes out refreshed and better than ever.
For larger batches, use a 400°F oven on a wire rack set over a baking sheet. This allows hot air to circulate underneath, preventing the dreaded soggy bottom. Heat for 8-10 minutes, flipping halfway through. The wire rack is crucial—direct contact with a baking sheet creates steam that ruins the texture. If you don't have a wire rack, flip every three minutes to prevent one side from getting soggy. Serve immediately after reheating—these don't hold well after their second heating.