
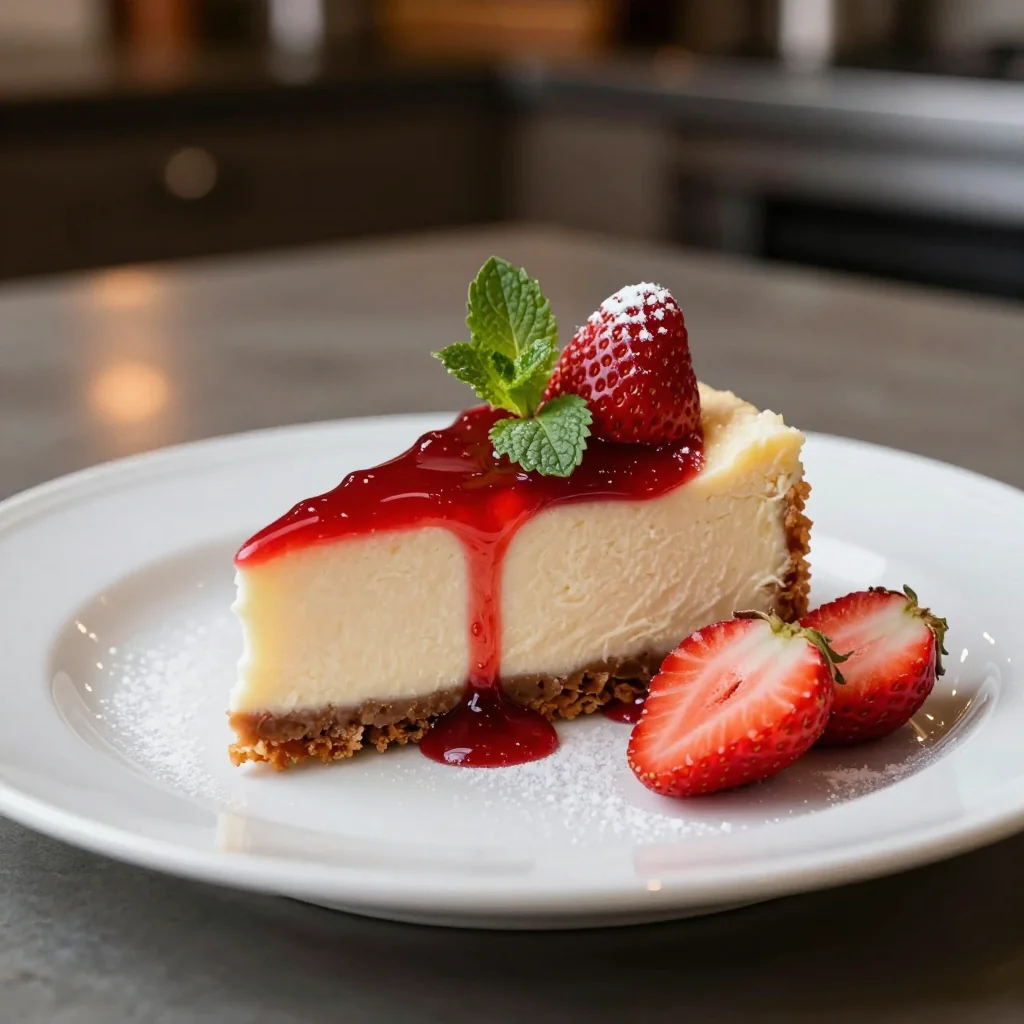
A silky, tangy strawberry cheesecake that sets itself—no oven required, just chill and thrill.
I still remember the first time I tasted a slice of strawberry cheesecake at a tiny seaside café in Amalfi. The bright pink glaze, the creamy tang of the cheese, and the buttery crumb beneath felt like a celebration of summer in a single bite. That memory lingered in my mind for years, prompting countless attempts to recreate the magic in my own kitchen.
This no‑bake version draws inspiration from that moment while adapting the classic Italian‑American dessert to a quicker, more accessible format. By forgoing the oven, you preserve the fresh strawberry flavor and keep the texture light, making it perfect for any season—whether you’re hosting a spring brunch or a cozy winter gathering.
In this guide, you’ll learn how to build a flawless crust, whip a velvety filling, and finish with a glossy strawberry topping that holds its shape without any baking. I’ll share the science behind each step, the little tricks that keep the cheesecake from cracking, and how to adjust the recipe for any number of guests.
So grab your mixing bowls, a few fresh strawberries, and let’s embark on a dessert adventure that will leave your guests asking for seconds.
🌟 Why This Recipe Will Win Your Heart
No‑bake cheesecakes often feel like a compromise, but this one delivers the full‑flavored experience of a traditional bake without the hassle.
- ✨ Effortless Preparation: All steps involve mixing, layering, and chilling—no oven, no temperature anxiety.
- ✨ Fresh Strawberry Flavor: The topping uses pure strawberry purée and a hint of lemon, preserving the fruit’s natural brightness.
- ✨ Creamy, Light Texture: By using a blend of cream cheese and Greek yogurt, the filling stays silky yet not overly heavy.
- ✨ Customizable Sweetness: You control the sugar level, allowing you to make it as sweet or as tart as you desire.
- ✨ Perfect for All Seasons: Serve it chilled on a hot summer day or as a refreshing finish to a hearty winter dinner.
- ✨ Crowd‑Pleaser: Its elegant look and familiar taste make it a hit at parties, baby showers, and holiday tables alike.
🥗 Ingredients
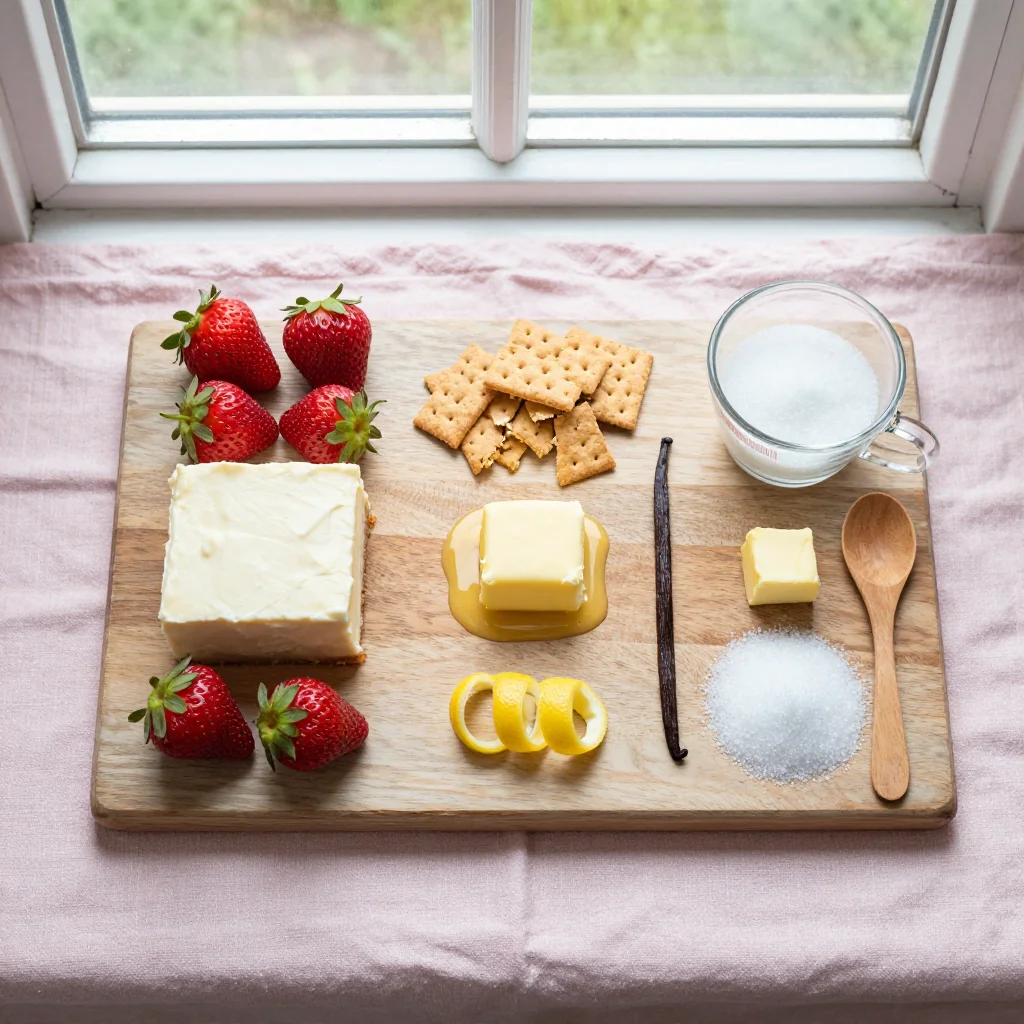
📝 Complete Ingredient List
For the Crust:
For the Filling:
For the Strawberry Topping:
🔍 Focus on Key Ingredients
Cream Cheese
Cream cheese provides the rich, tangy backbone of any cheesecake. For the smoothest texture, bring it to room temperature before mixing; this prevents lumps and ensures a uniform blend with the yogurt. When possible, select a brand that lists simple ingredients—milk, cream, and cultures—without unnecessary stabilizers.
Greek Yogurt
Greek yogurt lightens the filling while adding a subtle tartness that balances the sweetness of the strawberries. Its high protein content also contributes to a firmer set, especially important in a no‑bake recipe where gelatin does the heavy lifting. Choose a full‑fat version for a creamier mouthfeel.
Fresh Strawberries
The star of this dessert, strawberries should be ripe but firm. Over‑ripe fruit can become mushy when cooked, leading to a watery topping. Look for berries with a bright red color, a glossy surface, and a sweet fragrance. If strawberries are out of season, frozen berries (thawed and drained) work well without compromising flavor.
🔄 Quick Substitutions
| If you don’t have… | Use instead… |
|---|---|
| Graham cracker crumbs | Digestive biscuits, finely crushed |
| Greek yogurt | Plain full‑fat yogurt (strain through cheesecloth) |
| Gelatin powder | Agar‑agar (use 1/2 tsp for the same setting power) |
👨🍳 Step‑by‑Step Instructions
Follow these detailed steps to create a flawless no‑bake strawberry cheesecake. Each phase is designed to build confidence, from preparing the crust to achieving a glossy strawberry glaze.
📋 Phase 1: Crust Preparation
Start by creating a buttery, crunchy base that will hold the creamy filling.
Combine dry ingredients
In a medium bowl, whisk together the graham cracker crumbs, granulated sugar, and a pinch of salt. The sugar helps the crust caramelize slightly, giving it a subtle sweetness that complements the tangy filling.
Incorporate melted butter
Drizzle the melted butter over the dry mixture and stir until all crumbs are evenly coated. The butter should be warm, not hot, to avoid melting the sugar crystals.
Press into the pan
Transfer the crumb mixture into a 9‑inch springform pan. Using the back of a measuring cup, press firmly and evenly across the bottom, creating a compact layer. Chill the crust for 10 minutes while you prepare the filling.
🔥 Phase 2: Filling & Gelatin Set
This stage builds the silky cheese layer and activates the gelatin to ensure a firm set.
Bloom gelatin
Sprinkle the gelatin powder over 60 ml of cold water in a small bowl. Let it sit for 5 minutes until it absorbs the water and becomes spongy. Then, gently warm the mixture in the microwave for 10‑15 seconds, stirring until fully dissolved. Avoid boiling, which can degrade gelatin’s setting power.
Blend cream cheese and yogurt
In a large mixing bowl, beat the softened cream cheese until smooth and creamy, about 2 minutes. Add the Greek yogurt, powdered sugar, vanilla extract, and lemon juice. Continue beating on medium speed until the mixture is light and airy, approximately 3 minutes.
Incorporate gelatin
With the mixer on low, slowly drizzle the dissolved gelatin into the cheese mixture. This ensures even distribution without creating air pockets. The gelatin will give the cheesecake a firm yet melt‑in‑your‑mouth texture after chilling.
Assemble the cheesecake
Pour the filling over the chilled crust, smoothing the top with a spatula. Tap the pan gently on the counter to release any trapped air bubbles. Cover the pan with plastic wrap and refrigerate for at least 4 hours, preferably overnight.
✨ Phase 3: Strawberry Glaze and Final Touches
A glossy strawberry topping adds color, flavor, and a professional finish.
Prepare the strawberry purée
In a saucepan, combine hulled strawberries, granulated sugar, and lemon zest. Cook over medium heat, stirring occasionally, until the berries break down and release their juices, about 5 minutes.
Thicken the glaze
Dissolve the cornstarch in 2 tbsp of water, then stir it into the strawberry mixture. Continue cooking for another 2‑3 minutes until the glaze thickens and becomes glossy. Remove from heat and let cool slightly.
Glaze and serve
Pour the warm strawberry glaze over the set cheesecake, allowing it to cascade over the sides. Return the cake to the refrigerator for 15 minutes to let the glaze set. When ready, remove the springform ring, slice with a hot, wet knife for clean cuts, and serve chilled.
💡 Expert Tips & Tricks
🛒 Choosing the Right Ingredients
Opt for full‑fat dairy products; they provide the creaminess essential for a cheesecake that feels luxurious on the palate. When selecting strawberries, avoid those with white or green spots—they indicate underripeness. For the graham crackers, a lightly sweetened variety works best; overly sweet crumbs can overwhelm the subtle tang of the cheese.
🔪 Preparation Techniques
Always bring cream cheese to room temperature before mixing; this prevents a grainy texture. Use a hand mixer on low speed when adding gelatin to avoid creating bubbles that could cause cracks. When pressing the crust, apply even pressure with a flat-bottomed glass to achieve a uniform layer.
🌡️ Mastering the Set
Gelatin is temperature‑sensitive. After dissolving, let it cool to about 40 °C (104 °F) before adding to the filling; this protects the delicate balance of the cream cheese while still allowing the gelatin to activate. Refrigerate the assembled cake for at least 4 hours—shorter times may result in a softer set that won’t slice cleanly.
🍽️ Presentation & Service
For a polished look, drizzle extra strawberry glaze in a decorative pattern using a spoon or a squeeze bottle. Garnish with whole strawberries, a sprig of mint, or a light dusting of powdered sugar. Serve on a chilled plate to keep the cheesecake firm throughout the meal.
🏆 Pro Tips
Professional chefs rely on precision, chemistry, and aesthetics to elevate a simple dessert into a masterpiece.
- 🎯 Control the Gelatin Strength: Use bloom strength (e.g., 200 g Bloom) as a reference. For a firmer set, increase gelatin by 10 %; for a softer, mousse‑like texture, reduce by 10 %. This adjustment is crucial when scaling the recipe.
- 🎯 Layer Temperature Management: Keep the crust chilled while the filling is warm. This contrast prevents the crust from becoming soggy and ensures a clean separation between layers.
- 🎯 Use a Water‑Bath for the Glaze: Cooking the strawberry glaze in a double boiler protects the fruit’s delicate flavor from scorching, preserving its bright color and fresh aroma.
- 🎯 Achieve a Mirror Finish: After the glaze has thickened, strain it through a fine‑mesh sieve to remove seeds and pulp. This yields a smooth, reflective surface that looks restaurant‑ready.
- 🎯 Slice with a Hot Knife: Dip a long chef’s knife in hot water, wipe dry, and cut. The heat prevents sticking and gives each slice a clean edge.
- 🎯 Balance Sweetness with Acidity: A small amount of lemon zest or juice in the glaze brightens the overall flavor profile and cuts through the richness of the cheese.
"A perfect cheesecake is a symphony of texture and flavor; every element must play in harmony." — Dominique Ansel
🔄 Variations & Adaptations
The base recipe is a versatile canvas—feel free to experiment with flavors, dietary needs, and seasonal twists.
🥬 Vegan Version
Replace cream cheese with a vegan cream cheese alternative (e.g., cashew‑based) and use coconut yogurt instead of Greek yogurt. Swap gelatin for agar‑agar (½ tsp agar‑agar for every 1 tsp gelatin). The crust can stay the same, but ensure the butter is replaced with coconut oil for a fully plant‑based dessert.
- Vegan cream cheese (250 g) – provides the creamy base.
- Coconut yogurt (150 g) – adds tang without dairy.
- Agar‑agar (½ tsp) – sets the filling firmly.
🌶️ Flavor Variations
Switch up the fruit or add subtle spices to keep the recipe fresh throughout the year.
Spicy Mango Twist:
Use mango purée in place of strawberries and add a pinch of cayenne pepper to the glaze. The tropical sweetness paired with gentle heat creates a daring dessert.
Mediterranean Olive‑Infused Crust:
Blend finely chopped black olives into the crust mixture for a savory contrast, then top with a honey‑drizzled strawberry glaze.
Asian Matcha Delight:
Add 1 tsp matcha powder to the filling and garnish with toasted sesame seeds. The earthy green tea notes complement the strawberry’s brightness.
⚠️ Dietary Adaptations
Gluten‑Free:
Substitute graham cracker crumbs with gluten‑free oat or almond flour crumbs. Ensure the crumbs are finely ground to maintain a cohesive crust.
Lactose‑Free:
Use lactose‑free cream cheese and coconut yogurt. The coconut’s natural sweetness pairs well with strawberries, reducing the need for extra sugar.
Low‑Calorie:
Reduce the sugar in the glaze by half and replace half of the butter in the crust with unsweetened applesauce. This cuts calories while preserving texture.
👶 Kid‑Friendly Version
For younger palates, omit the lemon zest and reduce the glaze’s acidity. Add a swirl of chocolate ganache on top for a fun, dual‑flavor surprise that kids love.
📦 Storage & Reheating
🧊 Conservation
In the Refrigerator:
- Duration: 5 days
- Recommended container: airtight glass or plastic cake dome
- Tip: Place a piece of parchment paper directly on the surface to prevent the glaze from drying.
In the Freezer:
- Duration: 1 month
- Method: Freeze the whole cheesecake, still in the springform pan, wrapped tightly in plastic wrap and then foil.
- Defrosting: Transfer to the refrigerator overnight; allow 4‑6 hours before serving.
💡 For optimal texture, consume within three days of refrigeration; the gelatin may become slightly softer after extended storage.
♨️ Reheating
🔥 Oven (Recommended):
- Preheat to 150 °C (300 °F).
- Cover the cheesecake loosely with aluminum foil to protect the glaze.
- Heat for 8‑10 minutes, just until the glaze becomes slightly warm.
- Remove foil and heat an additional 2 minutes if you prefer a slightly caramelized top.
⚡ Microwave (Quick):
- Cover with a microwave‑safe lid.
- Heat on medium power for 30‑45 seconds.
- Check temperature; stir gently if the glaze softens unevenly.
🍳 Stovetop:
Place a slice in a non‑stick skillet over low heat, cover, and warm for 1‑2 minutes. This method is handy for individual servings.
🍷 Perfect Pairings
🥗 Side Dishes
- Mixed Green Salad with Balsamic Vinaigrette: The acidity cuts through the richness, refreshing the palate.
- Light Citrus Sorbet: A palate cleanser that highlights the strawberry notes.
- Fresh Berry Compote: Adds texture and a burst of additional fruit flavor.
🍷 Wine & Beverage Pairings
- Late Harvest Riesling: Its sweetness mirrors the dessert while the acidity balances the cheese.
- Prosecco: The effervescence lifts the creamy mouthfeel.
- Non‑Alcoholic Option – Sparkling Elderflower Water: Floral notes complement the strawberries without adding sugar.
🍰 Complementary Courses
Begin with a light citrus appetizer such as grapefruit segments with honey. Follow the cheesecake with a coffee‑infused chocolate mousse for a decadent finish. The progression from bright to rich keeps the dining experience balanced.
❓ Frequently Asked Questions
Q: Can I use a different fruit for the topping?
Absolutely! Blueberries, raspberries, or a mixed berry compote work beautifully. Adjust the sugar level based on the fruit’s natural sweetness, and add a splash of lemon juice to maintain a bright flavor.
Q: How do I prevent the crust from becoming soggy?
The key is to keep the crust chilled while the filling is still warm. The butter solidifies quickly, creating a barrier that stops moisture from seeping in. You can also add a thin layer of melted chocolate over the crust before adding the filling for extra protection.
Q: What if I don’t have gelatin?
Agar‑agar is a plant‑based alternative. Use half the amount (½ tsp agar‑agar for each 1 tsp gelatin) and dissolve it in hot water before adding to the filling. Note that agar sets at room temperature, so the cheesecake will be firmer than gelatin‑based versions.
Q: My cheesecake cracked after chilling—what went wrong?
Cracks usually result from rapid temperature changes or over‑mixing the filling, which incorporates too much air. Ensure the gelatin is fully dissolved and cooled to around 40 °C before mixing, and handle the filling gently.
Q: Can I make this recipe gluten‑free?
Yes. Substitute the graham cracker crumbs with gluten‑free oat or almond flour crumbs. Make sure the crumbs are finely ground to mimic the texture of traditional crumbs, and keep the butter ratio the same.
Q: How far in advance can I prepare the cheesecake?
The cheesecake can be assembled up to 24 hours ahead of serving. Keep it covered and refrigerated. The glaze can be made a day earlier; store it separately in an airtight container and add just before serving for the freshest appearance.
🎉 Let’s Get Baking!
This Strawberry Cheesecake No Bake Dessert proves that elegance doesn’t require an oven or hours of active cooking. By mastering the balance of a buttery crust, a silky gelatin‑set filling, and a vibrant strawberry glaze, you’ll have a show‑stopping dessert that dazzles guests and satisfies cravings. Remember, the secret lies in quality ingredients, precise temperature control, and a little patience while the flavors meld in the fridge.
I can’t wait to hear how your cheesecake turns out. Share your photos, tweak the flavors, and let your creativity shine. Your feedback helps the community grow, and every comment adds a new layer of inspiration for future recipes.
Have you tried this recipe?
Leave a comment and rating below! Share your masterpiece on Instagram with #NoBakeCheesecake for a chance to be featured.
Strawberry Cheesecake No Bake Dessert
A silky, tangy strawberry cheesecake that sets itself—no oven required.
📝 Ingredients
Crust
Filling
Strawberry Topping
👨🍳 Instructions
- 1
Combine graham cracker crumbs, sugar, and salt; stir in melted butter until evenly coated.
- 2
Press the crumb mixture firmly into the bottom of a 9‑inch springform pan and chill for 10 minutes.
- 3
Bloom gelatin in cold water, then dissolve over low heat; let cool to ~40 °C.
- 4
Beat cream cheese until smooth, add Greek yogurt, powdered sugar, vanilla, and lemon juice; mix until airy.
- 5
Slowly pour the dissolved gelatin into the cheese mixture while mixing on low speed.
- 6
Pour the filling over the chilled crust, smooth the top, cover, and refrigerate for at least 4 hours.
- 7
Cook strawberries, sugar, and lemon zest until softened; whisk cornstarch slurry into the mixture and simmer until glossy.
- 8
Allow the glaze to cool slightly, then pour over the set cheesecake; refrigerate 15 minutes to set glaze.
- 9
Remove the springform ring, slice with a hot, wet knife for clean cuts.
- 10
Serve chilled, optionally garnished with fresh strawberries and a mint leaf.
🥗 Nutritional Information (per serving)
*Values are estimates based on standard ingredient data.
📚 You Might Also Like
Blueberry No Bake Cheesecake
Lemon No Bake Cheesecake
Chocolate No Bake Cheesecake


💬 Comments & Reviews
Leave a Comment
No comments yet. Be the first to share your thoughts!