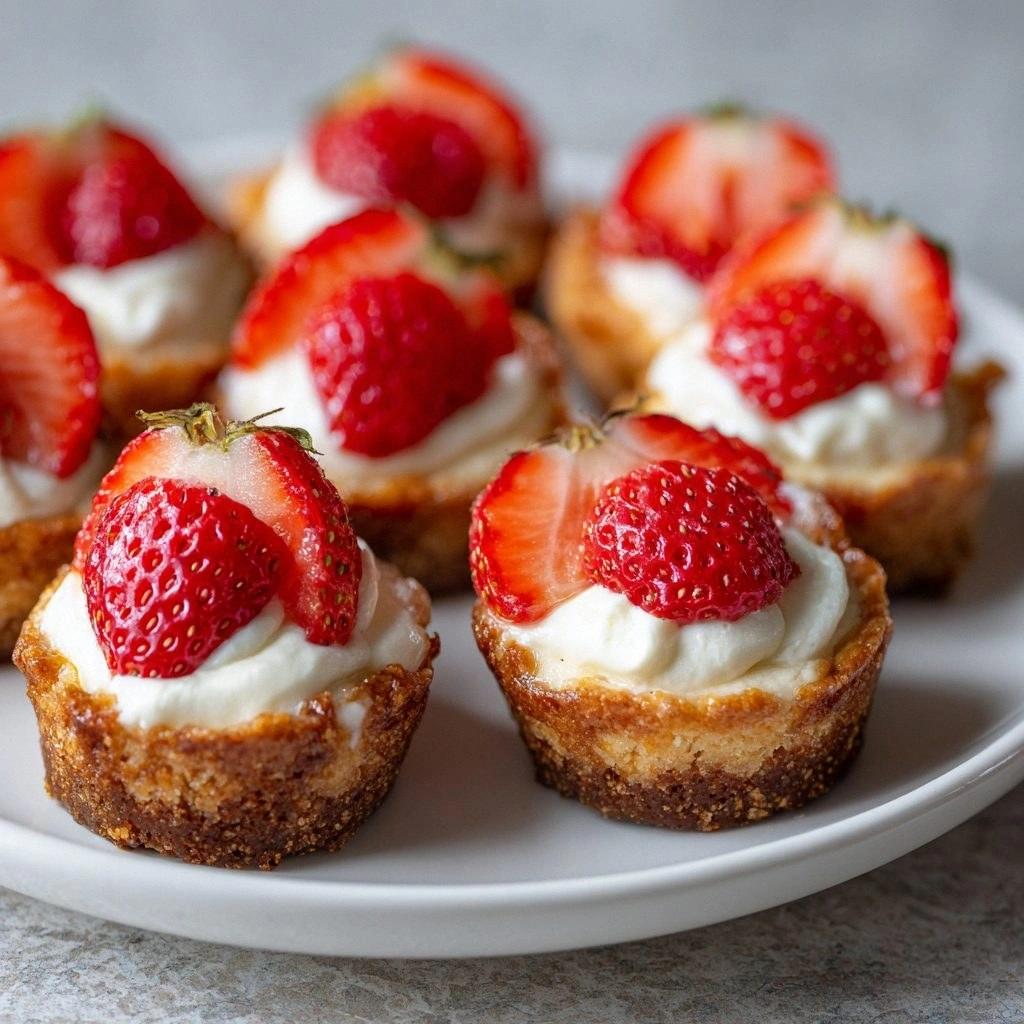
Picture this: the kitchen clock ticking toward midnight, your friends texting about their last bite of dessert, and you, standing in the middle of a flour‑laden counter, craving something sweet and creamy. I had just finished a marathon of chocolate cake and felt a sudden, insistent craving for strawberries. I opened the fridge, pulled out a block of cream cheese, and decided to mix the two in a way that would make my taste buds sing. That moment—half a dozen strawberries, a block of cream cheese, and a dash of vanilla—became the genesis of what I now call the ultimate Strawberry Cream Cheese Cups.
When I first tasted the first cup, the flavors exploded like a summer fireworks display. The strawberries were bright and tart, cutting through the rich, velvety cream cheese that was sweetened just enough to feel indulgent without drowning the fruit. The graham cracker crust added a subtle crunch that made each bite feel like a tiny, edible surprise. The whole experience was a sensory symphony: the fragrant citrus of lemon zest, the buttery aroma of melted butter, and the sweet, floral scent of vanilla. I could almost hear the gentle clink of the muffin tin as I slid the cups out of the oven.
What makes this recipe so unforgettable is that it’s not just a dessert—it’s an experience that invites conversation. Friends will gasp when they see the glossy, strawberry‑topped cups on the table, then fall silent as they take their first bite, and then start debating whether they’d rather have a cup or a slice of cheesecake. The dish is so versatile that it can be served as an elegant party appetizer, a comforting after‑dinner treat, or even a sweet snack on a lazy afternoon. I dare you to taste this and not go back for seconds; it’s that addictive. I’ll be honest—by the time I was done, I had already eaten half the batch before anyone else even had a chance to try a cup.
Most recipes get this completely wrong by over‑baking the filling, using too much sugar, or neglecting the crucial balance of tartness and sweetness. Here, I’ll walk you through every single step, from choosing the freshest strawberries to achieving that perfect, slightly crisp edge that shatters like thin ice. By the end, you’ll wonder how you ever made it any other way. And trust me, the secret ingredient—an unexpected twist—will keep you coming back for more. So grab your apron and let’s dive into the ultimate Strawberry Cream Cheese Cups.
What Makes This Version Stand Out
- Flavor: The strawberries are not merely sweet; they provide a bright, citrusy counterpoint to the rich, buttery cream cheese. The subtle hint of lemon zest elevates the entire profile, making each bite feel fresh.
- Texture: A perfectly crisp graham cracker crust meets a silky filling, creating a delightful contrast that’s both satisfying and indulgent. The slight crunch keeps the cups from becoming soggy.
- Simplicity: With just eight core ingredients, you can whip up a crowd‑pleaser in under an hour. No complicated sauces or exotic spices—just pure, honest flavors.
- Uniqueness: The combination of cream cheese and strawberries in a mini cup form is rarely seen in mainstream cookbooks. It’s a playful take on the classic cheesecake that feels both nostalgic and fresh.
- Audience Appeal: Whether you’re a seasoned baker or a novice, this recipe invites experimentation. It’s ideal for parties, potlucks, or a quiet evening at home.
- Ingredient Quality: The recipe rewards you for using fresh, high‑quality ingredients—think ripe, firm strawberries and full‑fat cream cheese. The result is a richer, more authentic taste.
- Methodology: The step‑by‑step instructions are designed to be foolproof, with clear sensory checkpoints that let you know exactly when the cups are ready.
- Make‑Ahead Potential: The cups can be assembled in advance and refrigerated, allowing you to focus on other preparations when entertaining.
Alright, let's break down exactly what goes into this masterpiece. Each component plays a vital role, and together they create a harmony that’s impossible to replicate with a single ingredient. By understanding the function of each element, you’ll be able to tweak the recipe to suit your taste or dietary needs without sacrificing the overall balance.
Inside the Ingredient List
The Flavor Base
The foundation of any great dessert is its flavor base, and for these cups, it’s a marriage of cream cheese and strawberries. The cream cheese provides a rich, tangy backdrop that holds the sweetness of the fruit, while the diced strawberries bring natural acidity and bright color. If you skip the strawberries, you lose the signature tartness that cuts through the richness, leaving the cups feeling flat and overly sweet. Swapping cream cheese for a lighter ricotta can reduce the calorie count, but the texture will shift from silky to more granular.
The Texture Crew
Texture is everything in these cups. The graham cracker crumbs create a crunchy shell that crumbles just enough to release a buttery crunch with each bite. The melted butter binds the crumbs together, ensuring the crust holds its shape during baking. If you omit the butter, the crust will be dry and crumbly, making it difficult to lift the cups from the pan. For a gluten‑free version, you can use almond flour or a gluten‑free graham cracker blend.
The Unexpected Star
What many people overlook is the subtle inclusion of lemon zest. It’s not just a garnish; it’s a flavor enhancer that brightens the entire dish. The zest adds a citrusy lift that prevents the sweetness from becoming cloying. If you’re allergic to citrus or prefer a milder flavor, a splash of vanilla extract can partially compensate, but the zing will be noticeably missing.
The Final Flourish
Finishing touches like a drizzle of strawberry glaze or a dollop of whipped cream transform a simple dessert into a showstopper. The glaze, made from pureed strawberries and a touch of honey, adds glossy sheen and an extra layer of fruitiness. Whipped cream, lightly sweetened, provides a light, airy contrast to the dense filling. If you’re watching calories, a few fresh strawberry slices on top can replace both glaze and cream.
Everything’s prepped? Good. Let’s get into the real action.
The Method — Step by Step
- Preheat the oven to 350°F (175°C). While the oven warms, line a mini muffin tin with paper liners. The heat will gently melt the butter in the crust mixture, creating a golden‑brown edge. Watch the timer—this is the moment where the batter begins to set, and you’ll notice a subtle scent of toasted crumbs filling the kitchen.
- Prepare the crust. In a medium bowl, combine ½ cup graham cracker crumbs with 2 tablespoons melted butter. Toss until the crumbs are evenly coated and the mixture resembles wet sand. If the crumbs feel dry, add a splash of milk to bring them together. Spread the mixture evenly in the bottom of each muffin cup, pressing down firmly so it forms a solid base.
- Blend the filling. In a food processor, pulse 8 oz softened cream cheese until smooth. Add ¼ cup powdered sugar, 1 tsp vanilla extract, and 1 tsp lemon zest. Process until the mixture is silky and free of lumps. The citrus will brighten the cream cheese, making it taste less heavy.
- Incorporate strawberries. Gently fold in 1 cup diced strawberries into the cream cheese mixture. Be careful not to overmix; you want the strawberries to remain whole for a burst of flavor with each bite. The strawberries’ moisture will keep the filling from becoming too dry, but if you’re worried about excess liquid, reserve a small portion to use as a glaze later.
- Assemble the cups. Spoon the cream cheese mixture over the crust in each muffin cup, filling them about three‑quarters full. The filling should be slightly domed, not overflowing. This ensures a neat finish and prevents the cups from spilling during baking.
- Bake until set. Place the muffin tin in the preheated oven and bake for 18–20 minutes, or until the edges of the crust are golden brown and the filling is set but still slightly jiggly in the center. The jiggly center is a sign that the cups will be creamy once cooled.
- Cool and chill. Remove the cups from the oven and let them cool in the tin for 5 minutes. Then transfer them to a wire rack to cool completely. Once cooled, cover the cups with plastic wrap and refrigerate for at least 1 hour to set the filling fully.
- Finish with a glaze. While the cups chill, blend ½ cup fresh strawberries with 1 tbsp honey until smooth. Strain the mixture through a fine sieve to remove seeds. Brush the glaze over the top of each cup just before serving. The glaze adds shine and an extra layer of strawberry flavor.
- Serve. Remove the cups from the refrigerator, let them sit at room temperature for 10 minutes, and then serve. The cups should be creamy inside, with a crisp crust and a glossy strawberry finish. Pair them with a light tea or a glass of sparkling water for a refreshing finish.
That’s it—you did it. But hold on, I’ve got a few more tricks that will elevate these cups to another level.
Insider Tricks for Flawless Results
The Temperature Rule Nobody Follows
Many bakers bake at a higher temperature, hoping for a faster set. However, baking at 350°F allows the crust to brown evenly without burning, and it gives the filling time to develop that silky texture. If you’re using a convection oven, reduce the temperature by 25°F to avoid over‑browning.
Why Your Nose Knows Best
Before you even touch the oven, sniff the batter. A faint citrus aroma indicates the lemon zest has infused properly. If the mixture smells overly sweet, add a pinch of salt to balance the flavors. My friend once skipped the lemon zest entirely, and the result was a flat, sugary cup that lacked depth.
The 5‑Minute Rest That Changes Everything
After removing the cups from the oven, let them rest in the tin for 5 minutes. This brief pause allows the filling to set without cracking. Skipping this step often leads to a slightly uneven surface that can look unappetizing.
Using Fresh vs. Frozen Strawberries
Fresh strawberries give a bright, vibrant flavor, but if you’re out of season, frozen strawberries work well. Thaw them, pat dry, and squeeze out excess water before adding to the filling. This prevents the cups from becoming too moist.
Whipped Cream vs. Fresh Strawberries
For a lighter finish, replace the glaze with a dollop of lightly sweetened whipped cream. The airy texture contrasts nicely with the dense filling and adds a creamy finish that’s less sweet than the glaze.
Keeping the Cups Cool During Serving
Serve the cups chilled or at room temperature? Keep them refrigerated until just before serving. If you leave them too long at room temperature, the filling may soften and become runny.
Creative Twists and Variations
This recipe is a playground. Here are some of my favorite ways to switch things up:
Chocolate Drizzle Edition
Replace the strawberry glaze with a thin drizzle of dark chocolate. The bittersweet flavor pairs beautifully with the creamy filling, creating a dessert that feels indulgent yet balanced.
Berry Medley Mix‑In
Swap half the strawberries for blueberries or raspberries. The combination of berries adds depth and a pop of color that makes the cups even more Instagram‑worthy.
Almond Crunch Layer
Add a layer of crushed almonds between the crust and the filling. The nutty crunch gives a new texture dimension and a subtle almond flavor that complements the strawberries.
Low‑Calorie Version
Use reduced‑fat cream cheese and a sugar substitute like erythritol. The cups will still taste sweet and creamy, but with fewer calories and a lower glycemic impact.
Spiced Variation
Incorporate a pinch of ground cinnamon or nutmeg into the filling. The warm spices add warmth and depth, making the cups perfect for cooler evenings.
Alcoholic Twist
Stir in 1 tablespoon of Chambord or strawberry liqueur into the filling. The subtle boozy flavor adds sophistication and makes the cups an excellent party starter.
Storing and Bringing It Back to Life
Fridge Storage
Store the cooled cups in an airtight container in the refrigerator for up to 3 days. The crust may soften slightly, but the filling stays creamy. Keep the glaze separate until you’re ready to serve.
Freezer Friendly
Wrap each cup individually in parchment paper and place them in a freezer bag. Freeze for up to 2 weeks. Thaw overnight in the refrigerator before serving.
Best Reheating Method
To revive frozen cups, place them in a preheated oven at 300°F (150°C) for 8–10 minutes. Add a splash of water to the baking dish before reheating; the steam keeps the filling moist and prevents it from drying out. Once warmed, let them sit for 5 minutes before glazing.