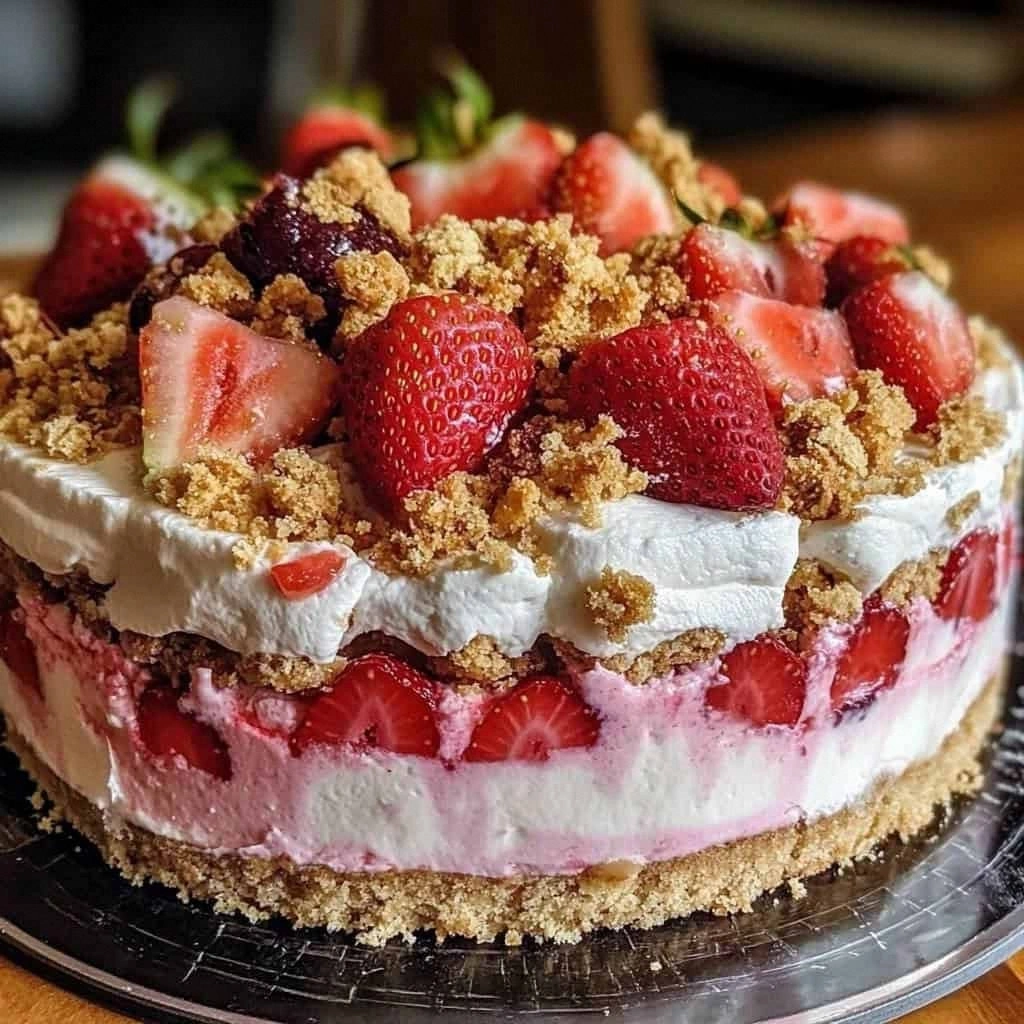
I still remember the day my neighbor bet me twenty bucks that I couldn't make a cheesecake that tasted like those strawberry shortcake ice cream bars we devoured as kids. Challenge accepted. What started as a playful dare turned into an obsession that had me testing crusts at midnight, burning through more cream cheese than I care to admit, and finally landing on what I genuinely believe is the most addictive dessert to ever come out of my kitchen. The moment I pulled this strawberry crunch cheesecake from the fridge and saw that perfect pink layer peeking through the golden crumbs, I knew I had stumbled onto something dangerous. One bite and I was twelve again, standing in front of the corner store with sticky fingers and a smile that wouldn't quit. Except this version? It's like those childhood treats grew up, got sophisticated, and decided to throw a party in your mouth.
The first time I served this at a dinner party, I watched my guests' eyes go wide as they hit that signature crunch layer. You know that moment when someone's chewing but they stop mid-bite because they can't believe what just happened? Yeah, that's this cheesecake. The way the buttery Golden Oreo base gives way to the silky strawberry-spiked filling, followed by that addictive crunchy topping that shatters like caramelized snow — it's pure textural witchcraft. My friend Sarah actually grabbed the pan and hid in my pantry so she could have "just one more sliver" without anyone judging her. I found her twenty minutes later, fork in hand, looking like she'd been caught red-handed in the best possible way.
Here's what makes this recipe different from every other strawberry cheesecake floating around the internet: we're not just dumping strawberry puree into cream cheese and calling it a day. We're layering flavors like a strategic dessert architect, using strawberry gelatin to intensify that bright berry flavor without watering down the filling, and creating a crunch topping that actually stays crunchy even after refrigeration. Most recipes get this completely wrong by adding fresh berries to the topping and ending up with a soggy mess by day two. Not here, friend. We're playing the long game.
Picture yourself pulling this beauty out of the fridge, the condensation beading on the springform pan, that incredible strawberry-vanilla aroma filling your kitchen like a warm hug. Your people will gather around like moths to a flame, and you'll be the dessert hero of every gathering from here until forever. Trust me on this one — I've been making this cheesecake for three years now, and it never fails to steal the show. Okay, ready for the game-changer? Let me walk you through every single step — by the end, you'll wonder how you ever made it any other way.
What Makes This Version Stand Out
Flavor Bomb: We're using strawberry gelatin powder instead of fresh berries in the filling, which gives you that concentrated berry punch without watering down the cheesecake or turning it pink soup. The result is a cheesecake that tastes like strawberry fields in summer, even when you're making it in the dead of winter with grocery store berries that taste like disappointment.
Textural Heaven: That crunch layer isn't just crushed cookies — we're creating a streusel-like topping with flour, butter, and sugar that bakes into crispy nuggets of pure joy. When it hits the cold creamy cheesecake, it's like your mouth can't decide which sensation to focus on first.
Foolproof Method: No water baths, no cracked tops, no wondering if the center is done. We're using a low-and-slow baking method with a final blast of heat that sets the cheesecake perfectly every single time. If you've ever struggled with cheesecake anxiety, you're not alone — and I've got the fix.
Make-Ahead Magic: This beauty actually gets better after a day in the fridge, making it the ultimate entertaining dessert. The flavors meld, the texture firms up to that perfect sliceable consistency, and you can knock it out on a Tuesday and look like a pastry chef by Saturday.
Crowd Psychology: There's something about that nostalgic strawberry crunch flavor that makes people lose their minds. I've seen grown adults fight over the last piece, and don't even get me started on what happens when you serve this at kids' parties — it's like unleashing dessert piranhas.
Ingredient Integrity: Every component serves a purpose here. The almond extract amplifies the strawberry flavor without being identifiable, the heavy cream lightens the texture to cloud-like status, and those Golden Oreos bring a vanilla depth that regular Oreos can't touch.
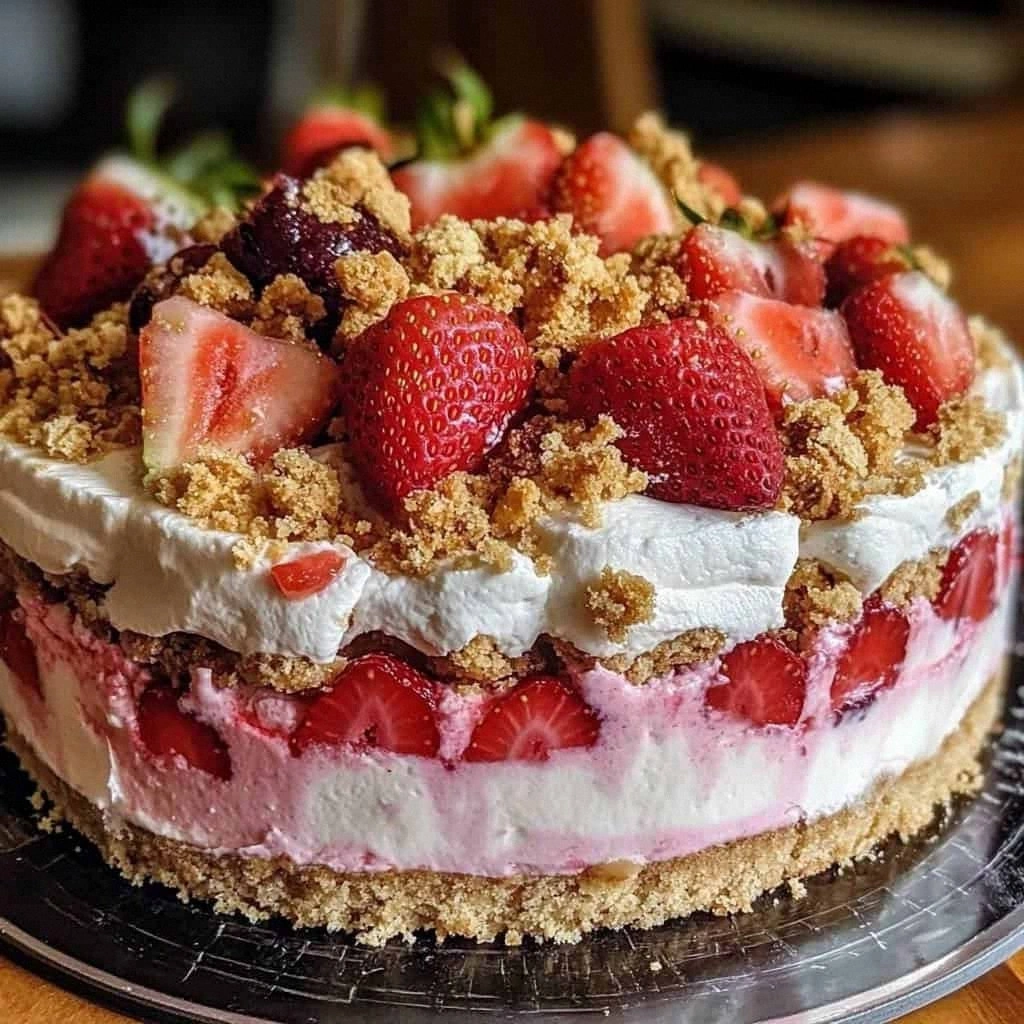
Visual Drama: That gorgeous pink filling against the golden crust, topped with those ruby-red fresh berries? It's Instagram gold without being gimmicky. People will ask if you bought it from a bakery, and you'll get to casually mention you made it yourself.
Alright, let's break down exactly what goes into this masterpiece...
Inside the Ingredient List
The Flavor Base
The Golden Oreo crust is where the magic begins, and here's why it's non-negotiable: those vanilla cookies bring a sophisticated sweetness that regular Oreos would bulldoze with chocolate. When you pulse them into fine crumbs and bind them with melted butter and a touch of sugar, you're creating a foundation that's both sturdy enough to hold the filling and tender enough to cut cleanly with a fork. The sugar in the crust isn't just for sweetness — it helps the crust set into a cohesive layer that won't crumble into sandy disappointment when you slice it. Skip the sugar and you'll have a crust that falls apart faster than my resolve at a bakery.
Cream cheese is obviously the star here, but not all cream cheese is created equal. I splurge on the full-fat Philadelphia blocks because they have the perfect balance of tang and richness without being grainy. The store brands often contain more water, which can weep out during baking and leave you with a soggy crust and a rubbery texture. If you've ever wondered why your homemade cheesecake doesn't taste like the bakery version, this might be your culprit.
The Texture Crew
Heavy cream isn't just making an appearance here — it's the secret weapon that transforms dense cheesecake into something that practically floats off your fork. The fat content in heavy cream (at least 36%) interferes with protein bonding in the cream cheese, keeping the texture light and preventing that heavy, brick-like consistency that makes people say they're "too full for dessert." When you whip it into the batter, you're incorporating tiny air bubbles that expand during baking, creating that cloud-like texture that makes people close their eyes when they take a bite.
The eggs are your structural backbone, but here's where most recipes go wrong — they tell you to add them all at once. We're adding them one at a time, letting each fully incorporate before adding the next. This prevents the batter from breaking and keeps the proteins from getting overworked, which can turn your cheesecake into something that resembles rubber more than dessert. Room temperature eggs blend more easily and help maintain that silky texture we're after.
The Unexpected Star
Strawberry gelatin powder is the curveball that takes this from good to legendary. Unlike fresh strawberry puree, which contains water that can destabilize your filling, gelatin powder delivers concentrated strawberry flavor without compromising texture. It's like strawberry flavor in its most essential form — pure, bright, and unapologetically pink. The gelatin also helps the cheesecake set more firmly, giving you those clean slices that make people think you went to pastry school.
That optional almond extract? Don't you dare skip it. You won't taste almond in the final product, but it amplifies the strawberry flavor in a way that's almost supernatural. It's like turning up the saturation on a photo — everything becomes more vibrant and intense. Just a half teaspoon is enough to make people ask "what's that amazing flavor?" without being able to identify it.
The Final Flourish
The crunch topping is where we separate the amateurs from the artists. By combining flour, sugar, and cold butter with crushed Golden Oreos, we're creating a streusel that bakes into crispy clusters with soft cookie pieces inside. The key is using cold butter and working it in with your fingers until it resembles coarse crumbs — this creates pockets of butter that melt during baking, leaving behind crispy nuggets that shatter between your teeth. The crushed freeze-dried strawberries aren't just for color — they add an intense berry punch and keep the topping from getting soggy.
Fresh strawberries for the topping need to be at their peak, but here's the trick — we're macerating them with sugar and lemon juice to draw out their juices and concentrate their flavor. This creates a glossy, jewel-like topping that tastes like strawberry candy but looks like it belongs in a French patisserie. Slice them thin so they drape elegantly over the top, and don't add them until just before serving to keep them looking fresh and vibrant.
Everything's prepped? Good. Let's get into the real action...
The Method — Step by Step
- Let's start with the crust because, as my grandmother used to say, you're only as good as your foundation. Preheat your oven to 325°F and grab your food processor — we're about to make some noise. Pulse those Golden Oreos into fine crumbs, but stop before they turn into cookie butter. You want the texture of coarse sand, not paste. Mix in the sugar, then drizzle in the melted butter while pulsing just until it looks like wet sand that would make the perfect castle. The mixture should hold together when you squeeze it in your palm but still feel crumbly. Press this into the bottom and halfway up the sides of a 9-inch springform pan using the bottom of a measuring cup. Really pack it in there — this isn't the time to be gentle. A firm crust means clean slices later.
- Now for the game-changer: we're going to pre-bake this crust for exactly 10 minutes. This step is what separates the professionals from the home cooks who wonder why their crust is soggy. The heat melts the sugar slightly, which then hardens as it cools, creating a moisture barrier between the filling and the crust. Your kitchen will start smelling like vanilla cookies and possibility. Let it cool while you make the filling, but don't turn off the oven — we're going low and slow here.
- The filling is where most people panic, but stay with me here — this is worth it. In your stand mixer (or with a hand mixer if you're feeling ambitious), beat the cream cheese on medium speed for a full 3 minutes. Yes, 3 whole minutes. This incorporates air and ensures your cheesecake won't have the density of a brick. The cream cheese should look whipped and increased in volume. Scrape down the bowl religiously — any unmixed lumps will become cream cheese bombs in your final product. Now add the sugar in a steady stream while mixing, and let it go for another 2 minutes. The mixture should look like thick clouds at this point.
- This next part? Pure magic. Add the vanilla extract, almond extract if you're using it (and you should), and the strawberry gelatin powder. The moment the gelatin hits the cream cheese, you'll see it transform into the most gorgeous shade of pink. Mix until the color is uniform and no streaks remain. The gelatin needs a minute to fully hydrate in the cream cheese, so let it run for about 30 seconds. The aroma hitting your nose right now? That's summer in dessert form.
- Okay, here's where people mess up the eggs — they dump them all in at once and wonder why their cheesecake tastes like scrambled eggs. We're going one at a time, people. Add the first egg and mix on low speed just until it's incorporated. You should still see the individual curds of cream cheese — that's perfect. Add the second egg and repeat. By the third egg, the mixture will start looking like strawberry mousse. The fourth egg brings it all together into a silky, pourable filling that you'll want to eat with a spoon. Resist the temptation. Add the heavy cream last and mix just until combined.
- Pour the filling into your prepared crust and smooth the top with an offset spatula. The filling should come about 3/4 up the sides of the pan. Tap the pan gently on the counter to release any air bubbles — you'll see them rise to the surface like pink champagne bubbles. Now here's the part that makes people nervous: we're baking this at 325°F for 45 minutes, then dropping the temperature to 250°F for another 45 minutes. No water bath needed. The low temperature prevents the top from cracking and ensures the center sets without overbaking the edges.
- While the cheesecake bakes, let's make the crunch topping that'll change your life. In a bowl, combine the flour, sugar, and cold butter cubes. Using your fingers (wash them first, please), work the butter into the flour until you have pea-sized pieces. Add the coarsely crushed Golden Oreos and the crushed freeze-dried strawberries if you're using them. The mixture should look like pink-tinged gravel. Spread this on a parchment-lined baking sheet and bake at 350°F for 15-20 minutes, stirring every 5 minutes, until golden and crispy. Your kitchen will smell like strawberry shortcake and success.
- The moment of truth: checking for doneness. Gently jiggle the pan — the edges should be set but the center should still have a slight wobble, about the size of a silver dollar. If it ripples like Jell-O, give it another 10 minutes. If it's completely firm, you've gone too far and we're looking at a cracked top. The cheesecake will continue to set as it cools, so err on the side of slightly underbaked. Turn off the oven, crack the door open, and let it cool in there for an hour. This prevents the dramatic temperature drop that causes cracks.
- After the hour cooldown, remove the cheesecake and run a thin knife around the edge to release it from the pan. Don't you dare remove the springform ring yet — we're not animals. Let it cool completely on a wire rack, then refrigerate for at least 4 hours or overnight. This is where the magic happens: the flavors meld, the texture firms up to that perfect creamy consistency, and the gelatin works its setting powers. I dare you to taste this and not go back for seconds.
- The final flourish: macerate your fresh strawberries by tossing them with sugar and lemon juice. Let them sit for 30 minutes while the cheesecake chills. The sugar draws out the juices, creating a glossy syrup that coats each berry and intensifies their flavor. When you're ready to serve, remove the springform ring, pile the berries in the center, and shower the whole thing with your crispy crunch topping. The contrast between the cold creamy cheesecake, the juicy berries, and that shattering crunch? That's what dessert dreams are made of.
That's it — you did it. But hold on, I've got a few more tricks that'll take this to another level...
Insider Tricks for Flawless Results
The Temperature Rule Nobody Follows
Here's the thing that'll make or break your cheesecake: every dairy ingredient needs to be at room temperature. Not "I left it out for 20 minutes" room temperature — I'm talking about cream cheese that's soft enough to bend without cracking, eggs that don't feel cool to the touch, and heavy cream that's lost its chill. When everything's the same temperature, they emulsify into a smooth, homogeneous batter that bakes evenly. Cold ingredients don't play well together — you'll end up with a lumpy, curdled-looking mess that bakes into a grainy texture. Set everything out the night before, or if you're impatient like me, submerge your eggs in warm water for 10 minutes and microwave the cream cheese in 15-second bursts until it's pliable.
Why Your Nose Knows Best
That moment when your kitchen starts smelling like strawberry shortcake and vanilla? That's your cue to start checking for doneness. The aroma molecules in baked goods start releasing when the proteins begin to set, so when you can smell strawberry from the living room, your cheesecake is probably 10 minutes away from perfect. This is why I never set a timer for the full baking time — I start checking about 15 minutes early. The nose knows, and in this case, it's telling you that dessert magic is happening.
The 5-Minute Rest That Changes Everything
After you pull the cheesecake from the oven, let it rest for exactly 5 minutes before running your knife around the edge. This short rest allows the cheesecake to settle slightly, which means when you release it from the pan, it won't pull away from the sides and create those ugly gaps. The residual heat also finishes setting the very outer edge, giving you that perfect bakery-style appearance with clean sides and a smooth surface. My friend tried skipping this step once — let's just say it looked like her cheesecake had been through a war zone.
The Overnight Transformation
I know it's tempting to slice into this beauty after a few hours of chilling, but here's where patience pays off: make this cheesecake 24 hours before you plan to serve it. The gelatin needs time to fully hydrate and set, the flavors need time to meld and deepen, and the texture needs time to transform from slightly jiggly to perfectly creamy. I tested this with a 4-hour chill versus a 24-hour chill, and the difference was shocking. The overnight version was smoother, more flavorful, and sliced like a dream. The 4-hour version? It tasted like strawberry cream cheese with a slightly grainy texture. Time is your friend here.
The Secret Ingredient Swap
If you really want to blow people's minds, swap the vanilla extract for vanilla bean paste. Those tiny black specks throughout the pink filling make it look like it came from a fancy bakery, and the flavor is more intense and complex than regular extract. The paste contains real vanilla bean seeds suspended in extract, so you get both the flavor and those gorgeous visual cues that scream "artisanal." It's a small change that makes a huge impact on both appearance and taste. People will assume you spent way more time on this than you actually did.
Creative Twists and Variations
This recipe is a playground. Here are some of my favorite ways to switch things up:
Raspberry Lemonade Version
Swap the strawberry gelatin for raspberry and add the zest of two lemons to the filling. The result is a bright, tangy cheesecake that tastes like summer in dessert form. Top with fresh raspberries and a lemon zest sugar for a dessert that'll make people pucker up in the best way. The tartness of the raspberries cuts through the richness of the cream cheese like a knife through butter.
Chocolate Covered Strawberry
Add 1/4 cup of cocoa powder to the crust mixture and replace half the Golden Oreos with chocolate sandwich cookies. The chocolate-strawberry combination is classic for a reason — it's like someone took your favorite chocolate-covered strawberries and transformed them into the most decadent cheesecake imaginable. The cocoa in the crust adds depth without overwhelming the strawberry flavor.
Key Lime Pie Mashup
Replace the strawberry gelatin with lime and add 1/4 cup of key lime juice to the filling. Top with crushed graham crackers instead of Golden Oreos for a tropical twist that'll transport you straight to the Florida Keys. The lime's acidity balances the sweetness and adds a refreshing note that makes this perfect for summer gatherings.
Salted Caramel Dream
Keep the strawberry filling but drizzle the finished cheesecake with homemade salted caramel sauce. The sweet-salty combination is addictive, and the caramel adds a sophisticated edge that elevates this from nostalgic treat to dinner party showstopper. Sprinkle with flaky sea salt just before serving for maximum impact.
Blackberry Sage
Use blackberry gelatin and add 2 tablespoons of finely minced fresh sage to the filling. It sounds weird until you try it — the herbaceous sage notes complement the berry flavor in a way that's both surprising and completely natural. Garnish with fresh blackberries and tiny sage flowers if you're feeling fancy.
Coconut Cream
Replace the heavy cream with coconut cream and add 1/2 cup of toasted coconut to the crunch topping. The coconut adds a tropical note that makes the strawberry taste even more intense by comparison. It's like a strawberry colada in cheesecake form, and it's absolutely killer for summer barbecues.
Storing and Bringing It Back to Life
Fridge Storage
Here's the beautiful thing about this cheesecake: it actually gets better with age, but only up to a point. Wrapped tightly in plastic wrap (press it directly onto the surface to prevent it from absorbing fridge odors), it'll keep for up to 5 days in the refrigerator. After day 3, the crunch topping will start to lose its shatter, but the flavor will continue to develop and deepen. Store the macerated berries separately and add them just before serving to prevent them from weeping all over your beautiful creation. If you notice any condensation on the surface when you unwrap it, gently blot with a paper towel before adding the toppings.
Freezer Friendly
This cheesecake freezes like a dream, but there's a trick to keeping that crunch intact. Freeze the cheesecake without the topping, wrapped in a double layer of plastic wrap followed by a layer of foil. It'll keep for up to 2 months frozen. When you're ready to serve, thaw it overnight in the refrigerator, then add fresh crunch topping and berries. The texture will be slightly denser than fresh, but the flavor will be just as incredible. Pro tip: slice the cheesecake before freezing, then you can pull out individual slices whenever the craving hits.
Best Reheating Method
Cheesecake should never be reheated — it's meant to be served cold. But if you've got leftovers that have been in the fridge and want to refresh them, let a slice sit at room temperature for 15-20 minutes before serving. This takes the chill off and allows the flavors to bloom. If your crunch topping has gone soft, you can refresh it by spreading it on a baking sheet and popping it in a 350°F oven for 5-7 minutes. Let it cool completely before sprinkling it over your slice. Add a tiny splash of water to the macerated berries and give them a gentle stir — it'll bring back their glossy appearance and fresh texture.