I’ll be honest — I ate half the batch before anyone else got to try it, and that’s because the first time I made these Teriyaki Chicken Grilled Skewers I nearly set off the smoke alarm, but the smell that followed was pure, unadulterated joy. Imagine a backyard BBQ on a humid summer night, the grill humming like a low‑frequency bass, and the air thick with a sweet‑savory perfume that makes your mouth water before you even see the food. That moment, when the sauce hits the hot grill and starts to caramelize, is the kind of culinary fireworks that makes you swear you’ve discovered the secret to happiness. I dared my roommate to taste this and not go back for seconds, and she lost the bet in three bites.
The story behind this version began with a kitchen disaster that could have been straight out of a sitcom. I was trying to make a quick teriyaki chicken dinner after a marathon of Zoom meetings, and I accidentally mixed the sauce with too much water. The result? A watery glaze that clung to the chicken like a sad, soggy blanket. After a frantic Google search and a few frantic phone calls to my grandma (who swears by cornstarch for thickening), I stumbled upon the perfect balance of sweet, salty, and umami that turned the mishap into a masterpiece. This is hands down the best version you’ll ever make at home, and I’m about to spill every secret.
What truly sets this recipe apart is the marriage of technique and flavor. Most recipes get the sauce wrong, either making it too thin or overly salty, and they forget the magic of a quick sear on the grill that locks in juices. Here, we use a thin layer of cornstarch slurry that gives the glaze a glossy, almost lacquered finish that clings to each bite like velvet. The chicken thighs add a juicy richness that breasts can’t match, but I’ll give you the low‑down on how to make both work flawlessly. And the best part? You’ll need just a handful of pantry staples, no exotic imports, because I believe great food should be accessible, not a treasure hunt.
Picture yourself pulling these skewers off the grill, the whole kitchen smelling like a Japanese street market, the glaze shimmering in the sunset light, and the first bite delivering a perfect snap of caramelized edges that shatter like thin ice. The sweet honey and brown sugar caramelize into a buttery glaze, while the soy sauce and ginger give it that unmistakable umami punch. I’m about to walk you through every single step — by the end, you’ll wonder how you ever made it any other way.
What Makes This Version Stand Out
- Taste: The balance of sweet honey, deep soy, and zingy ginger creates a flavor symphony that sings on the palate, making each bite unforgettable.
- Texture: A glossy, slightly sticky glaze that clings to the chicken while the grill gives you that coveted char‑kissed crunch.
- Simplicity: Only twelve ingredients, most of which you already have in your pantry, and a prep time under 20 minutes.
- Uniqueness: The cornstarch slurry is the game‑changer that turns a run‑of‑the‑mill teriyaki into a restaurant‑quality glaze.
- Crowd Reaction: Even the pickiest eaters (yes, even your teenage son) will line up for seconds, and you’ll hear the “wow” in their eyes.
- Ingredient Quality: Using low‑sodium soy sauce keeps the sodium in check while preserving that deep umami depth.
- Cooking Method: Grilling on a medium‑high heat gives you that smoky whisper without burning the delicate sauce.
- Make‑Ahead Potential: The sauce can be prepared ahead of time and stored, so you’re only minutes away from perfection on grill night.
Inside the Ingredient List
The Flavor Base
First up, the low‑sodium soy sauce. It’s the backbone of the sauce, delivering that deep, salty umami without overwhelming the other flavors. If you substitute regular soy sauce, you’ll need to cut back on the added salt elsewhere, or else you’ll end up with a sauce that tastes like a salty sea. I always reach for the dark, aged soy sauce because it has a richer, more complex profile that mimics the depth you’d get from a slow‑cooked broth.
Garlic and fresh ginger are the dynamic duo that bring brightness and heat. Freshly minced garlic releases allicin, giving a pungent bite that mellows as it cooks, while ginger adds a warm, peppery spark that cuts through the sweetness. If you’re allergic to ginger, a pinch of ground ginger works, but you’ll lose that fresh zing that makes the glaze sing.
The Sweet‑Savory Balance
Brown sugar and honey are the sweet side of the equation. Brown sugar brings a molasses‑like depth, while honey adds a floral, slightly floral note that rounds everything out. Too much honey and the glaze becomes overly sticky; too much brown sugar and you risk a burnt edge. I recommend a 3:2 ratio, which gives you caramelization without the bitter aftertaste.
Rice vinegar is the unsung hero that adds a subtle acidity, lifting the sauce and preventing it from feeling cloyingly sweet. It’s like the bright top note in a perfume – you barely notice it, but without it the whole composition feels flat. If you don’t have rice vinegar, a splash of apple cider vinegar works in a pinch, though the flavor will be a tad sharper.
The Texture Crew
Cornstarch mixed with water creates a slurry that thickens the sauce at the last minute, giving it that glossy sheen and a slightly velvety mouthfeel. This step is crucial – skip it and you’ll end up with a runny glaze that slides off the skewers like a wet noodle. I always whisk the slurry until it’s completely smooth to avoid any gritty lumps.
Sesame oil is a dash of nutty richness that rounds out the flavor profile. It’s potent, so a little goes a long way. Overdo it, and you’ll mask the delicate balance of soy and honey. A teaspoon is enough to give the sauce a whisper of toasted sesame that lingers on the palate.
The Final Flourish
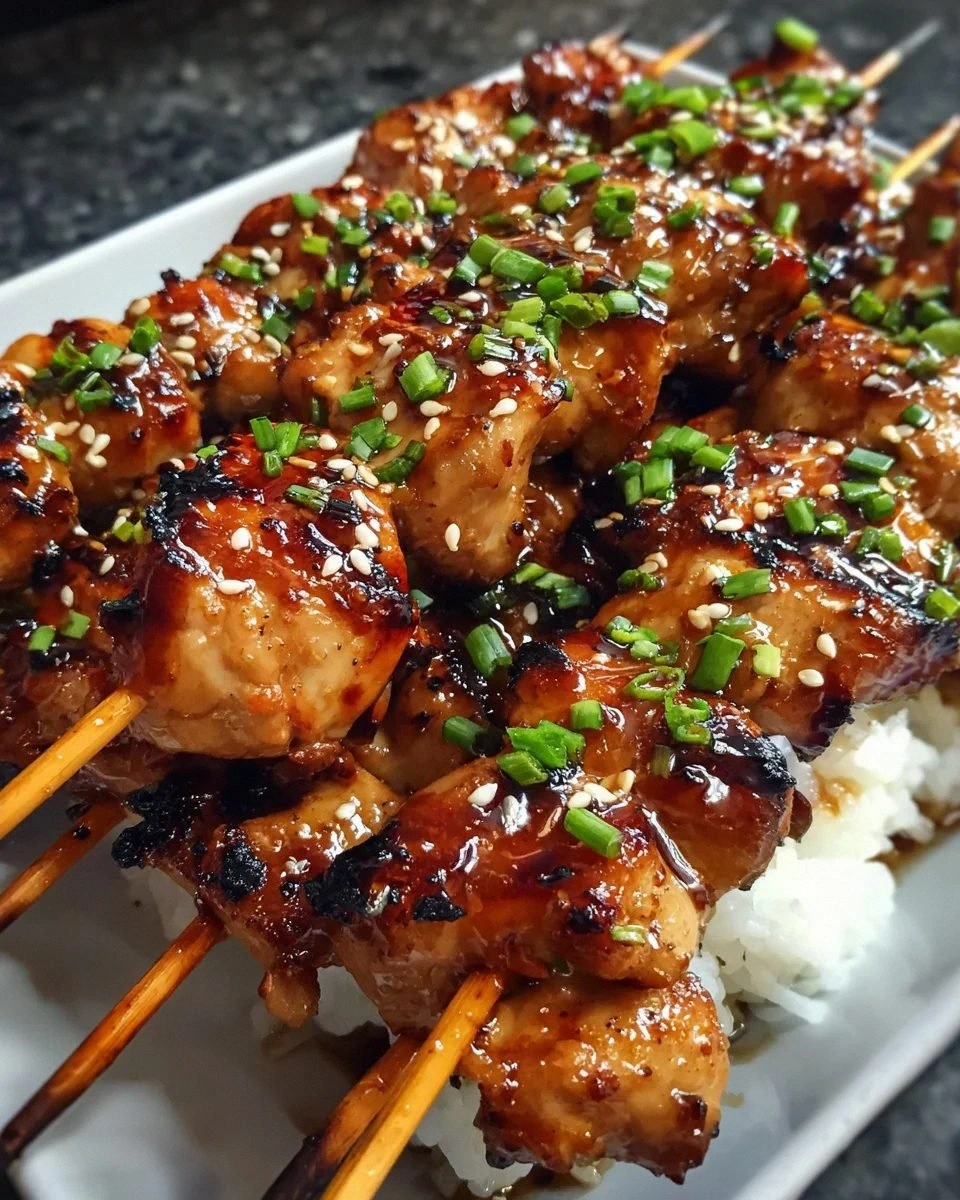
Sesame seeds and chopped green onion are optional, but they’re the garnish that turns a good dish into a great one. Toasted sesame seeds add a crunchy texture and a toasty aroma, while the bright green onion brings a fresh, oniony bite that cuts through the richness. If you’re serving a crowd, sprinkle them right before serving for maximum visual impact.
Everything's prepped? Good. Let’s get into the real action…
The Method — Step by Step
- Prep the chicken. Cut the chicken thighs or breasts into bite‑size cubes, about 1½ inches each. This size ensures quick, even cooking and maximizes surface area for the glaze to cling. Toss the cubes in a bowl with a pinch of salt and a drizzle of sesame oil; the oil helps the sauce adhere later. Let the pieces rest for five minutes while you prep the skewers – this short rest lets the meat relax, making it juicier when it hits the heat.
- Make the teriyaki glaze. In a small saucepan, combine low‑sodium soy sauce, brown sugar, honey, minced garlic, minced ginger, and rice vinegar. Bring the mixture to a gentle simmer over medium heat, stirring constantly. Once it bubbles, whisk in the cornstarch slurry (2 Tbsp cornstarch mixed with ¼ cup water). Keep stirring; the sauce will thicken within two minutes, turning a deep amber that looks like liquid caramel. Remove from heat and let it cool slightly – this is the moment where the sauce becomes glossy, coating the spoon like a mirror.
- Thread the chicken onto skewers. Take your soaked bamboo or metal skewers and thread three to four chicken cubes onto each, leaving a tiny gap between pieces for even heat distribution. If you’re using metal skewers, you can pre‑oil them lightly with a brush of sesame oil to prevent sticking. Arrange the skewers on a tray, then drizzle a thin layer of the teriyaki glaze over each skewer, making sure every piece gets a good coating.
- Preheat the grill. Light your grill to medium‑high heat, aiming for about 400‑425 °F (204‑218 °C). A properly heated grill gives you those coveted grill marks without steaming the chicken. If you’re using a charcoal grill, let the coals turn gray before you start; this indicates they’re at the right temperature. While the grill heats, give the remaining glaze a quick stir – the cornstarch may have settled.
- Grill the skewers. Place the skewers on the grill at a 45‑degree angle to the grates. Grill for 3‑4 minutes on the first side, listening for that satisfying sizzle that tells you the glaze is caramelizing. Flip the skewers and brush them with another generous spoonful of glaze; this is the moment of truth because the second coating creates a deeper, richer glaze. Grill the other side for another 3‑4 minutes, watching for the edges to start pulling away from the meat – that’s your cue that the chicken is cooked through.
- Finish with sesame seeds and green onion. Once the chicken is nicely charred and the glaze is glossy, remove the skewers from the grill and let them rest for two minutes. This short rest allows the juices to redistribute, keeping each bite moist. Sprinkle toasted sesame seeds and chopped green onion over the top while the skewers are still hot; the residual heat releases their aromas, turning the garnish into a fragrant finishing touch.
- Serve and savor. Arrange the skewers on a platter, drizzle any remaining glaze over the top, and serve immediately with steamed rice or a crisp Asian slaw. The sauce should be thick enough to cling without pooling, and the chicken should be juicy, with a caramelized exterior that crackles when you bite into it. That first bite? It’s a symphony of sweet, salty, and smoky notes that will have you shouting, “I dare you to taste this and not go back for seconds!”
That’s it — you did it. But hold on, I’ve got a few more tricks that'll take this to another level…
Insider Tricks for Flawless Results
The Temperature Rule Nobody Follows
Most home cooks crank the grill to “high” and then panic when the sauce starts to burn. The secret is to start at medium‑high, about 400 °F, and only increase the heat for the final minute if you want extra char. This controlled heat prevents the sugars in the glaze from scorching while still giving you those coveted grill marks. I once left the grill on full blast and ended up with a blackened mess that tasted like burnt plastic – lesson learned.
Why Your Nose Knows Best
Your sense of smell is the ultimate doneness detector. When the glaze starts to caramelize, you’ll notice a sweet, nutty aroma that intensifies just before it burns. If you catch that scent early, you can flip the skewers and avoid a bitter finish. Trust your nose more than the clock; it’s the most reliable kitchen timer you have.
The 5‑Minute Rest That Changes Everything
After grilling, let the skewers rest for at least five minutes before cutting or serving. This short pause lets the muscle fibers relax, redistributing the juices throughout the meat. Skipping this step results in a dry bite, and you’ll hear the collective groan of disappointed diners. I used to serve them hot off the grill and got complaints about “dry chicken” – now I always give them a five‑minute chill, and the compliments pour in.
Marinate‑Free Magic
You might think a long marination is essential for flavor, but the high heat of the grill and the glaze’s intensity make a short 15‑minute “marinate” in the sauce more than enough. This saves time and prevents the chicken from becoming mushy. If you’re in a hurry, just coat the cubes and let them sit while the grill heats – you’ll still get that deep flavor penetration.
The Flip‑And‑Brush Technique
Instead of flipping once and finishing, I recommend a flip‑and‑brush approach: flip the skewer, brush with fresh glaze, then flip again and brush once more. This layering builds a glossy, multi‑dimensional coating that’s both sticky and slightly crisp. A friend tried skipping the second brush and ended up with a dull, uneven glaze – don’t make that mistake.
Creative Twists and Variations
This recipe is a playground. Here are some of my favorite ways to switch things up:
Spicy Sriracha Kick
Add a tablespoon of sriracha to the glaze for a subtle heat that pairs perfectly with the honey’s sweetness. The heat will linger on the palate, making each bite exciting without overwhelming the delicate teriyaki notes. Great for those who love a little fire.
Pineapple Paradise
Thread a chunk of fresh pineapple between chicken pieces on each skewer. The fruit caramelizes alongside the sauce, adding a juicy burst of tropical sweetness that balances the salty glaze. It’s a crowd‑pleaser for summer barbecues.
Coconut‑Infused Glaze
Swap half the water in the cornstarch slurry for coconut milk. This adds a creamy undertone that makes the glaze richer and adds a subtle coconut aroma. Pair with jasmine rice for a truly exotic experience.
Sesame‑Crusted Crunch
Before threading the chicken, roll each cube in a mixture of toasted sesame seeds and panko breadcrumbs. The result is a crunchy exterior that adds texture contrast to the silky glaze. It’s like having a mini‑crouton on a stick.
Herb‑Infused Green Onion
Mix chopped cilantro or Thai basil into the green onion garnish. The herbaceous notes lift the dish, making it feel fresher and lighter, perfect for a spring garden party.
Storing and Bringing It Back to Life
Fridge Storage
Place any leftover skewers in an airtight container and store them in the refrigerator for up to three days. The glaze may thicken as it cools; simply reheat gently and add a splash of water to loosen it back to a glossy consistency.
Freezer Friendly
For longer storage, separate the chicken pieces from the glaze and freeze them in a zip‑top bag for up to two months. When you’re ready to eat, thaw in the refrigerator overnight, then re‑assemble the skewers and grill as directed. The glaze can be frozen separately in a small freezer‑safe container.
Best Reheating Method
To reheat, preheat a grill or grill pan to medium heat and brush the skewers with a tiny splash of water before placing them on the grill. The steam created prevents the chicken from drying out and revives the glaze’s shine. In a pinch, you can microwave for 60 seconds, then finish under a broiler for a minute to restore the char.