Remember that night when the kitchen turned into a chaotic blender of sticky peanut butter and runaway oats? I was halfway through a batch of homemade granola, the jar had exploded, and the whole room smelled like a nutty, sweet disaster. I stared at the mess, my eyebrows furrowed, and thought, “If this is how peanut butter and oats can be, I’m going to make it taste like a dream.” That moment sparked a daring experiment: a no‑bake, no‑fuss, peanut‑butter‑oat bar that would become the highlight of my snack repertoire.
Picture the scene: a glass of cold coffee on the counter, a drizzle of honey still glistening on the countertop, and the faint scent of toasted oats mingling with the buttery aroma of melted coconut oil. The sound of a whisk clinking against the bowl is punctuated by the gentle hiss as the mixture warms. Each spoonful is a silky, nutty cascade that coats the tongue like velvet, while the chocolate chips burst into a glossy, bittersweet drizzle. The texture is a perfect balance—chewy in the center, with a crisp edge that shatters like thin ice when you bite into it. The first bite sends a wave of comfort, a reminder that simple ingredients can create a symphony of flavors.
What makes this version a standout? It’s the marriage of convenience and flavor—no oven, no fuss, just a handful of pantry staples that deliver a decadent treat. I dared to replace the usual sugar rush with honey, bringing a natural sweetness that deepens the nutty profile. The addition of chia or flaxseed meal injects a subtle crunch and a nutritional punch that turns a snack into a mini‑meal. And the final flourish of mini chocolate chips? It’s the secret that turns each bite into a mini‑indulgence, a whisper of luxury that keeps you coming back for more. I dare you to taste this and not go back for seconds.
If you’ve ever struggled with the “too sweet” or “too dry” dilemma in homemade bars, you’re not alone—and I’ve got the fix. This is hands down the best version you'll ever make at home because it eliminates the common pitfalls of texture and flavor imbalance. Picture yourself pulling these out of the fridge, the whole kitchen smelling incredible, and feeling the confidence of a recipe that works every single time. Okay, ready for the game‑changer? Let me walk you through every single step—by the end, you'll wonder how you ever made it any other way.
What Makes This Version Stand Out
- Taste: The natural sweetness of honey replaces refined sugar, giving a deeper, richer flavor that pairs perfectly with the nutty base. The chocolate chips add a glossy finish that melts into a silky drizzle, turning every bite into a mini‑indulgence.
- Texture: The rolled oats provide a hearty chew, while the chia or flaxseed meal introduces a subtle crunch that keeps the bars from becoming clumpy or too sticky.
- Convenience: No oven required—just a quick mix and chill, saving you time and energy while still delivering a satisfying treat.
- Uniqueness: The combination of coconut oil and vanilla extract gives a silky, tropical undertone that elevates the classic peanut‑butter‑oat flavor.
- Portability: These bars hold up well in a lunchbox or backpack, making them ideal for on‑the‑go snacking or a quick post‑workout boost.
- Ingredient Quality: Using creamy peanut butter and high‑quality honey ensures a richer, more authentic taste that outshines store‑bought alternatives.
- Make‑ahead Potential: Chill for up to a week, or freeze for even longer, so you always have a ready‑to‑eat snack at hand.
- Health Boost: Chia or flaxseed meal adds omega‑3 fatty acids and fiber, turning a sweet treat into a balanced, nutrient‑dense snack.
Alright, let's break down exactly what goes into this masterpiece...
Inside the Ingredient List
The Flavor Base
The rolled oats are the backbone of this recipe. They absorb the liquid, creating a chewy, satisfying bite that holds the mixture together. If you skip the oats, the bars will crumble like a bad cookie, losing that comforting chew. For those who love a smoother texture, you can pulse the oats in a food processor to a finer consistency, but be careful not to turn them into flour—otherwise, you’ll lose the signature crunch.
The Texture Crew
The creamy peanut butter is the star that brings richness and a deep, nutty flavor. It coats the oats and chocolate chips, creating a cohesive mass that holds together. If you use a thin peanut butter, the bars might be too runny; opt for a thick, creamy variety for optimal binding. The coconut oil adds a silky mouthfeel and a subtle tropical hint that complements the peanut butter’s earthiness.
The Unexpected Star
Honey (or maple syrup) is the sweetener that replaces refined sugar. It not only sweetens but also adds moisture and a subtle floral note that enhances the overall flavor profile. If you’re vegan, maple syrup works just as well, offering a slightly different sweetness that pairs wonderfully with the oats. Skipping this step will leave the bars bland and dry.
The Final Flourish
Mini chocolate chips are the crowning glory that transforms the bars into a treat. They melt into a glossy drizzle that adds a burst of chocolatey sweetness with each bite. If you’re looking to reduce sugar, consider dark chocolate chips or a sprinkle of unsweetened cocoa powder for a bittersweet twist. The chia or flaxseed meal, though small in quantity, adds a subtle crunch and a nutritional boost of omega‑3s and fiber.
Everything's prepped? Good. Let's get into the real action...
The Method — Step by Step
- Step 1: Warm the Peanut Butter. Place the creamy peanut butter in a small saucepan over low heat. Stir constantly until it becomes silky and easy to mix. This step is crucial; if the peanut butter is too cold, it won’t bind the oats properly. Watch the color change to a lighter shade—this indicates the oils have fully emulsified. I dare you to taste it; it should be rich and buttery, not gritty.
- Step 2: Melt the Coconut Oil. Add the coconut oil to the same saucepan with the peanut butter. Let it melt into the mixture, creating a glossy, smooth base. The coconut oil’s subtle tropical aroma will mingle with the vanilla, adding depth. If you’re using a non‑stick pan, you can skip the saucepan and use a microwave for a quick melt. This is the moment where the kitchen smells like a tropical vacation.
- Step 3: Combine Sweeteners. Pour in the honey (or maple syrup) and vanilla extract. Stir until the mixture is uniformly blended. The honey should coat the back of a spoon, indicating it’s ready. If the mixture looks too runny, let it sit for a minute; the oils will thicken slightly. This is where the flavor starts to sing, and you’ll notice the sweet aroma rising.
- Step 4: Add the Dry Ingredients. In a large mixing bowl, combine the rolled oats, chia or flaxseed meal, and salt. Pour the warm peanut butter mixture over the dry mix. Use a large spoon or spatula to fold everything together until the oats are fully coated. The mixture should look like a thick, golden paste. If you see dry pockets, add a splash more honey or a teaspoon of water to bring it together. The texture should feel like a soft, chewy dough.
- Step 5: Fold in the Chocolate. Gently fold in the mini chocolate chips. They should be evenly distributed, creating pockets of glossy chocolate throughout. Be careful not to overmix; you want the chips to remain intact for that satisfying burst of chocolate when you bite. The aroma of chocolate will now mingle with the nutty base, creating a mouth‑watering scent that will have you craving more.
- Step 6: Press into the Pan. Line an 8‑inch square pan with parchment paper. Transfer the mixture into the pan and press it firmly with the back of a spoon or a flat spatula. The goal is to create an even layer, about 1.5 inches thick. If you leave gaps, the bars may separate during chilling. Pressing tightly also ensures the chocolate chips are embedded, preventing them from floating to the top.
- Step 7: Chill. Place the pan in the refrigerator for at least 30 minutes, or until the mixture is firm enough to cut. The chill allows the coconut oil to solidify, giving the bars a firm bite. If you’re short on time, pop it in the freezer for 15 minutes; just be careful not to overfreeze or it will become too hard. The first bite after chilling should be creamy, with a hint of chocolate and a satisfying crunch from the oats.
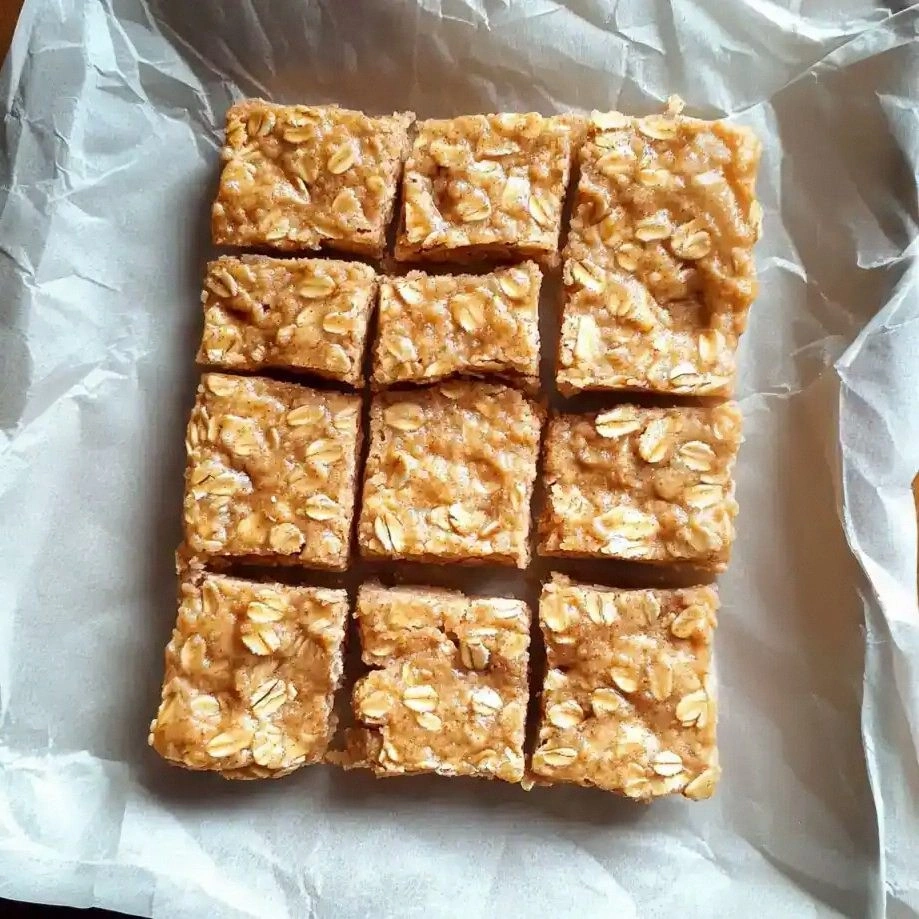
- Step 8: Slice and Serve. Remove the parchment from the pan and lift the slab onto a cutting board. Slice into bars or squares using a sharp knife. Each piece should hold together like a mini‑cake, not crumble. Store the bars in an airtight container at room temperature for up to a week, or freeze for longer storage. Enjoy them as a snack, a dessert, or a post‑workout power bite.
That's it — you did it. But hold on, I've got a few more tricks that'll take this to another level. These little adjustments will make the bars even more irresistible and tailored to your taste.
Insider Tricks for Flawless Results
The Temperature Rule Nobody Follows
The key to a perfect no‑bake bar is keeping the peanut butter mixture warm enough to blend but not so hot that the chocolate chips melt. If the mixture is too hot, the chocolate will liquefy and spread, ruining the pockets. I discovered that a gentle heat of 120°F (49°C) is ideal. Use a kitchen thermometer to keep the temperature in check. A friend once tried the recipe at a high heat and ended up with a gooey, chocolate‑heavy mess that tasted like a chocolate fondue.
Why Your Nose Knows Best
Your nose is your best quality control. As you stir, inhale the aroma; it should be a sweet, nutty perfume with a hint of vanilla. If you detect a metallic or burnt scent, the mixture is overheating. Trust your senses—if it smells like a toasted granola, you’re on the right track. I’ve used my nose to adjust the heat on the stove, ensuring the peanut butter doesn’t scorch.
The 5-Minute Rest That Changes Everything
After folding in the chocolate chips, give the mixture a quick 5‑minute rest before pressing it into the pan. This pause allows the chocolate to set slightly, preventing it from sinking to the bottom. The rest also lets the oats absorb the liquid more evenly, resulting in a cohesive texture. I’ve found that bars made with this rest are less crumbly and easier to slice.
Use a Silicone Mat for Easy Release
Instead of parchment paper, line your pan with a silicone baking mat. It gives a non‑stick surface that’s easier to lift the slab from the pan, especially if the bars have started to set. The mat also adds a subtle texture to the base of the bars, making them even more appealing. A friend once tried parchment and ended up with a jagged edge; the silicone mat saved the day.
Keep It Cool, Keep It Crunchy
If you store the bars at room temperature for more than a day, the coconut oil may soften, making the bars too soft to hold their shape. Keep them in the fridge if you plan to enjoy them over a week, or freeze for extended storage. When you’re ready to eat, let them sit at room temperature for a few minutes to soften just enough for that perfect bite. I’ve tried this trick at a picnic, and the bars stayed firm even after hours of sun.
Creative Twists and Variations
This recipe is a playground. Here are some of my favorite ways to switch things up:
Citrus Burst
Add zest from one orange or lemon to the mixture. The citrus adds a bright, fresh note that cuts through the richness of peanut butter and chocolate. Pair it with a handful of dried cranberries for a sweet‑tart contrast. This version is perfect for a spring snack.
Spiced Delight
Stir in ½ teaspoon of cinnamon or a pinch of nutmeg. The warm spices create a comforting flavor reminiscent of holiday treats. Combine with dark chocolate chips for an extra depth of flavor. Great for a cozy evening snack.
Nutty Crunch
Add chopped almonds, walnuts, or pecans for an extra crunch and nutty flavor. The nuts also provide healthy fats and protein, turning the bars into a more balanced snack. Toast the nuts lightly before adding for an enhanced aroma.
Chocolate‑Lover's Dream
Replace the mini chocolate chips with dark chocolate chunks or chocolate nibs. Use a 70% cacao chocolate for a bittersweet experience that pairs beautifully with the peanut butter. The result is a chocolate‑heavy bar that satisfies the sweet tooth without being overly sweet.
Vegan Sweetness
Swap the honey for maple syrup and use a vegan peanut butter. The bars will still hold together nicely, and the maple syrup adds a subtle, caramel‑like flavor. This version is perfect for vegans and those looking to reduce animal products.
Protein Power
Add a scoop of unflavored protein powder to the dry mix. The protein powder increases the protein content without altering the flavor significantly. It’s a great addition for athletes or anyone looking to boost their protein intake.
Storing and Bringing It Back to Life
Fridge Storage
Keep the bars in an airtight container or zip‑top bag in the refrigerator for up to one week. The cold environment preserves the coconut oil’s firmness, ensuring each bite remains firm and chewy. If the bars start to soften, let them sit at room temperature for a few minutes before eating.
Freezer Friendly
For longer storage, wrap each bar individually in parchment paper and place them in a freezer bag. They can last up to three months when frozen. Thaw at room temperature for about 20 minutes before eating to restore the original texture.
Best Reheating Method
If you prefer a warmer bite, place a single bar on a microwave-safe plate and heat on low for 10–15 seconds. Add a tiny splash of water before reheating to create steam, which helps the bar regain its softness without drying out. A quick 30‑second burst on the stovetop with a splash of milk also works wonders.