Love this? Pin it for later! 📌
What started as a desperate attempt to use up leftover vegetables has evolved into the most requested lunch in our household. The beauty lies in their versatility: each child can customize their own color combination, making them feel like the chef of their own mini kitchen. Plus, they're a fantastic way to introduce new vegetables without the dinner table standoff. My middle child, who once declared war on anything green, now proudly asks for "extra emerald sticks" (her adorable name for cucumber strips).
Why This Recipe Works
- Visual Appeal: The rainbow arrangement makes vegetables irresistible to kids who typically push them aside.
- No Cooking Required: Perfect for busy mornings when you need lunch ready in under 10 minutes.
- Customizable Colors: Each child can create their own rainbow, reducing mealtime battles.
- Make-Ahead Friendly: Prep vegetables on Sunday for effortless assembly all week.
- Hidden Nutrition: Cream cheese spread provides protein while vegetables offer essential vitamins.
- Lunchbox Safe: No heating required, stays fresh until lunchtime with proper storage.
- Budget-Friendly: Uses common vegetables, reducing food waste and grocery costs.
Ingredients You'll Need
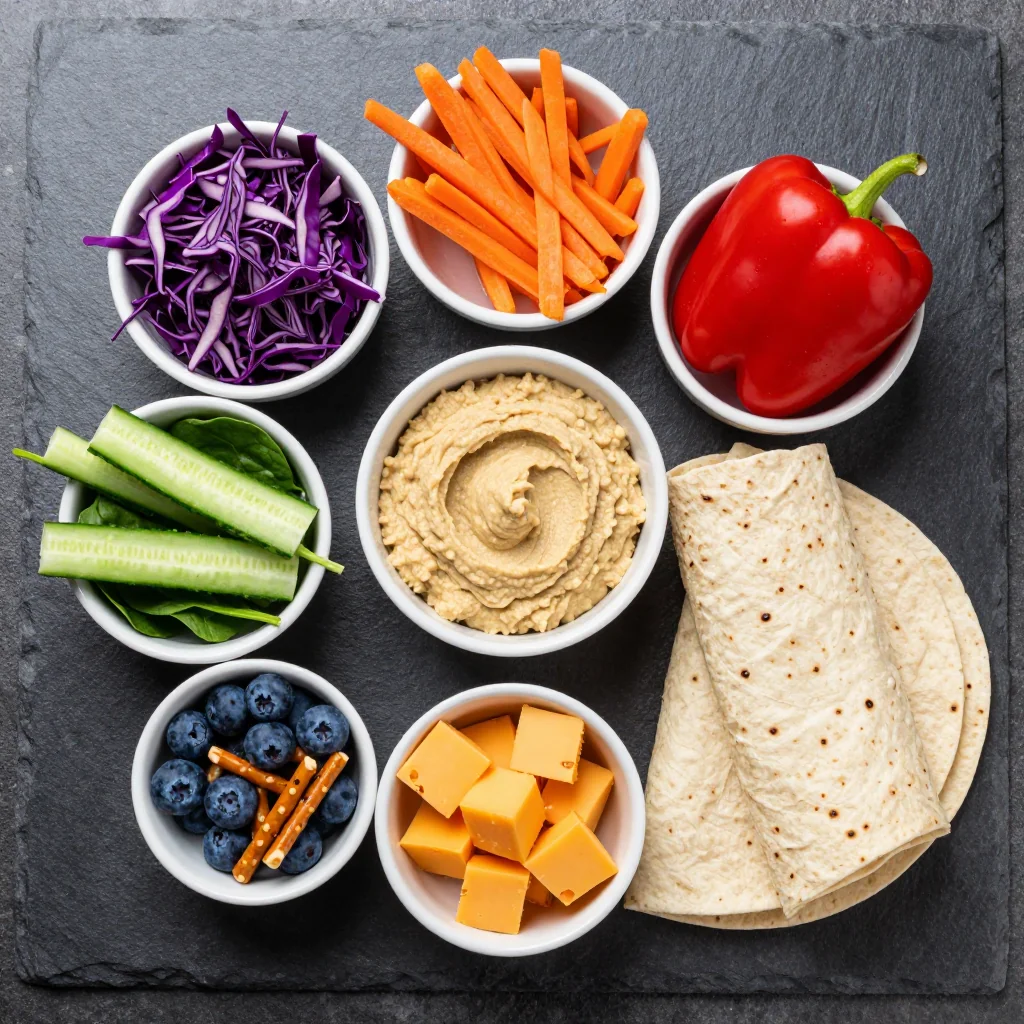
Creating these vibrant wraps starts with selecting the freshest vegetables available. I visit our local farmers' market every Saturday morning, where my kids compete to find the most unusually colored vegetables. The key is choosing vegetables that are crisp and brightly colored—they'll maintain their texture and visual appeal even after a morning in a lunchbox.
For the Rainbow Filling:
Large flour tortillas (8-10 inch): The foundation of your wrap. Look for ones labeled "burrito size" for easy rolling. Whole wheat options add extra nutrition while maintaining flexibility. If you're dealing with gluten sensitivities, corn tortillas work but require gentler handling.
Cream cheese (8 oz): Acts as the "glue" holding everything together. I prefer whipped cream cheese for easier spreading. For dairy-free families, Kite Hill's almond milk cream cheese spreads beautifully and offers similar protein content.
Ranch seasoning mix (1 tablespoon): The secret weapon that makes vegetables addictive. I make my own blend using dried dill, chives, garlic powder, and a touch of smoked paprika. Store-bought works perfectly for busy weeks.
Red bell pepper: The top of your rainbow. Choose peppers with firm, glossy skin and no soft spots. Red, orange, and yellow peppers are actually the same variety at different ripeness stages, with red being the sweetest—perfect for converting veggie skeptics.
Shredded purple cabbage: Provides the purple band of your rainbow. It's incredibly nutrient-dense, containing 36 different anthocyanins. Pre-shredded bags save time, but shredding fresh cabbage stays crunchier longer.
Baby spinach: Your green layer. Baby spinach has a milder flavor than mature spinach, making it more kid-friendly. If spinach is a no-go, try thinly sliced cucumber or avocado for the green element.
Optional Additions:
Shredded carrots: Add an orange layer between red pepper and yellow vegetables. Look for pre-shredded bags in the produce section—thicker shreds maintain better texture than finely grated carrots.
Yellow squash or corn: For the yellow stripe. Fresh corn cut off the cob adds sweetness, while yellow squash provides a mild flavor that disappears among stronger vegetables.
Microgreens or sprouts: Add nutrition and make kids feel like they're eating something from a fairy garden. Sunflower sprouts are particularly kid-friendly with their nutty flavor.
How to Make Rainbow Veggie Wraps for Fun Kid-Friendly Lunches
1Prepare Your Workspace
Clear a large section of counter space and gather all your ingredients. I like to set up an assembly line with vegetables arranged in rainbow order—this becomes a fun learning activity about colors and healthy eating. Place a damp kitchen towel under your cutting board to prevent sliding, especially important when little helpers are involved. Set out your cream cheese to soften while you prep vegetables—it should be spreadable but not melted.
2Mix the Flavored Spread
In a medium bowl, combine softened cream cheese with ranch seasoning. For extra kid appeal, I add a teaspoon of honey—it balances the savory notes and makes vegetables more palatable. Mix thoroughly using a spatula, ensuring no seasoning clumps remain. The spread should be smooth and easily spreadable. If it's too thick, add a teaspoon of milk; if too thin, refrigerate for 10 minutes to firm up.
3Prep Your Vegetables
Wash all vegetables thoroughly and pat completely dry—excess moisture makes wraps soggy. Slice bell peppers into thin strips, about 1/4 inch wide. For purple cabbage, remove the core and slice into the thinnest possible shreds using a sharp knife or mandoline. Spinach can be used whole if using baby leaves. If using carrots, shred them using the large holes of a box grater. Pro tip: prep extra vegetables and store in separate containers for quick assembly throughout the week.
4Soften the Tortillas
Cold tortillas crack when rolled. Warm them briefly in a dry skillet for 10-15 seconds per side, or wrap 3-4 tortillas in damp paper towels and microwave for 20-30 seconds. They should be warm and pliable but not hot. Work with one tortilla at a time, keeping the others covered with a clean kitchen towel to prevent drying out. This step is crucial for achieving tight, secure wraps that won't fall apart in lunchboxes.
5Spread the Base
Lay your warm tortilla on a flat surface. Using the back of a spoon or an offset spatula, spread a thin, even layer of cream cheese mixture across the entire surface, leaving a 1/2-inch border around the edge. The layer should be thin enough that you can see the tortilla through it—too much spread makes rolling difficult and creates a mess. For younger kids, draw a smiley face with the spread first, then let them fill in the spaces.
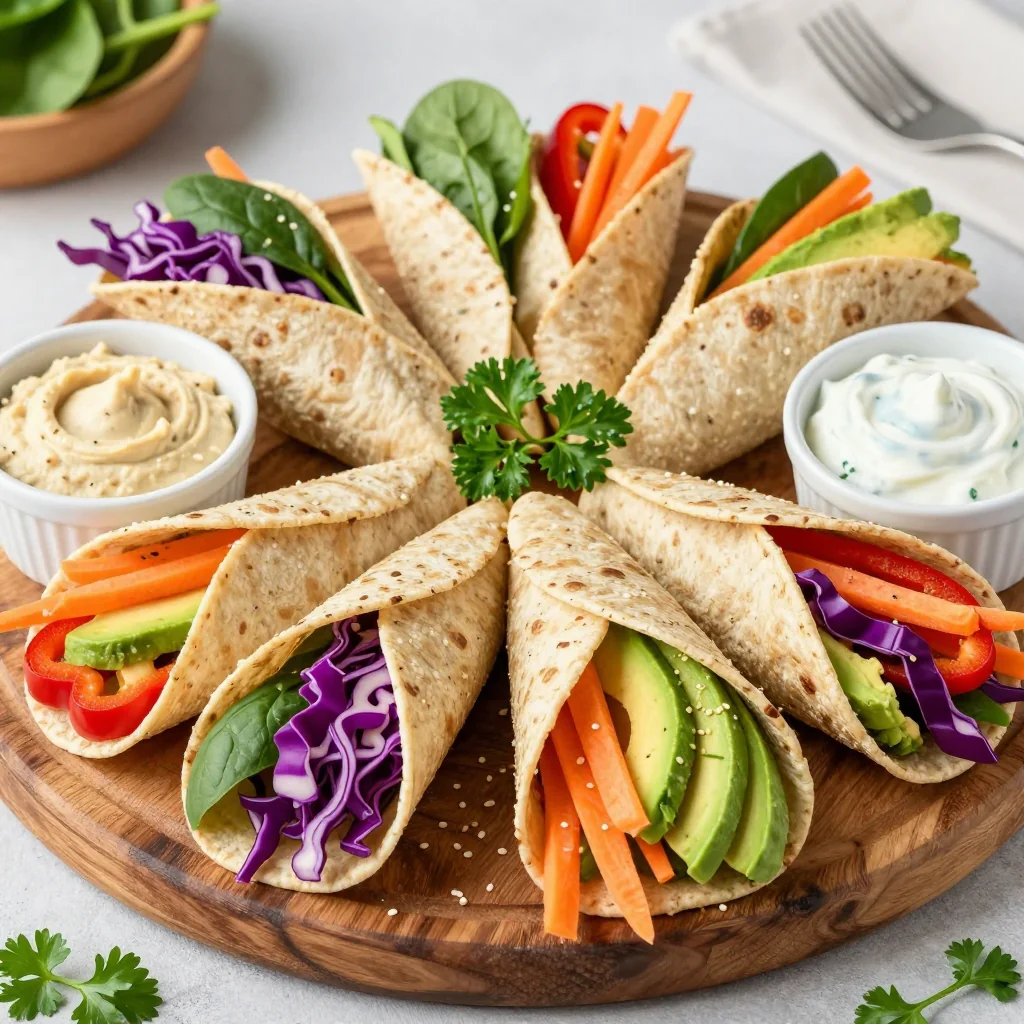
6Build Your Rainbow
Start with red vegetables along one edge, then add each color in order, creating horizontal stripes across the tortilla. Keep vegetables in a single layer—overstuffing makes rolling impossible. For younger children, make wider stripes with fewer colors. The rainbow should cover about 2/3 of the tortilla, leaving the far edge clear for sealing. Let kids arrange their own vegetables—ownership increases the likelihood they'll actually eat their creation.
7Roll Tightly
Starting from the edge with vegetables, roll the tortilla away from you, keeping it as tight as possible without tearing. Use your fingers to keep vegetables in place as you roll. When you reach the far edge, the cream cheese will act as a natural seal. Place seam-side down on a cutting board and gently press to secure. For extra security, you can spread a thin line of cream cheese along the edge before completing the roll.
8Slice and Pack
Using a sharp knife, slice the wrap in half diagonally for older kids, or into 1-inch rounds for younger children. The rounds reveal the rainbow pattern and are easier for small hands to manage. For lunchboxes, wrap each piece tightly in plastic wrap or beeswax wraps. Include a small container of extra ranch dressing for dipping—kids love the interactive element. These wraps stay fresh for up to 24 hours when properly stored.
Expert Tips
Prevent Sogginess
Pat vegetables completely dry and spread cream cheese all the way to edges, creating a moisture barrier that keeps tortillas from getting soggy.
Color Psychology
Red and orange vegetables are naturally sweeter—place these prominently to win over vegetable-resistant kids.
Uniform Cutting
Cut vegetables to similar thickness for even rolling. Use a mandoline for perfectly consistent strips that create professional-looking spirals.
Chill Before Slicing
Refrigerate rolled wraps for 15 minutes before slicing—they'll hold their shape better and create cleaner cuts.
Allergy Adaptations
Use hummus or mashed avocado instead of cream cheese for dairy-free versions—both provide creamy texture and protein.
Morning Rush Hack
Prep vegetables on Sunday, store in separate containers with paper towels to absorb moisture, and assemble in under 3 minutes.
Variations to Try
Protein Power Wraps
Add a stripe of sliced turkey, ham, or smoked tofu for extra protein. The key is keeping protein layers thin—thick slices make rolling difficult. For vegetarians, mashed chickpeas mixed with a touch of mayo create a tuna-salad-like texture kids love.
Mediterranean Rainbow
Replace ranch seasoning with za'atar and add feta crumbles. Use roasted red peppers, purple onions, spinach, and yellow tomatoes. The flavor profile is more sophisticated, perfect for adventurous young eaters.
Sweet Fruit Wraps
Create dessert versions using strawberry cream cheese and fruits arranged in rainbow order. Strawberries, oranges, pineapple, kiwi, blueberries, and grapes make a naturally sweet treat that's still packed with nutrition.
Spicy Teen Version
Add sriracha to the cream cheese and include jalapeño strips for older kids who enjoy heat. Pepper jack cheese adds another flavor dimension while maintaining the rainbow aesthetic.
Storage Tips
Refrigeration: Store assembled wraps in an airtight container lined with paper towels. The towels absorb excess moisture, preventing soggy tortillas. Properly stored, they'll maintain optimal texture for up to 24 hours. For best results, pack dipping sauces separately and add just before eating.
Make-Ahead Strategy: Prep vegetables on Sunday and store in separate containers with tight-fitting lids. Place paper towels in each container to absorb moisture. Cream cheese spread can be made up to 3 days ahead and stored in a covered container. Morning assembly takes just 3-4 minutes with everything pre-prepped.
Freezing: While fresh is best, these wraps can be frozen for up to 1 month. Wrap each piece individually in plastic wrap, then place in a freezer bag. Thaw overnight in the refrigerator. Note that texture changes slightly—vegetables will be softer, but flavors remain delicious.
Lunchbox Packing: Include a small ice pack to maintain food safety, especially during warmer months. Wrap pieces individually in beeswax wraps or reusable silicone bags. Include a fun toothpick flag or character pick to make eating more interactive and appealing to young children.
Frequently Asked Questions
Start with just 2-3 colors using vegetables they already tolerate. The visual appeal and hands-on assembly often overcome resistance. Many parents report success by letting children "design" their rainbow, even if it means starting with mostly red and orange vegetables. The ranch-flavored spread masks vegetable flavors while the rainbow concept makes eating fun rather than obligatory.
Three key factors ensure wrap integrity: warm, pliable tortillas; proper cream cheese coverage (it acts as edible glue); and avoiding overfilling. Roll tightly while keeping vegetables in place. For extra security, spread cream cheese along the final edge before completing the roll. Refrigerating for 15 minutes before slicing helps everything set. For very young children, consider using smaller tortillas and making "sushi" style rounds that are easier to handle.
Absolutely! The basic recipe is naturally nut-free. If substituting cream cheese, avoid nut-based alternatives and use hummus, mashed avocado, or sunflower seed butter mixed with honey. Always check labels on tortillas and seasoning mixes, as some brands process in facilities that handle nuts. Most schools appreciate having the recipe to share with other parents dealing with allergies.
Wrap individual pieces in beeswax wraps or reusable silicone bags. Include a small ice pack to maintain food safety. Pack dipping sauces in leak-proof containers separately. Add a fun element like character toothpicks or a note about the rainbow. For younger children, cut into smaller rounds and include a fork for easier eating. The wraps stay fresh for 5-6 hours with proper storage.
Cracking indicates tortillas are too cold or dry. Always warm them before use—either in a dry skillet for 10-15 seconds per side or wrapped in damp paper towels in the microwave for 20-30 seconds. Store tortillas in a sealed bag with a paper towel to maintain moisture. If they still crack, brush lightly with water before warming. Very fresh tortillas work best; if yours are approaching expiration, the warming step becomes even more crucial.
Every step offers kid-friendly involvement! Young children can wash vegetables and arrange them in rainbow order (great color learning). Slightly older kids can spread cream cheese and place vegetables. Tweens can handle the rolling with supervision. Make it educational by discussing each vegetable's nutritional benefits using age-appropriate language. Many families turn it into a weekend activity, prepping vegetables together for the week ahead while discussing healthy eating habits.
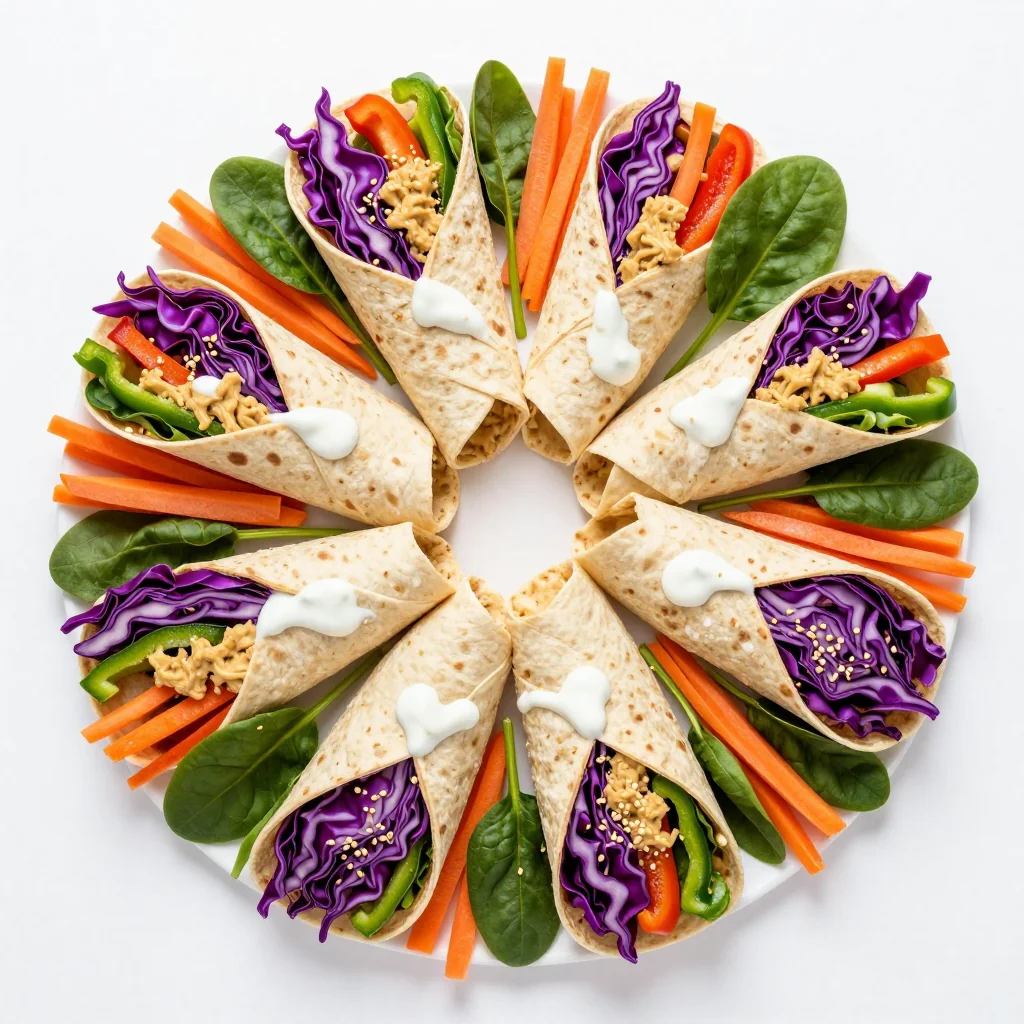
Rainbow Veggie Wraps for Fun Kid-Friendly Lunches
Ingredients
Instructions
- Prepare Cream Cheese Spread: In a medium bowl, mix softened cream cheese with ranch seasoning until smooth and well combined.
- Prep Vegetables: Wash and dry all vegetables. Cut bell peppers into thin strips, shred cabbage and carrots, and have spinach leaves ready.
- Warm Tortillas: Heat tortillas in a dry skillet for 10-15 seconds per side until pliable, or wrap in damp paper towels and microwave for 20-30 seconds.
- Spread Base: Lay tortilla flat and spread a thin layer of cream cheese mixture over entire surface, leaving 1/2-inch border.
- Build Rainbow: Arrange vegetables in horizontal stripes in rainbow order (red, orange, yellow, green, purple) across the tortilla.
- Roll Tightly: Starting from vegetable edge, roll tortilla away from you, keeping it tight. Seal edge with cream cheese.
- Slice and Serve: Cut in half diagonally for older kids, or into 1-inch rounds for younger children. Pack immediately or store refrigerated.
Recipe Notes
For best results, prep vegetables on Sunday and store in separate containers for quick assembly all week. These wraps stay fresh for up to 24 hours when properly stored in an airtight container with paper towels to absorb moisture.